
Configure Attribution and Analytics
Configure attribution and analytics for Apphud Flows web funnels (pixels, custom parameters).
Before You BeginThis guide assumes you have already contacted our representative and enabled the Flows add-on. If you haven’t done so, please contact us to get started.
Collect Attribution Data
What is it for?Collecting attribution data is required for integrations and analytics as it collects both Click IDs and campaign data.
When running advertising campaigns, collecting attribution data is essential (e.g., fetching Click IDs, which vary across platforms). Apphud uses these Click IDs to postback subscription events to the relevant advertising network, ensuring precise attribution and reporting.
Supported Advertising Networks
Apphud Web SDK collects attribution data from the following networks:
- Meta Ads: Fetches
fbclid,fbcandfbpfrom Meta Pixel. - Google: Fetches
client_idfrom Google tag with gtag.jsgtag.js. - TikTok: Fetches
ttclidfrom TikTok Pixel.
How to Install Meta Pixel
To install Meta Pixel, follow the official Meta documentation.
Example Installation Code:
<!-- Load Meta Pixel -->
<script>
!function(f,b,e,v,n,t,s)
{if(f.fbq)return;n=f.fbq=function(){n.callMethod?
n.callMethod.apply(n,arguments):n.queue.push(arguments)};
if(!f._fbq)f._fbq=n;n.push=n;n.loaded=!0;n.version='2.0';
n.queue=[];t=b.createElement(e);t.async=!0;
t.src=v;s=b.getElementsByTagName(e)[0];
s.parentNode.insertBefore(t,s)}(window, document,'script',
'https://connect.facebook.net/en_US/fbevents.js');
fbq('init', 'YOUR_PIXEL_ID'); <!-- Replace with your Pixel ID -->
fbq('track', 'PageView');
</script>
How to Install TikTok Pixel
To install TikTok Pixel, follow the official TikTok documentation.
Example Installation Code:
<script>
    !function (w, d, t) {
        w.TiktokAnalyticsObject=t;var ttq=w[t]=w[t]||[];
        ttq.methods=["page","track","identify","instances","debug","on","off","once","ready","alias","group","enableCookie","disableCookie"],
        ttq.setAndDefer=function(t,e){t[e]=function(){t.push([e].concat(Array.prototype.slice.call(arguments,0)))}};
        for(var i=0;i<ttq.methods.length;i++)ttq.setAndDefer(ttq,ttq.methods[i]);
        ttq.instance=function(t){for(var e=ttq._i[t]||[],n=0;n<ttq.methods.length;n++)
        ttq.setAndDefer(e,ttq.methods[n]);return e},ttq.load=function(e,n){
        var i="https://analytics.tiktok.com/i18n/pixel/events.js";
        ttq._i=ttq._i||{},ttq._i[e]=[],ttq._i[e]._u=i,ttq._t=ttq._t||{},
        ttq._t[e]=+new Date,ttq._o=ttq._o||{},ttq._o[e]=n||{};
        n=document.createElement("script");
        n.type="text/javascript",n.async=!0,n.src=i+"?sdkid="+e+"&lib="+t;
        e=document.getElementsByTagName("script")[0];
        e.parentNode.insertBefore(n,e);
        };

        ttq.load('YOUR_PIXEL_ID');  <!-- Replace with your TikTok Pixel ID -->
        ttq.page();
    }(window, document, 'ttq');
</script>
How to Install Google Tag with gtag.js
To install Google Tag using gtag.js, follow the official Google Tag documentation. Ensure you create a Web stream for your production website URL in Google Analytics. Your Tag ID (also known as Measurement ID) should start with G-. Learn more.
Example Installation Code:
<!-- Load Google Tag Manager -->
<script async src="https://www.googletagmanager.com/gtag/js?id=G-XXXXXXX"></script>
<script>
  window.dataLayer = window.dataLayer || [];
  function gtag(){dataLayer.push(arguments);}
  gtag('js', new Date());

  gtag('config', 'G-XXXXXXX');  <!-- Replace with your Tag ID -->
</script>
To obtain Tag ID open your Google Analytics account, and select Admin > Data Streams > Web.
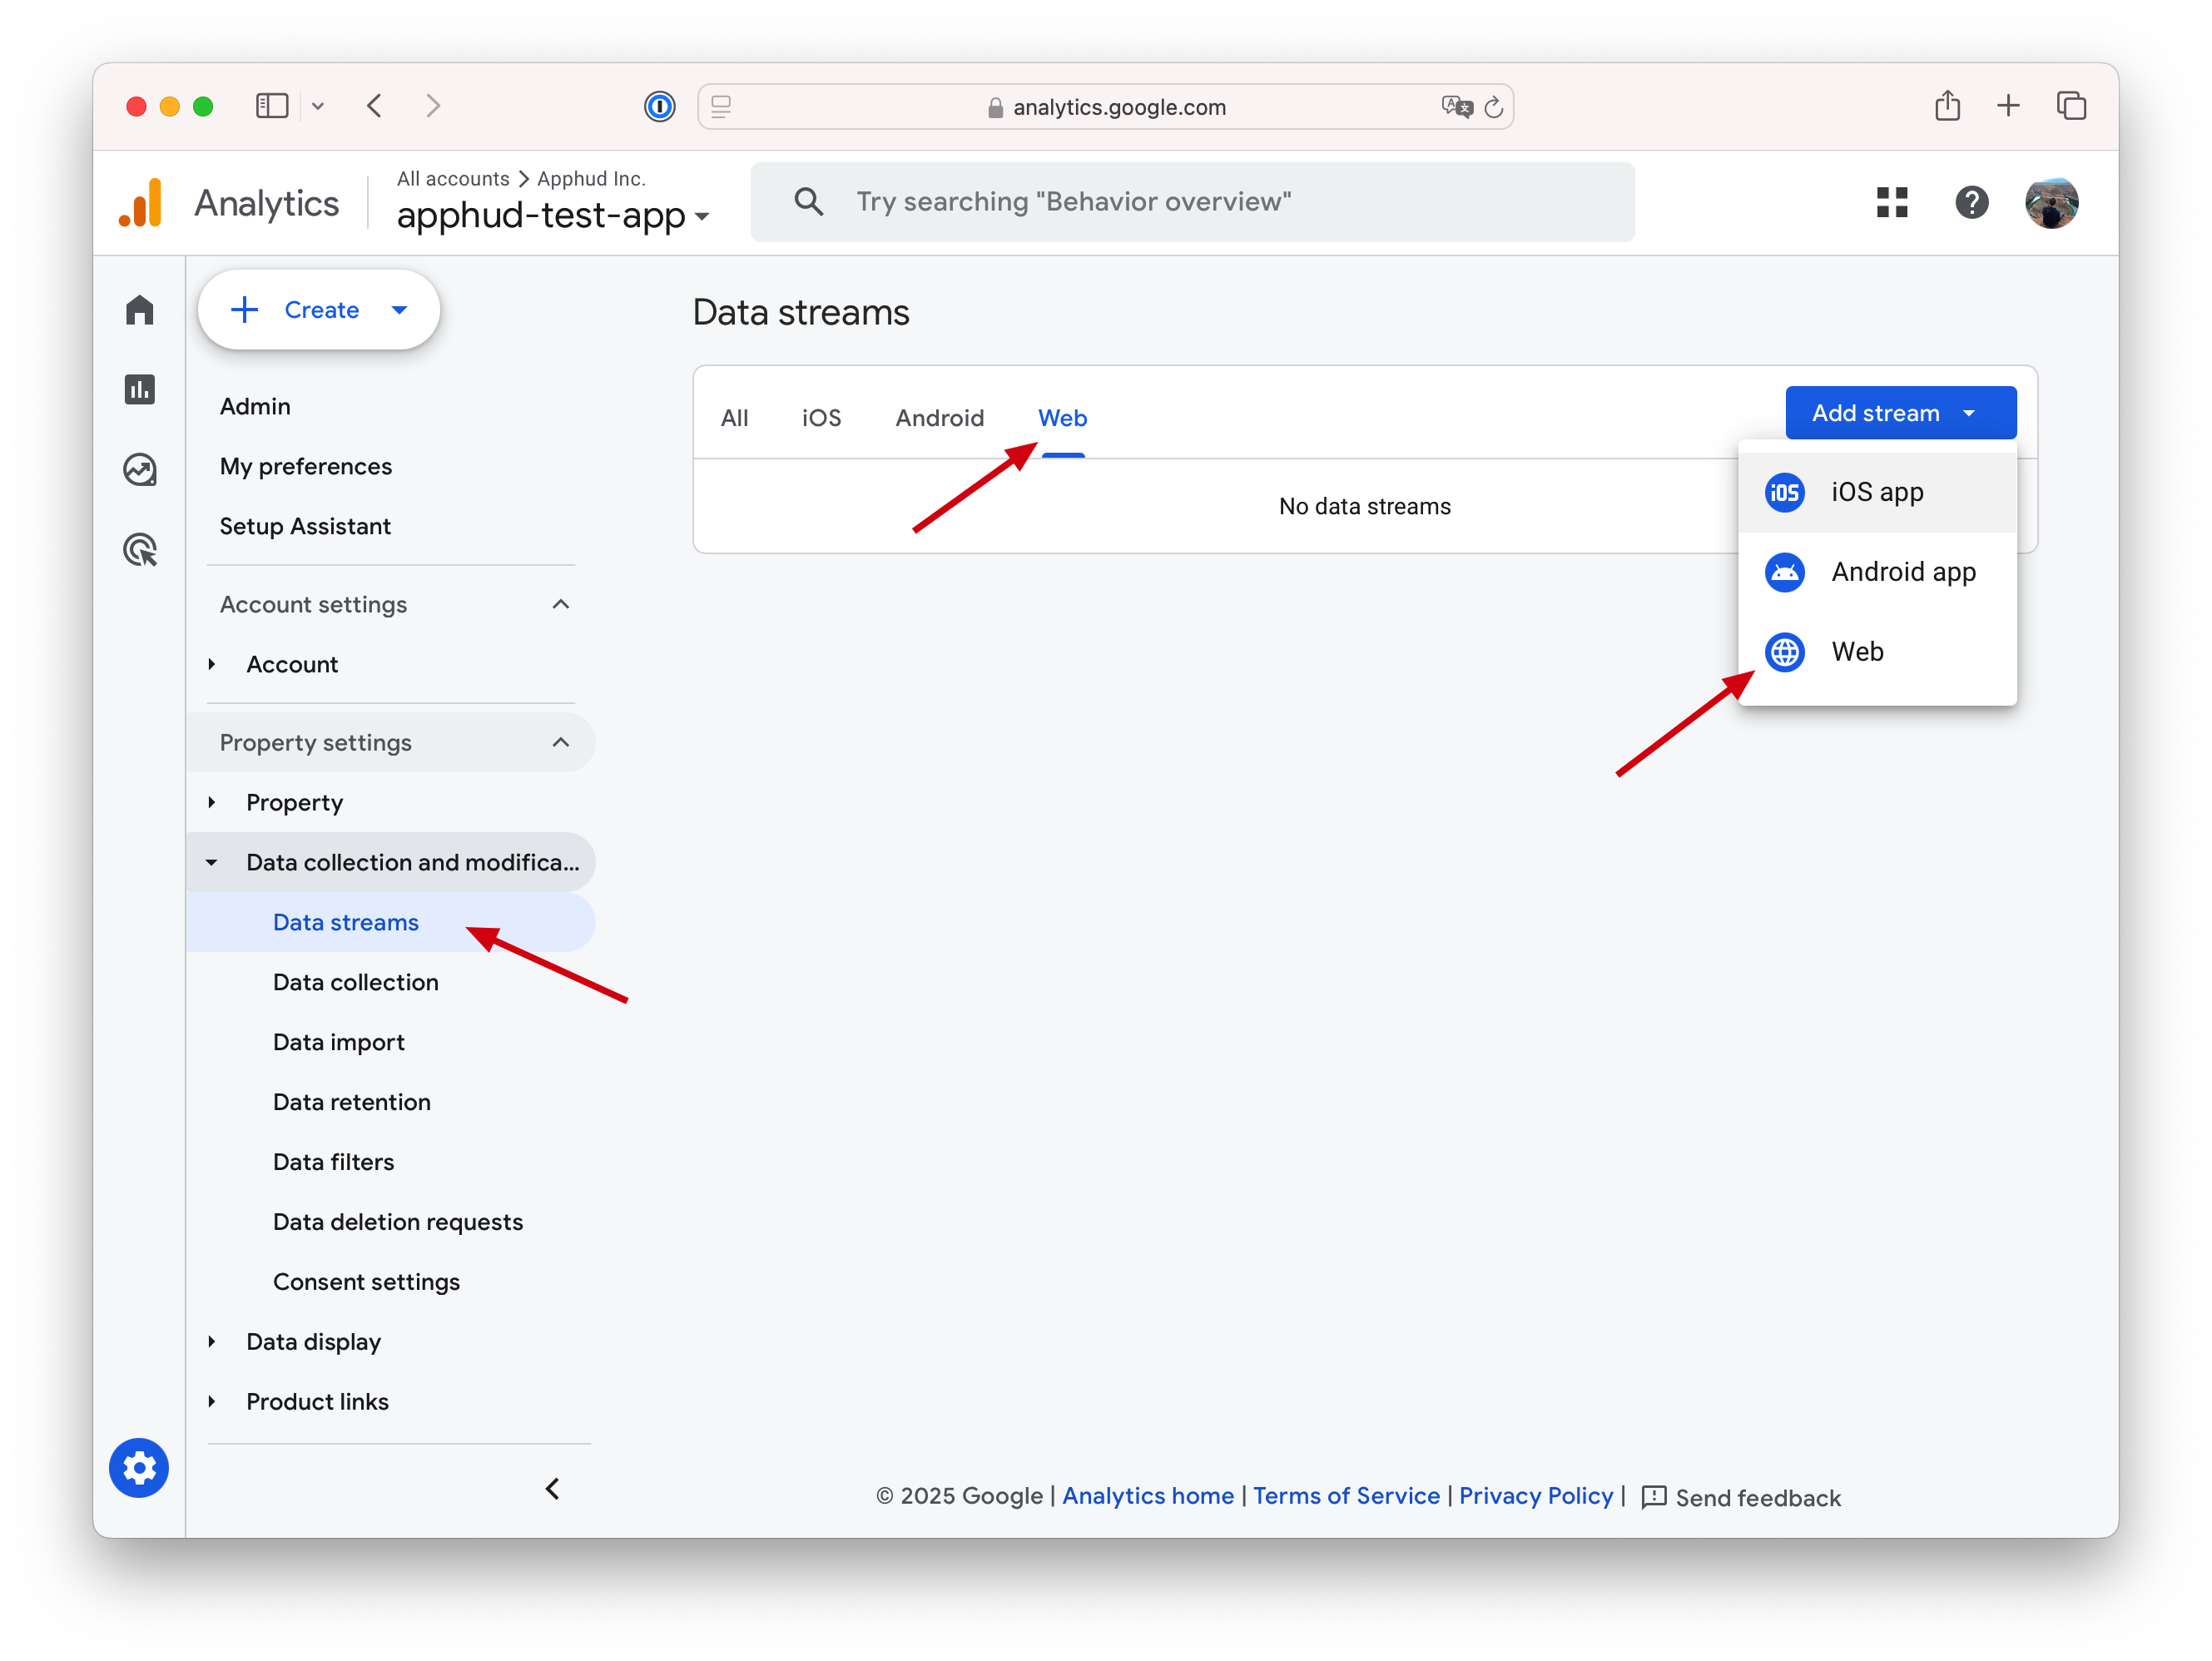
Create your web stream and enter your production website URL (e.g., myappwebsite.com for your own domains). This will provide you with your Measurement ID. Learn more..
If you plan to test on a temporary Framer URL, you’ll need to create an additional web stream, as each stream is connected to a single URL.
How to Collect Attribution Data
To enable automatic attribution data collection, ensure the advertising pixel libraries are included in the <head> tag before Apphud Web SDK.
The Apphud Web SDK must be initialized in the <body> section using the init method, as shown below:
<head>
<!-- Load Google Tag Manager -->
<script async="" src="https://www.googletagmanager.com/gtag/js?id=G-ABCDEF"></script>
<script>
  window.dataLayer = window.dataLayer || [];
  function gtag(){dataLayer.push(arguments);}
  gtag('js', new Date());

  gtag('config', 'G-ABCDEF');
</script>

<!-- Load Meta Pixel -->
<script>
!function(f,b,e,v,n,t,s)
{if(f.fbq)return;n=f.fbq=function(){n.callMethod?
n.callMethod.apply(n,arguments):n.queue.push(arguments)};
if(!f._fbq)f._fbq=n;n.push=n;n.loaded=!0;n.version='2.0';
n.queue=[];t=b.createElement(e);t.async=!0;
t.src=v;s=b.getElementsByTagName(e)[0];
s.parentNode.insertBefore(t,s)}(window, document,'script',
'https://connect.facebook.net/en_US/fbevents.js');
fbq('init', '0123456789');
fbq('track', 'PageView');
</script>

<!-- Load Apphud SDK in the end -->
<script src="https://js.apphud.com/web/v2/apphud.js"></script>
</head>


<body>
  <!-- Initialize Apphud SDK inside body -->
  <script>
    apphud.init({ apiKey: "your_flow_api_key", version: "1.0", debug: false });
  </script>
...
</body>
Configure headers in your Framer projectTo configure
headandbodytags go to your Framer website settings.
How to Collect Campaign Data
Apphud Web SDK can automatically fetch campaign parameters from the URL or cookies if advertising pixels are initialized before Apphud.
Requirements for Campaign Data Collection:
- Include UTM parameters in your Flow URLs
- Web SDK will detect these parameters and send them to Apphud servers.
Example Campaign URL:
| Original URL | Campaign URL with UTM parameters |
|---|---|
| https://mypetsoundsservice.com/webapp | https://mypetsoundsservice.com/webapp?utm_source={{site_source_name}}&utm_medium={{adset.name}}&utm_campaign={{campaign.name}} |
Data Usage in Apphud
- UTM parameters (e.g.,
utm_source,utm_medium,utm_campaign) are stored for each user. - This data is visible on the User Page under the Apphud Attribution Data section.
- Attribution filters are available in all charts under the Apphud Attribution filter group, enabling detailed campaign performance analysis.
Campaign Parameters Mapping
Apphud maps campaign parameters as follows:
Not available for public yet. Contact us to get detailed information on campaign parameters mapping.
Configure Integrations
Follow these guides:
- Conversions API Integration for Web-to-Web.
- Google Ads Integration for Web-to-Web.
- TikTok Integration for Web-to-Web.
Configure Amplitude and Mixpanel
To properly configure product analytics, ensure that User IDs are consistently matched between Apphud and your analytics platforms.
Below are examples of how to sync User ID between Apphud and Amplitude or Mixpanel.
Call this code after both SDKs have been initialized in your HTML headers:
// Ensure both Apphud and Amplitude or Mixpanel are initialized

// assuming "amplitude" is a variable of window
window.amplitude.setUserId(apphud.getUserID());

// assuming "mixpanel" is a variable of window
window.mixpanel.identify(apphud.getUserID());
Creating Deep Links
What is it for?Attribution links (Deferred Deep Links) are used to restore a user’s premium access after a successful web subscription purchase.
After users successfully purchase a subscription on the web, they see a page prompting them to download the app. The call-to-action button directs them to the appropriate app store, where they can install the app. Upon installation, the app should recognize the user as a premium subscriber.
Currently, Apphud supports the following attribution providers for the Flows:
- AppsFlyer
- Branch
Not using deferred deep linking?If you prefer to attribute app users as premium subscribers using only their email, you can skip this step.
AppsFlyer OneLink
To set up deferred deep linking using AppsFlyer OneLink:
-
Create a OneLink Template:
Follow the steps in this guide to create a OneLink template. Configure Associated Domains for iOS and App Links for Android as described in AppsFlyer documentation. -
Generate a OneLink URL:
Use this guide to create a OneLink URL for your flow. There are no specific requirements for the link parameters; any valid OneLink will work with Apphud. -
Retargeting (optional):
If you plan to run retargeting campaigns, enable the Retargeting option. Consult your UA Manager for additional details.
Branch Quick Link
To set up deferred deep linking using Branch Quick Links:
-
Configure Default Link Behaviors:
Set up default link behaviors in your Branch dashboard by following this guide. Consult your UA Manager for additional details. -
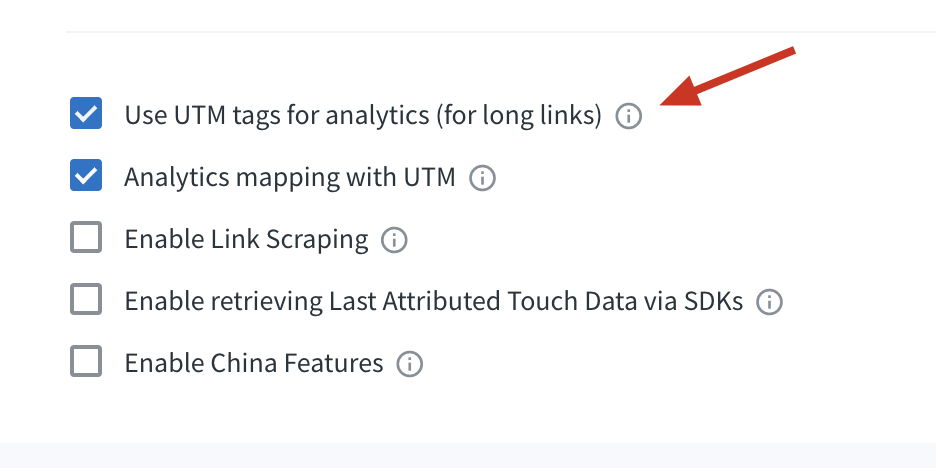
Enable UTM Tag Analytics (Optional):
Enable the "Use UTM tags for analytics" option in the Branch dashboard. Apphud appends UTM tags to the link, allowing Branch to fetch and display these tags in their dashboard.Enabling this option ensures Branch displays campaign names from the original advertising network, rather than the names entered during link setup.
-
Create a Quick Link:
Follow the steps in this guide to create a Quick Link for your flow. There are no specific requirements for the link parameters; any valid link will work with Apphud. Consult your UA Manager for more details.
Adjust Deep Links
Create and configure deferred deeplinks in Adjust dashboard and follow their documentation.
View Attribution Data from Deep Links
If campaign data is included in the attribution deep link, Apphud will display this data under the AppsFlyer Attribution or Branch Attribution filters in charts.
What's Next?
Now that you've created an attribution link, it's time to set up your first Flow! Follow our Flows Quickstart guide for detailed instructions.
Updated 18 days ago