
OneSignal
This guide describes how to add and configure OneSignal integration.
The OneSignal integration updates User Tags in OneSignal with Apphud subscription data, so you can target specific users with Segments and send personalized messages via Tag Substitution.
About Integration
Apphud updates User Tags in OneSignal. Tags are key-value attributes that allow you to target specific users or groups using Segments and send personalized messages with Tag Substitution.
How to Add Integration?
Step 1 - Install SDKs
- Install Apphud SDK on iOS or Android.
- Install OneSignal SDK.
- Match User IDs between OneSignal and Apphud. See below.
Step 2 - Preparations in OneSignal
In your OneSignal app, get the following:
- Application ID — your OneSignal Application ID.
- Sandbox Application ID (optional) — if you maintain a separate OneSignal app for testing.
- REST API Key (optional) — required if you use the latest OneSignal SDKs and enabled Identity Verification in the OneSignal app's Keys & IDs settings.
Step 3 - Authentication
In Apphud, open Connections → Integrations (the All or Marketing tab). Click Add Connection for OneSignal and choose a Source in the pop-up.
Enter the Application ID, Sandbox Application ID (optional), and REST API Key (optional).
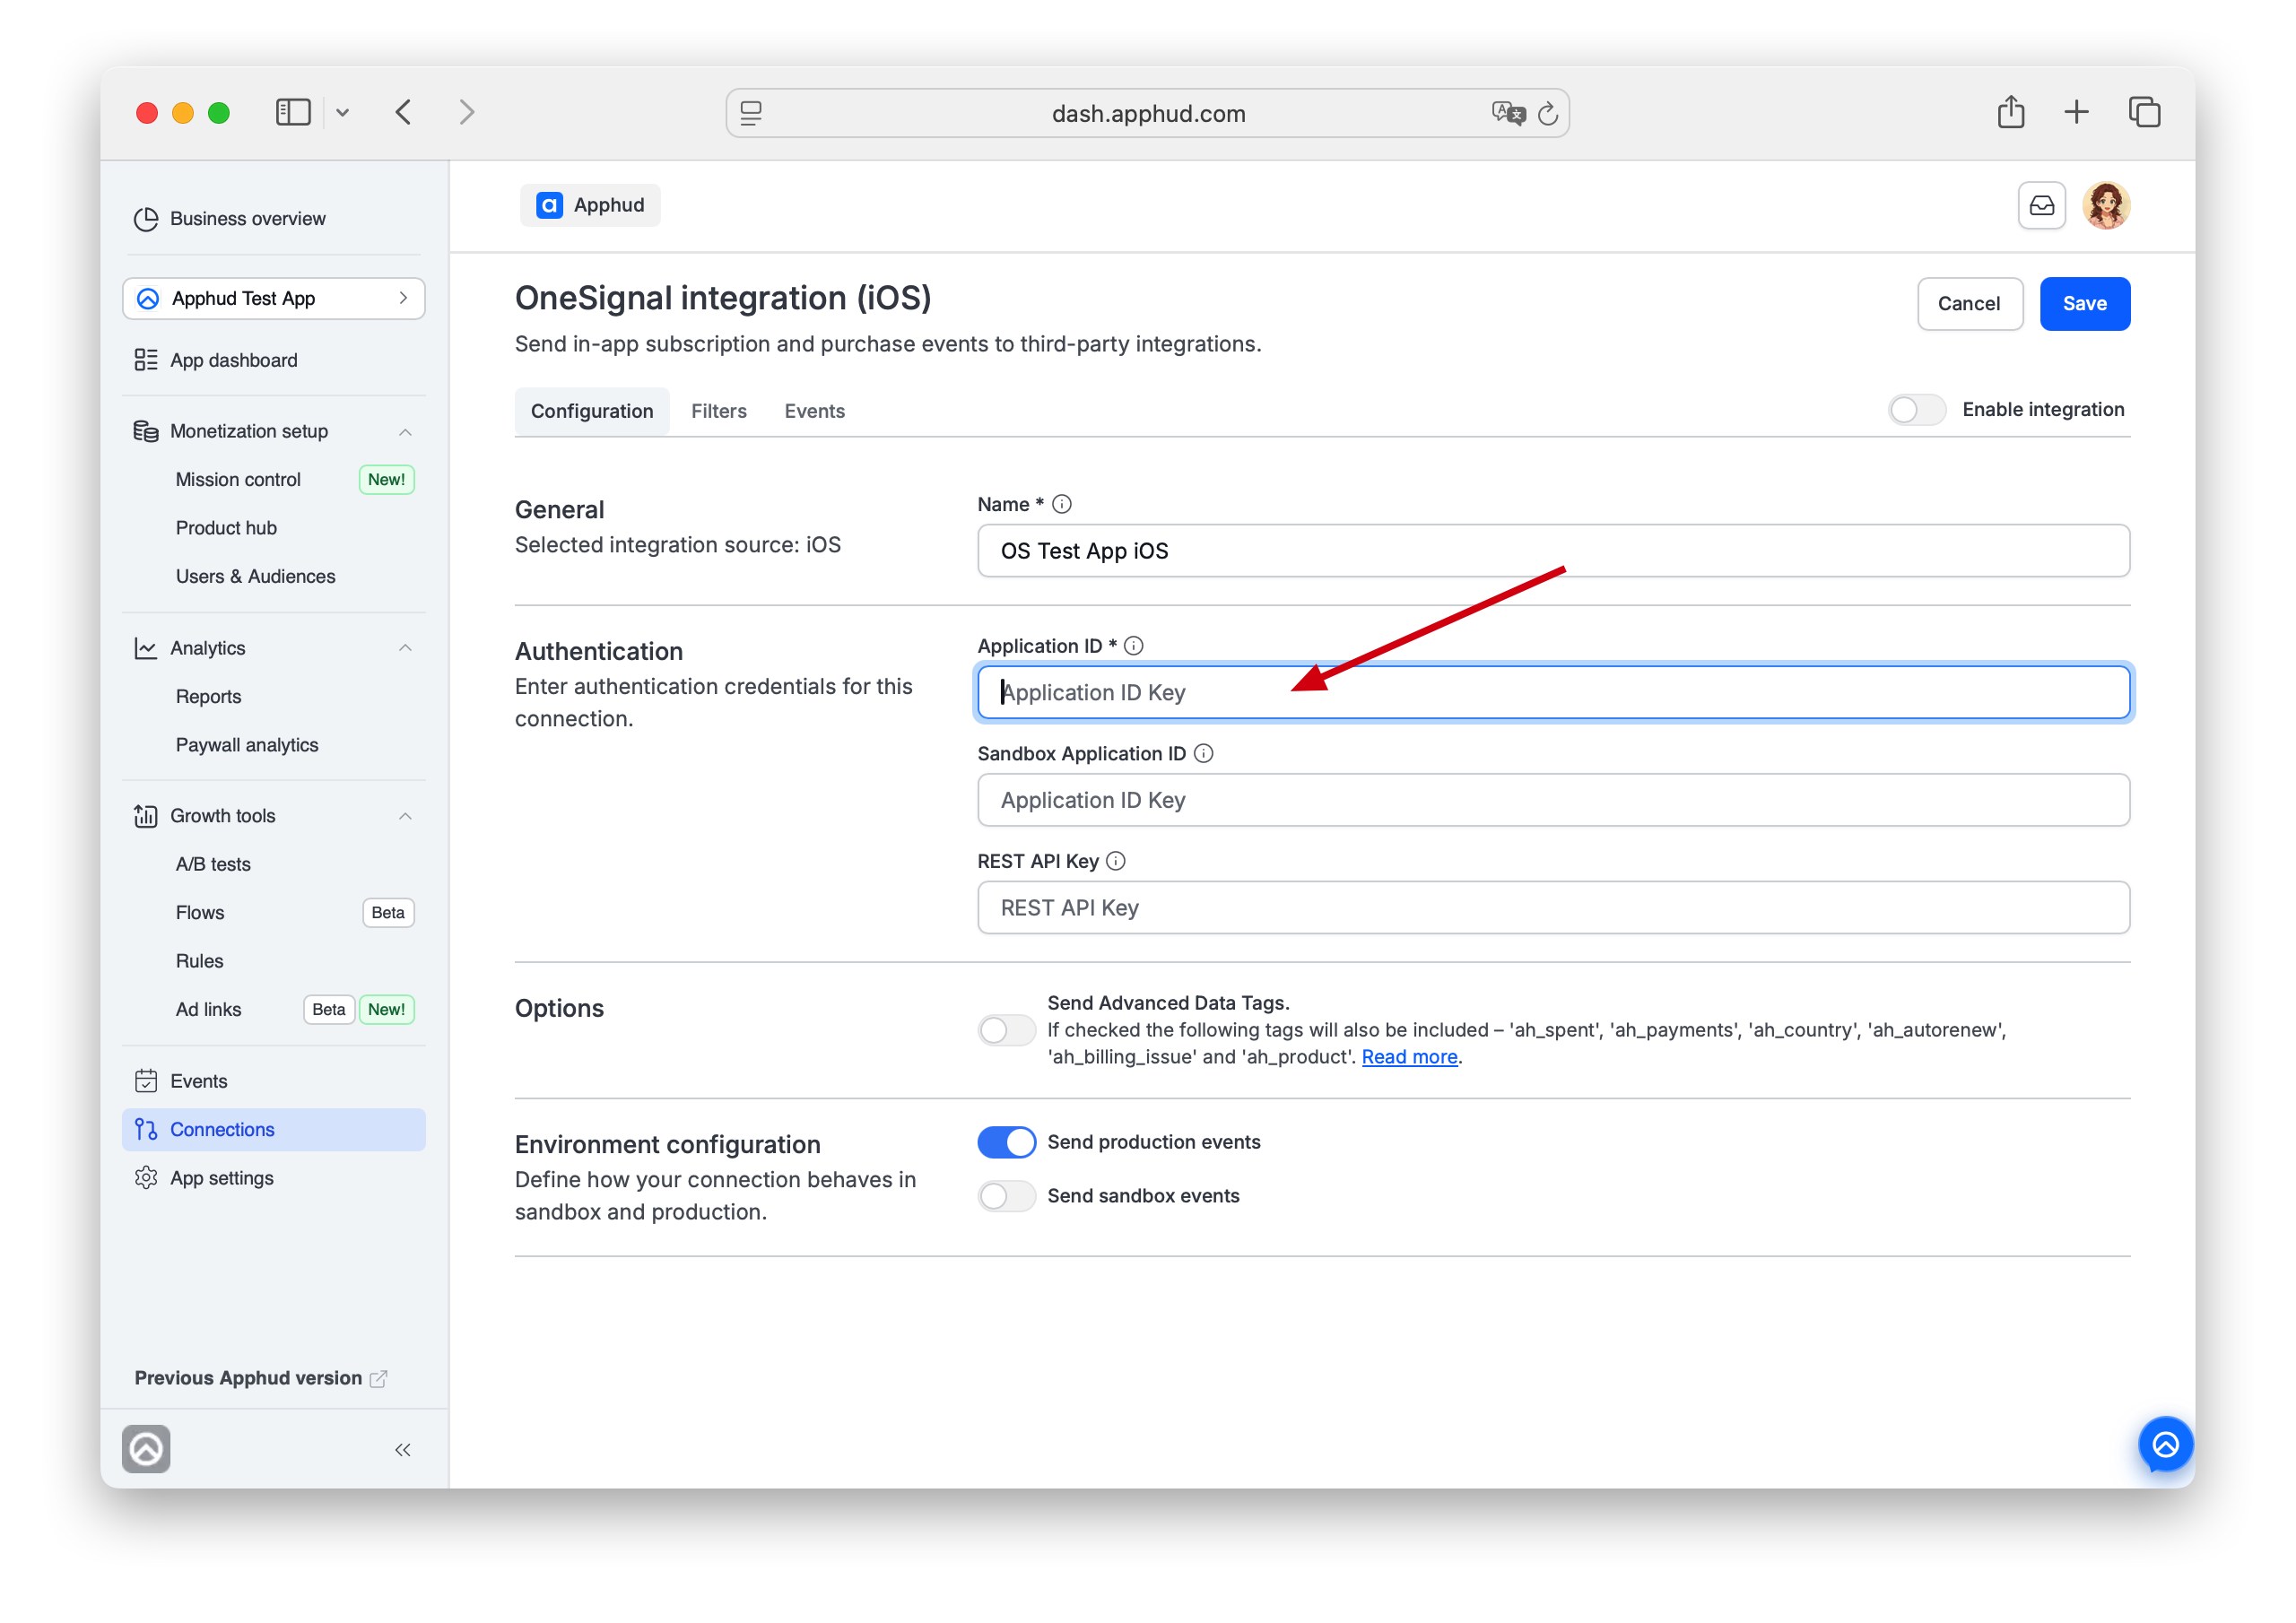
Step 4 - Additional Configuration
Advanced Data Tags
By default the option is OFF and only default tags are sent.
Enable Advanced Data Tags only if your OneSignal plan allows that.
Environment
Configure generic Environment settings as described on Integrations overview → Configuration tab.
Step 5 - Set up filters (optional)
Navigate to Filters tab. Set up filters if needed as described on Integrations overview → Filters tab.
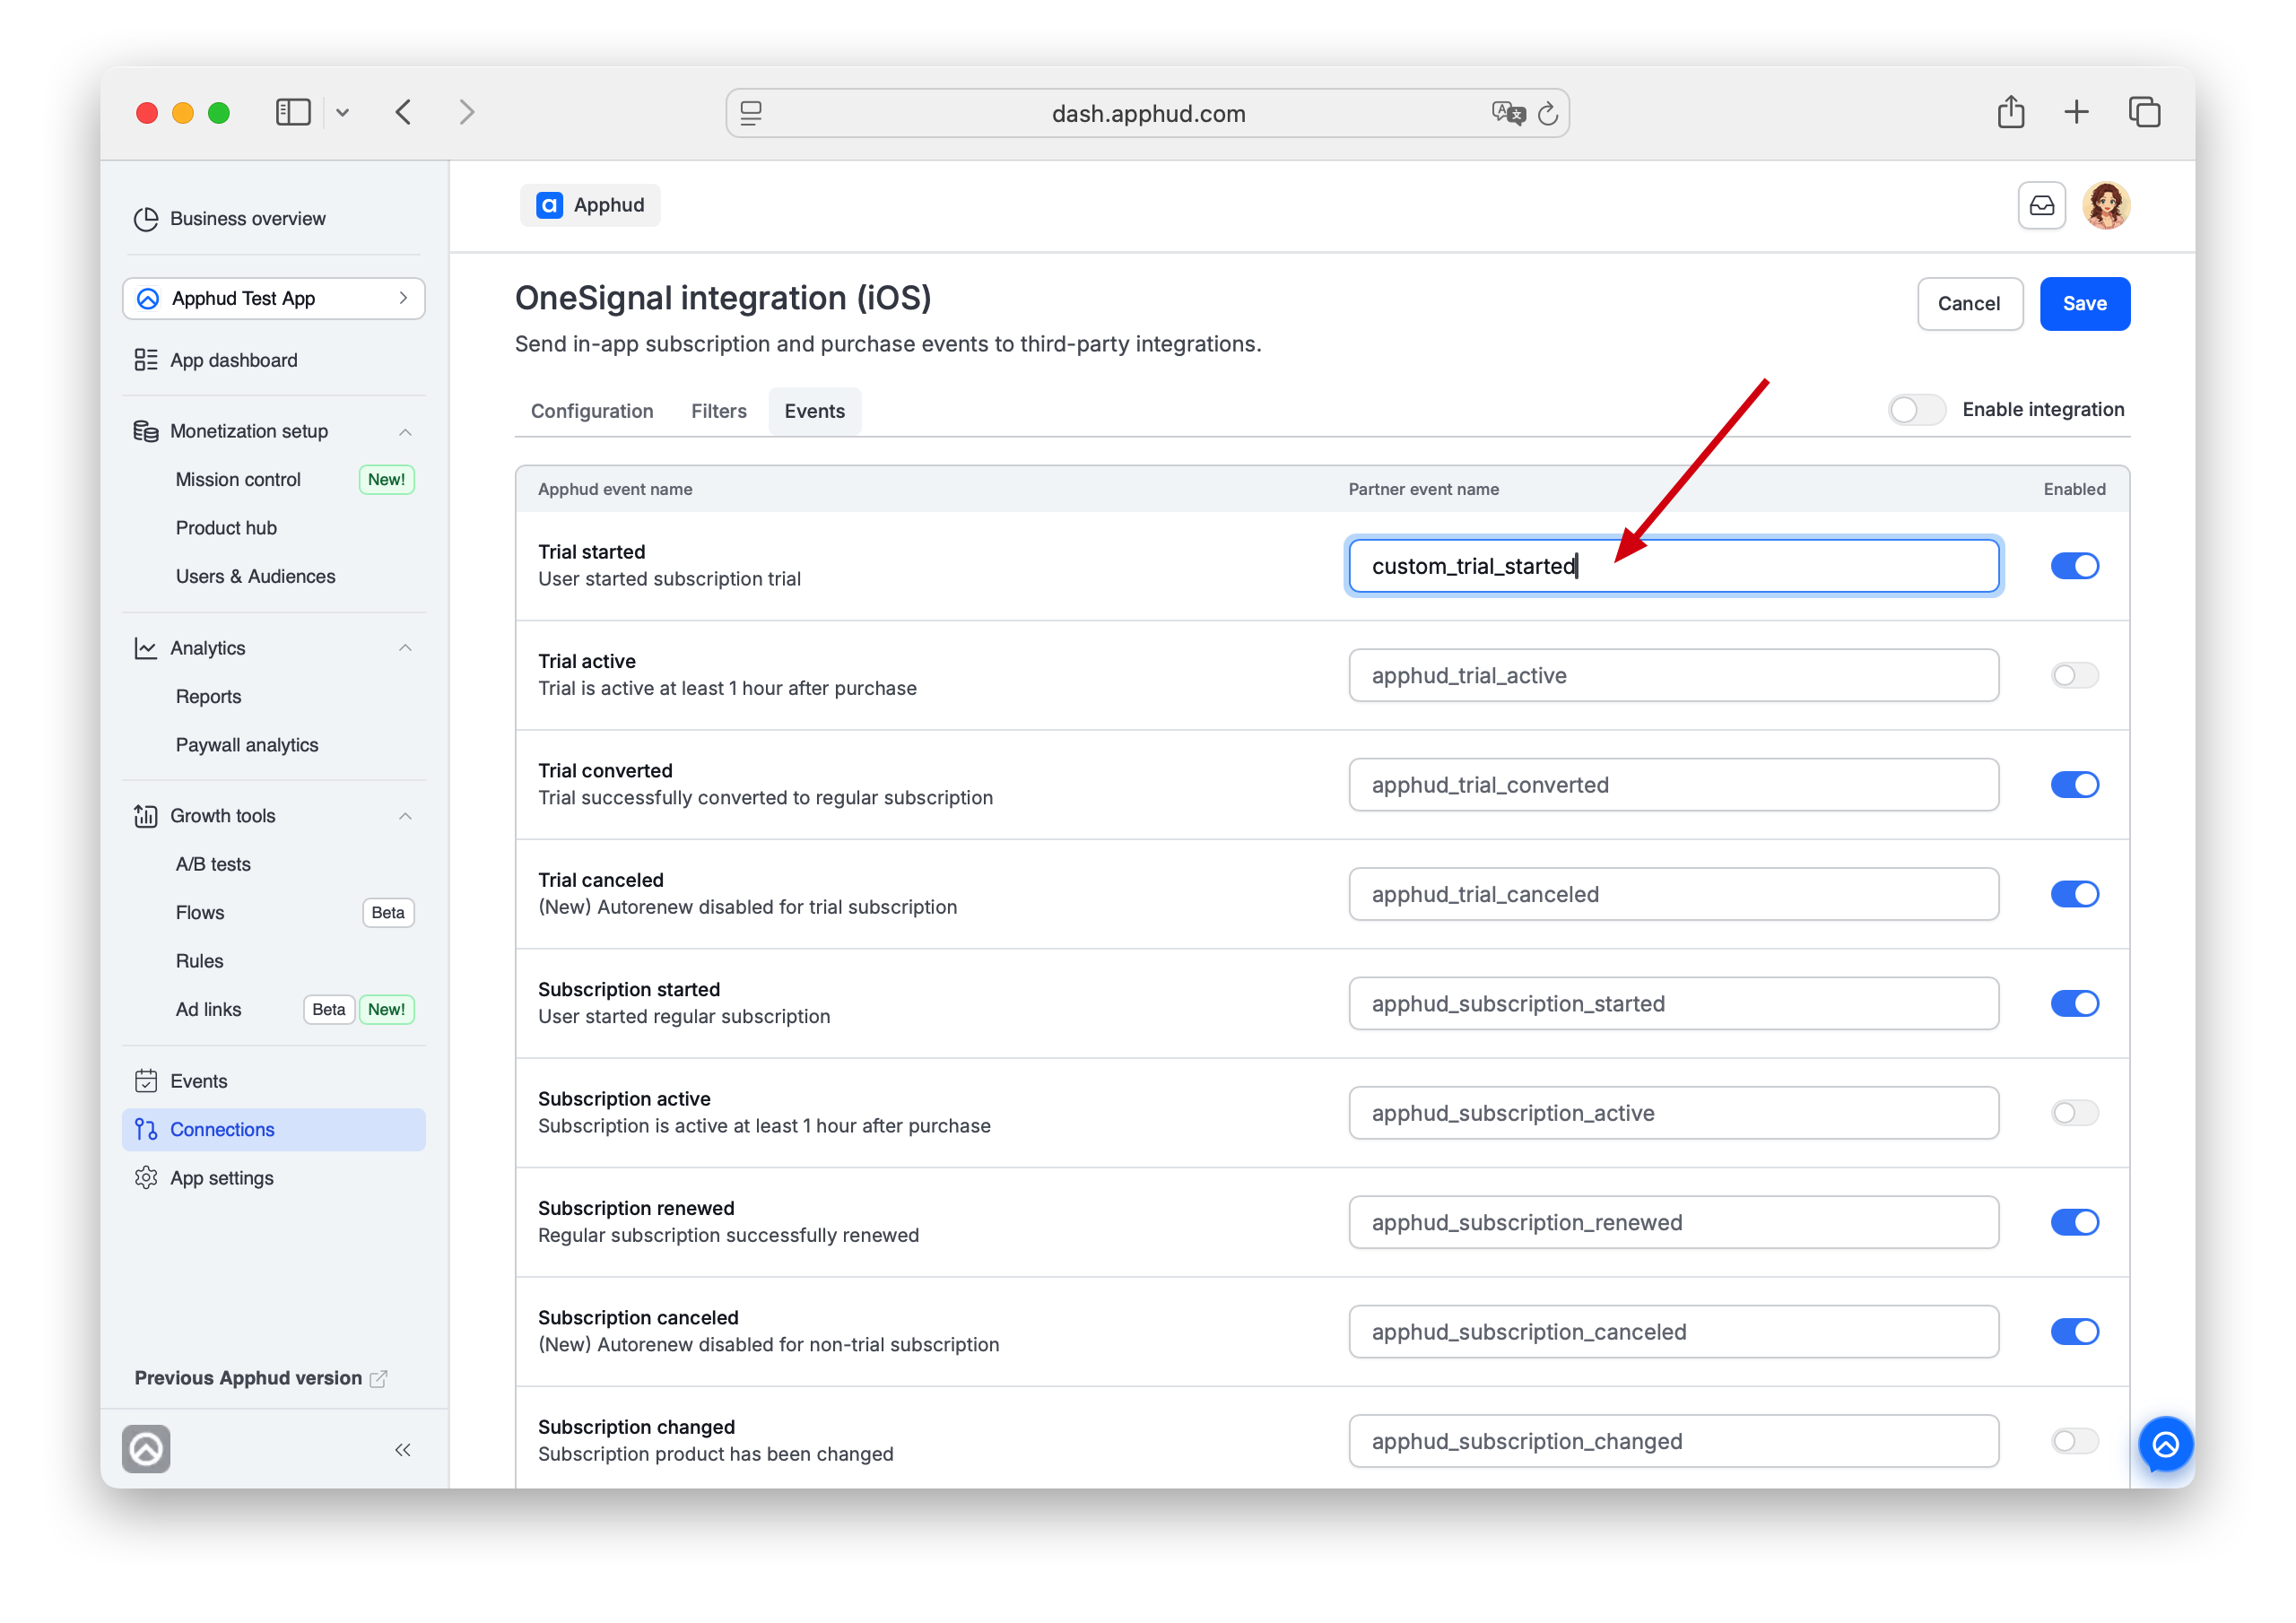
Step 6 - Set up Events list
Open the Events tab of the configuration. You can enter custom event names or disable some.
Step 6 - Test connection (optional)
Save the connection.
For the general integration configuration testing flow see Integrations overview → Test connection.
Step 7 - Enable and save
Enable integration and click Save.
Match User IDs
Set the Apphud User ID as the OneSignal externalUserID. Assuming both SDKs are initialized:
OneSignal.login(Apphud.userID())[OneSignal login:Apphud.userID];OneSignal.login(Apphud.userID())OneSignal.login(Apphud.userID());Segment Audience
Use the Segment tab in OneSignal to create custom audiences based on User Tags:
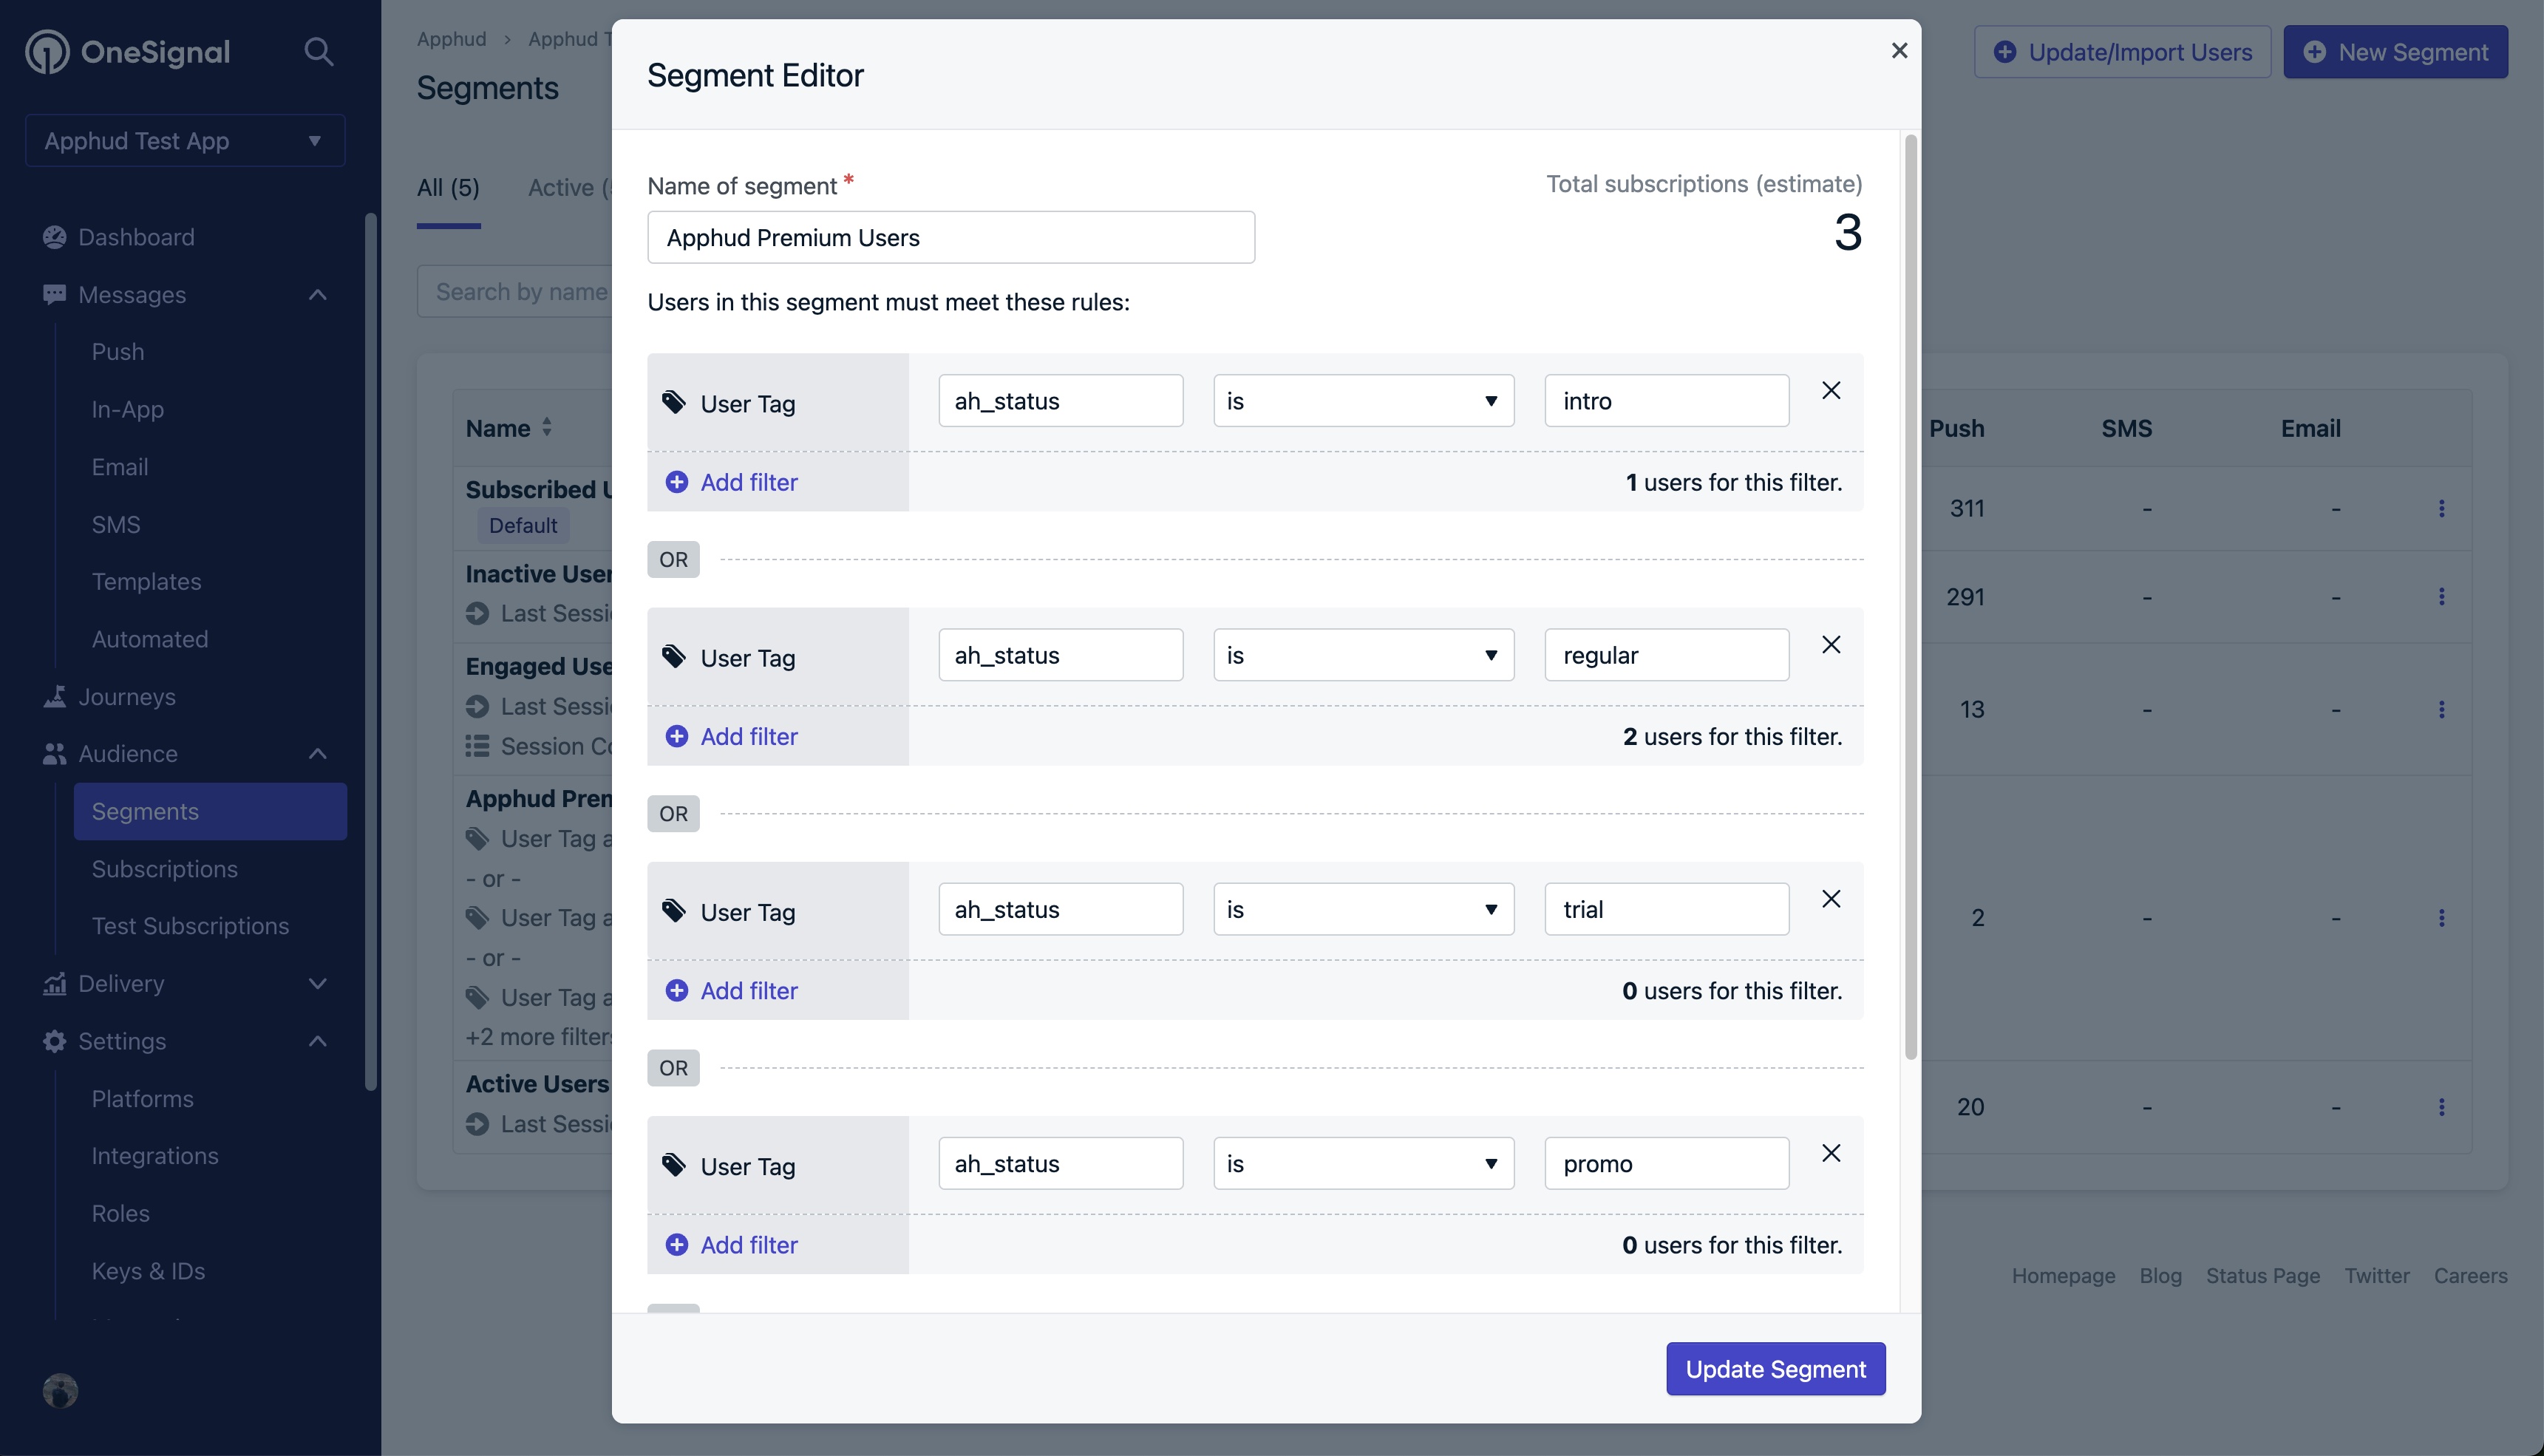
In the screenshot above, the Premium Users audience is created based on the ah_status User Tag. These conditions describe premium users based on their subscription status.
You can also use additional tags, such as ah_spent. By specifying a condition where ah_spent > 0, you can target paying users.
These custom audiences can be used in your Push campaigns.
Data Tags
Apphud sends the following payload in each event. In addition to default tags, advanced tags are sent only when the Advanced Tags option is enabled in the integration settings.
Default Tags
| Key | Description |
|---|---|
ah_event | Event Name |
ah_status | Subscription Status. Possible values: trial, intro, regular, promo, refunded, expired, grace |
JSON example of event with Default Tags:
{
    "ah_event": "apphud_subscription_renewed",
    "ah_product": "com.product.id"
}
Advanced Tags
Requires Paid OneSignal planYou should only turn on this option if your OneSignal plan allows sending a larger number of Tags.
If you enable Advanced Tags on the OneSignal integration page, additional tags are sent:
| Key | Description |
|---|---|
ah_spent | Total amount of money the user has been charged, in USD |
ah_payments | Number of transactions the user has been charged |
ah_country | User's App Store Country |
ah_autorenew | Subscription auto-renew state. "1" or "0" |
ah_billing_issue | Whether the subscription has a billing issue. "1" or "0" |
ah_product | Product ID of the subscription |
JSON example of event with Advanced Tags enabled:
{
    "ah_event": "apphud_subscription_renewed",
    "ah_product": "com.product.id",
    "ah_billing_issue": "0",
    "ah_autorenew": "1",
    "ah_country": "UK",
    "ah_status": "regular",
    "ah_spent": "9.99",
    "ah_payments": "1"
}
Using both OneSignal and Apphud Push Notifications on iOS
On iOS, if you are using Apphud Rules, incoming push notifications must be handled by either Apphud or OneSignal. Without the changes below, OneSignal does not let notifications go through.
Let Apphud handle incoming push notifications in OneSignal callbacks
OneSignal.setNotificationOpenedHandler { result in
    if Apphud.handlePushNotification(apsInfo: result.notification.rawPayload) {
        // Push Notification was handled by Apphud, probably do nothing
    } else {
        // Handle other types of push notifications
    }
}
OneSignal.setNotificationWillShowInForegroundHandler { notif, completion in
    if Apphud.handlePushNotification(apsInfo: notif.rawPayload) {
        // Push Notification was handled by Apphud, probably do nothing
    } else {
        // Handle other types of push notifications
    }
    completion(notif)
}
Modify OneSignal's UINotificationServiceExtension to pass Apphud notifications through
UINotificationServiceExtension to pass Apphud notifications through// NotificationService.swift
override func didReceive(_ request: UNNotificationRequest, withContentHandler contentHandler: @escaping (UNNotificationContent) -> Void) {
self.receivedRequest = request;
self.contentHandler = contentHandler
bestAttemptContent = (request.content.mutableCopy() as? UNMutableNotificationContent)
// (!) --> add this line -->
bestAttemptContent?.userInfo.merge(["custom": ["i": NSUUID().uuidString]], uniquingKeysWith: {old, new in return old})
if let bestAttemptContent = bestAttemptContent {
OneSignal.didReceiveNotificationExtensionRequest(self.receivedRequest, with: self.bestAttemptContent)
contentHandler(bestAttemptContent)
}
}Troubleshooting
I get error with code 401
Make sure you have provided the REST API Key and enabled Identity Verification in OneSignal app settings.
I get error with code 404
Make sure you matched users by calling:
OneSignal.login(Apphud.userID())If nothing helps
Try to update OneSignal SDK to the latest version and run a sandbox purchase. If you still experience issues, contact our Support team.
Updated 5 months ago