
Connection Builder
You can build your own integration from scratch using various liquid macros
The Connection Builder lets you compose your own integration from scratch — send custom POST requests with fully templated JSON bodies to any third-party service whenever selected in-app events occur. Use it to recreate Apphud's built-in integrations, send events to internal systems, or build payloads tailored to APIs not covered by the standard integration catalog.
NoteConnection Builder is available on Expert and Enterprise plans.
Overview
The Custom Connection Builder lets you send custom POST requests to third-party services whenever selected in-app events occur. With it, you can recreate Apphud's built-in integrations or design your own payloads for any supported event.
How to Add a Custom Connection
Step 1 - Create a Connection
In Apphud, navigate to Connections → Integrations, find Connection Builder at the top of the list (on the All or Custom tabs), and click Add Connection.
As with other integrations, each custom connection is created for a specific data source platform. You'll be prompted to select a Source: iOS, Android, Web, iOS (Deeplinks), or Android (Deeplinks).
Step 2 - Configure URL and Request method
After selecting a source, you'll be taken to the connection settings page. Enter a Name and URL for the connection.
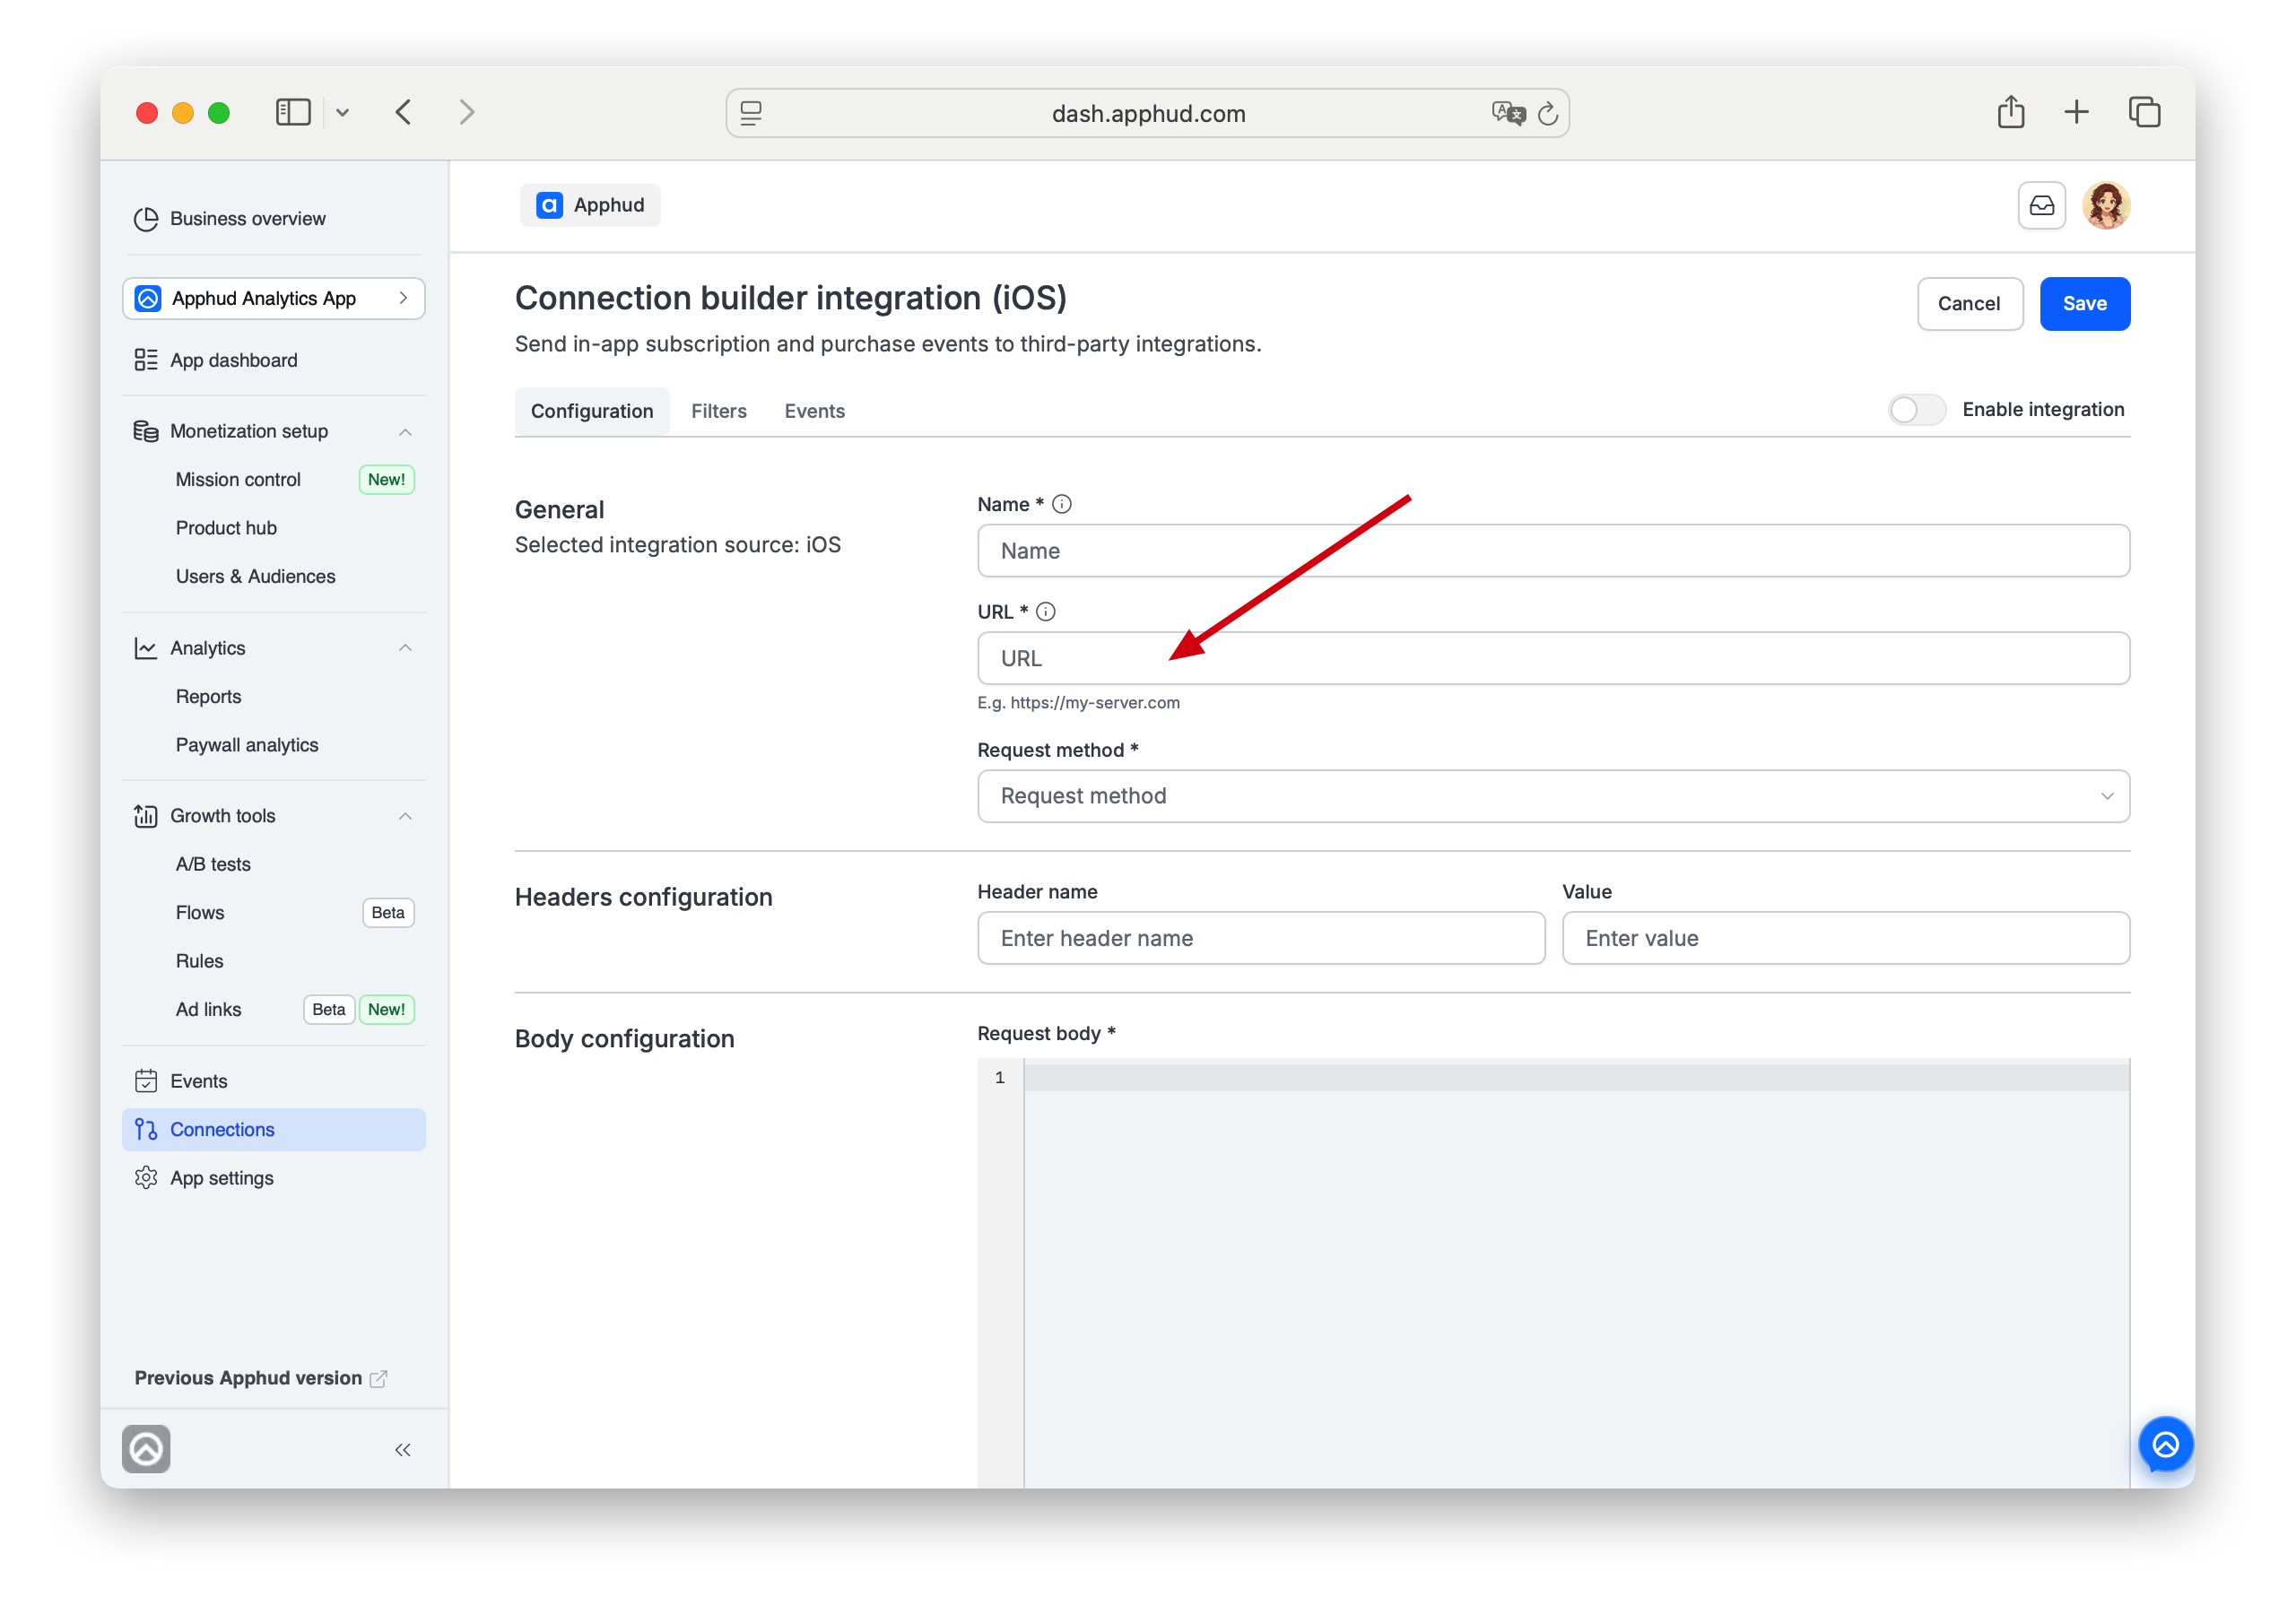
Choose a Request method from the dropdown.
As a rule, clients prefer that events are sent to the specified URL via POST requests.
Step 3 - Add headers
Define request headers by specifying Header name and Value. To include multiple headers, click Add header and fill in the additional fields. Note that the button is shown only if you added at least one Header.
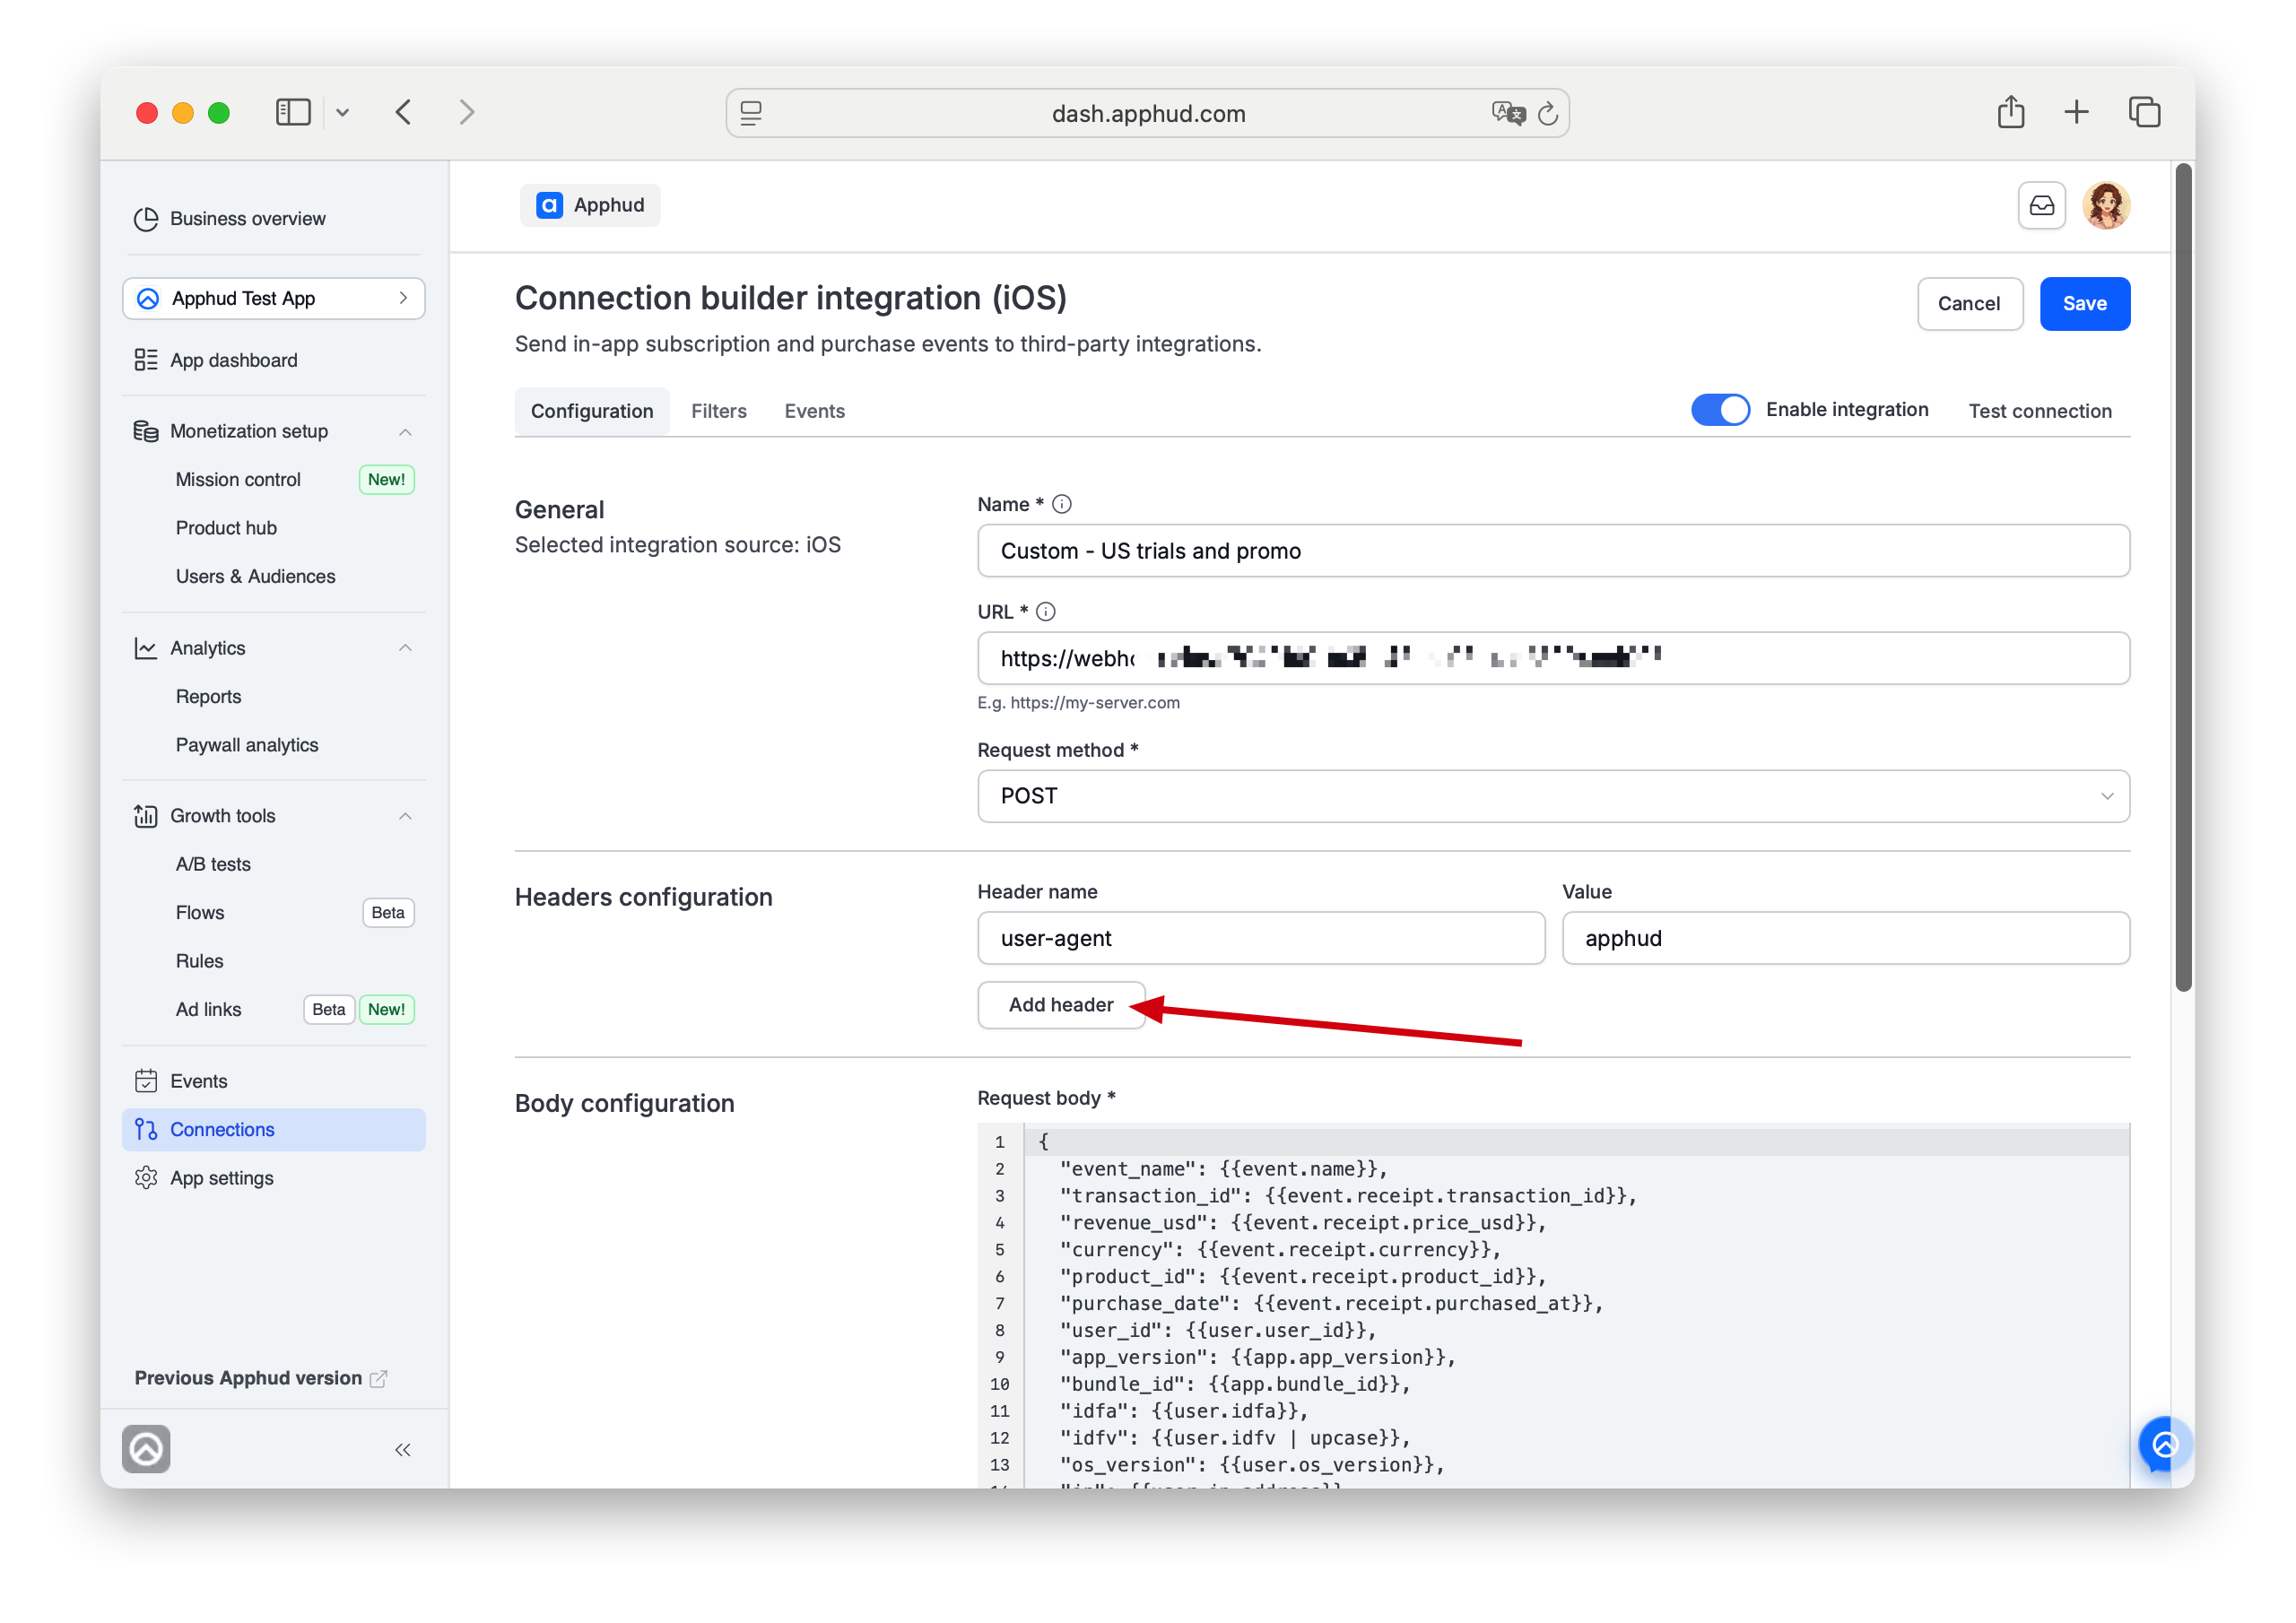
Step 4 - Set up request body
In the Body configuration section, compose your JSON payload using supported Liquid macros (see the Liquid Macros reference below).
Remove null values settings is set to ON by default. Fields with null values will be excluded from the payload.
Step 5 - Apply Event Filters (optional)
The standard for integrations Environment configuration block will help you to define which data will be sent to the destination, so, you can use these settings as the initial high-level filter. By default only production events are sent.
Important NoteNo need to create a filter
Environment = Production. By default, Apphud skips sandbox events, so this filter is redundant.
Then, go to Filters tab. Click + Add filter to add conditions that determine which events should be sent.
If an event is enabled but doesn't match the filter conditions, it appears as Skipped in the event logs with the reason "Event did not match filters."
Add powerful event filters to ensure only specific data is sent to a destination. For example:
Revenue > $29Product duration = WeeklyTrial started = true
These filters can be applied per connection for precise control.
Available filters grouped by category:
| Category | Filter |
|---|---|
| General | Environment (Sandbox, Production); App Version (=, >, <, e.g. > 1.20.1) |
| User | Country by IP; Store Country; Has Advertising ID (IDFA) |
| Product | Type (Auto-renewable, Non-renewing); Duration (Weekly, 2 Weeks, Monthly, 3 Months, 6 Months, Annually); Family Shared; Product ID; Revenue (USD) with <, >, = |
| Attribution | Ad Network; Channel; Campaign Name |
| User Properties | Keys with exact values |
NoteFilters do not apply to non-receipt events like
user_created,paywall_shown, except for Store Country and Environment.
Step 6 - Select events
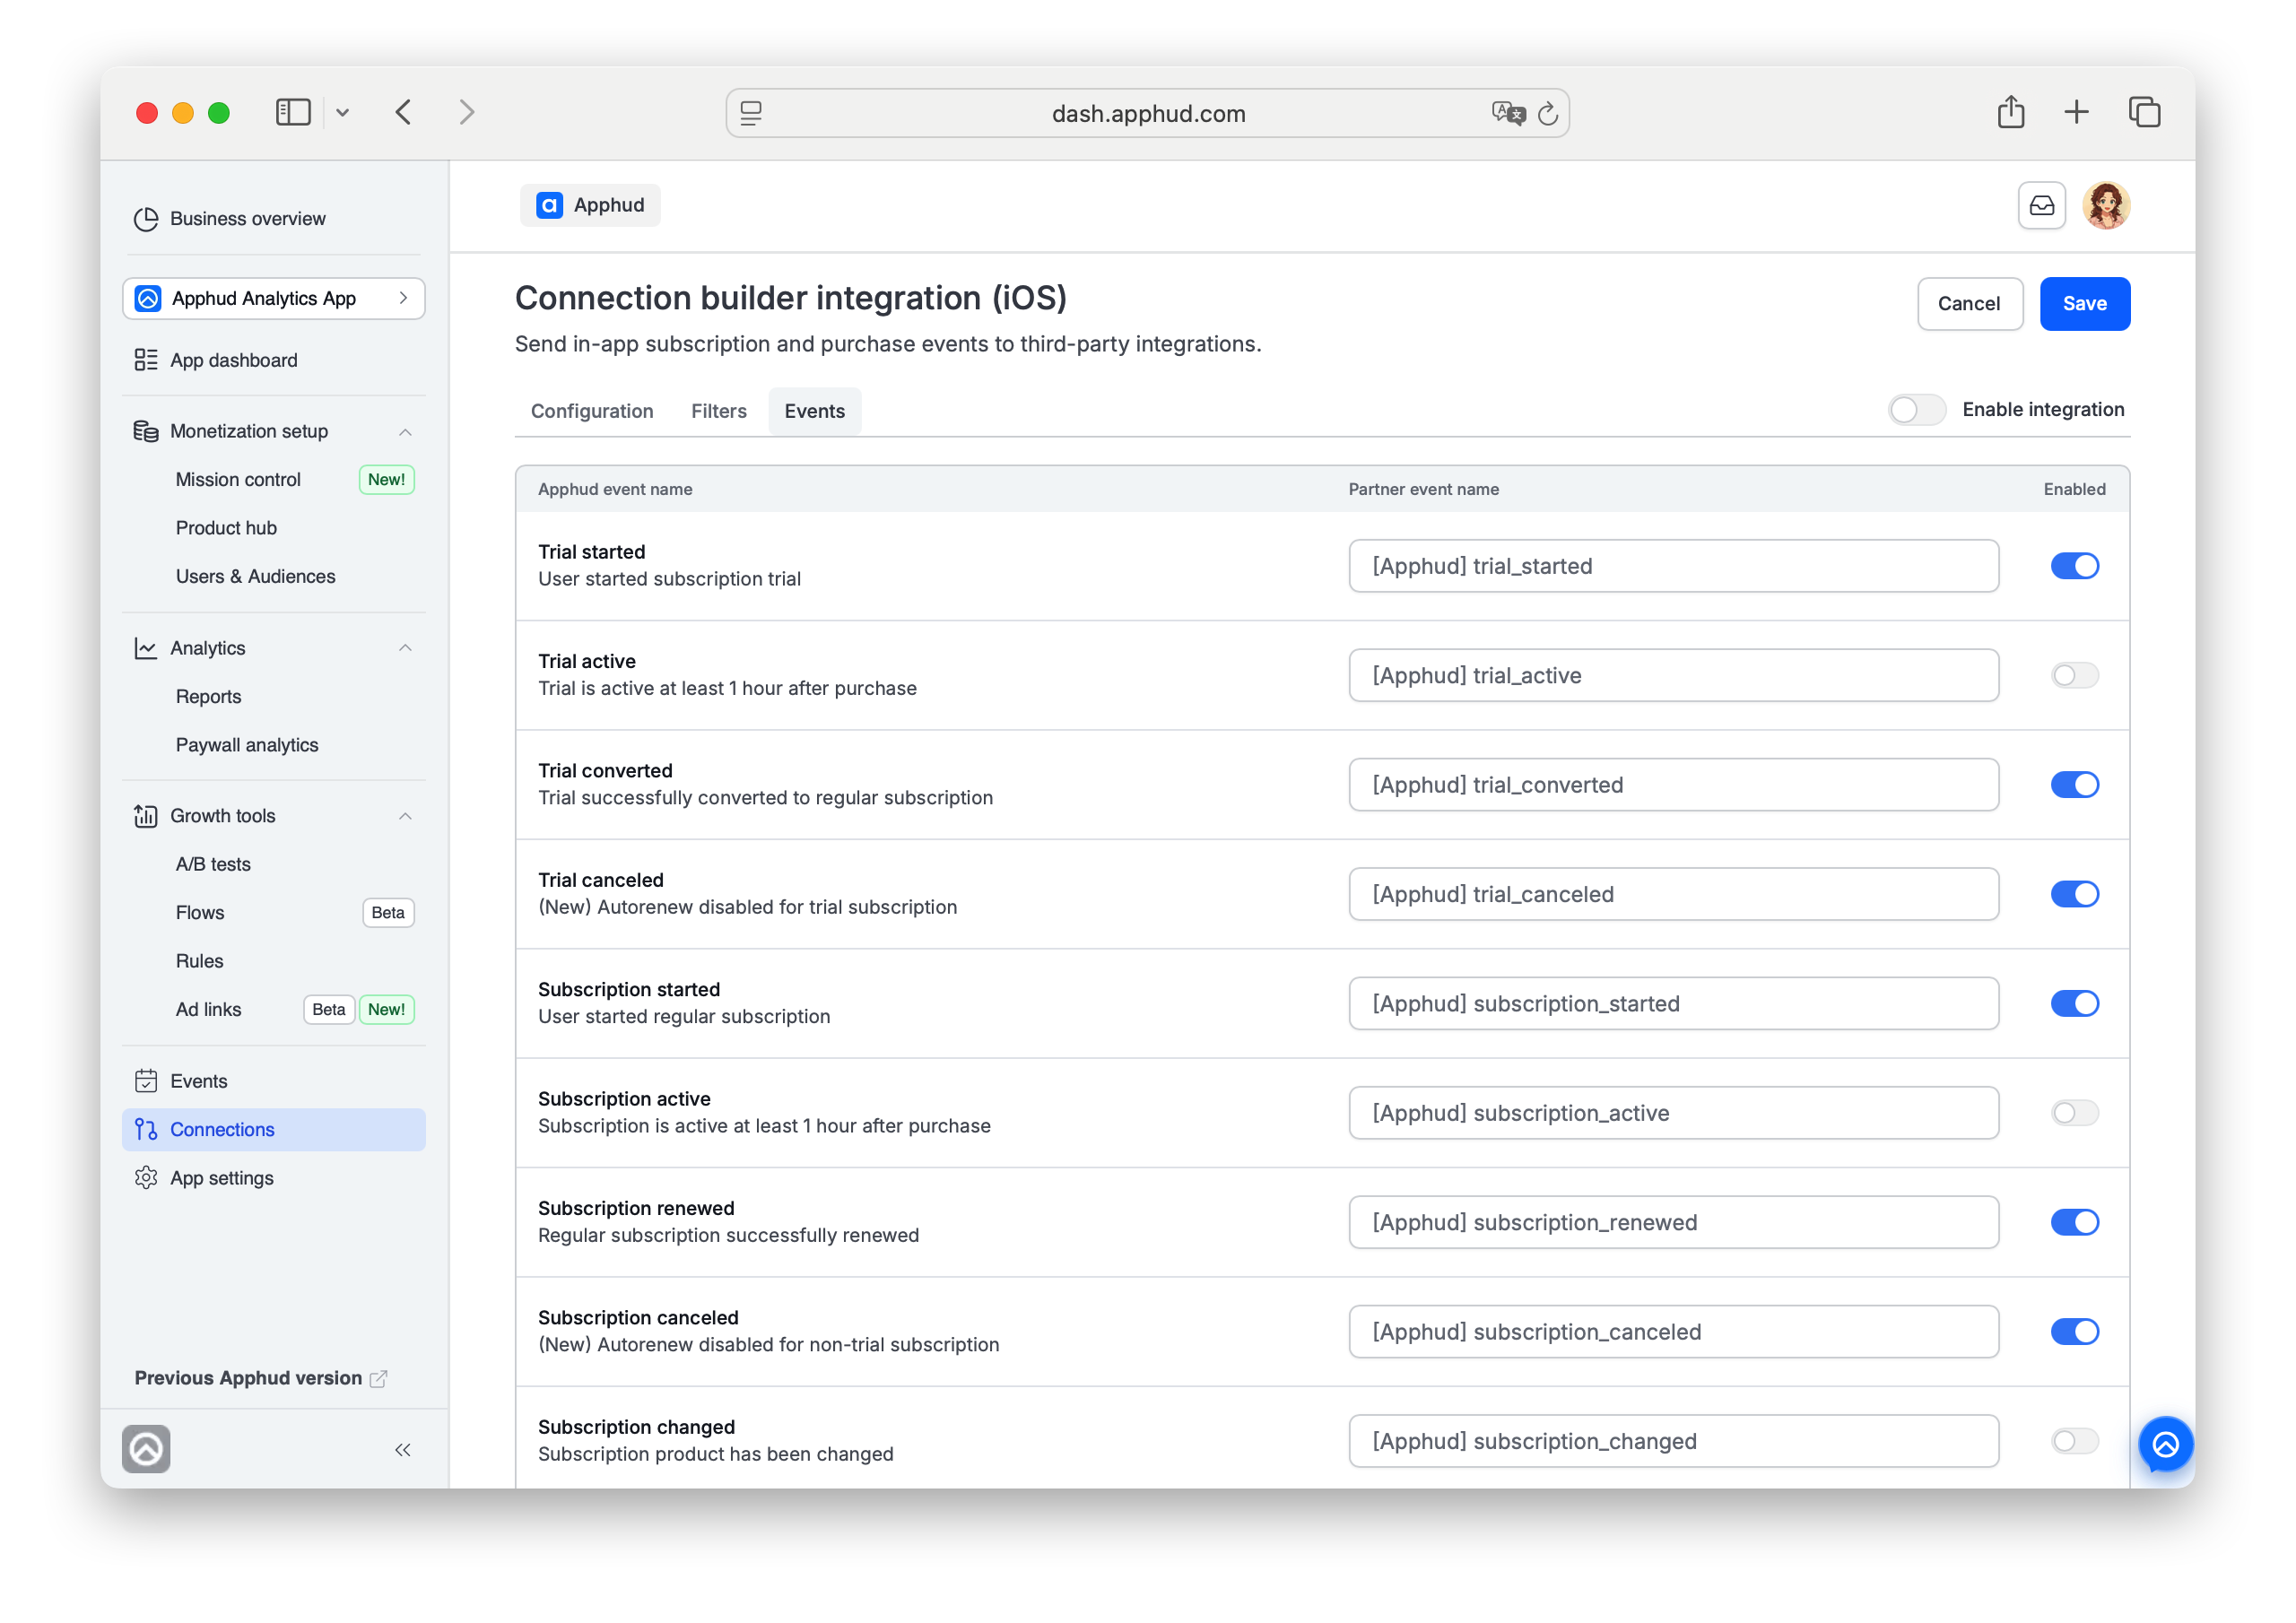
Navigate to Events tab. Choose the events you'd like to send through the connection. You can also rename these events using custom labels.
Step 7 - Save and test
Save the connection. The connection can be Enabled right away — however, we recommend testing it first.
Liquid Macros
Use these macros inside your JSON body. Each renders the corresponding value at send time.
App
| Macro | Description | Format | Example |
|---|---|---|---|
{{ app.app_version }} | App Version | String | 1.2.20 |
{{ app.bundle_id }} | iOS Bundle ID | String | com.bundle.id |
{{ app.package_name }} | Android Package Name | String | com.android.package |
Event
| Macro | Description | Format | Example |
|---|---|---|---|
{{ event.created_at }} | Event creation date (ISO) | Date | 2022-03-12T09:38:38.081Z |
{{ event.created_at_ts }} | Event creation date (Unix seconds) | Integer | 1743481200 |
{{ event.name }} | Event name | String | custom_trial_started |
{{ event.original_name }} | Unmodified original name | String | trial_started |
{{ event.receipt.product_id }} | Product ID | String | my.weekly.id |
{{ event.receipt.purchased_at }} | Transaction date (ISO) | Date | 2022-03-12T09:38:38.081Z |
{{ event.receipt.purchased_at_ts }} | Transaction date (Unix seconds) | Integer | 1743481200 |
{{ event.receipt.intro_period }} | Introductory period | Boolean | TRUE |
{{ event.receipt.trial_period }} | Trial period | Boolean | FALSE |
{{ event.receipt.transaction_id }} | Transaction ID | String | 1000000999999999 |
{{ event.receipt.original_transaction_id }} | Original Transaction ID | String | 1000000888888888 |
{{ event.receipt.price_usd }} | Price in USD | Float | 9.99 |
{{ event.receipt.proceeds_usd }} | Proceeds in USD | Float | 6.99 |
{{ event.receipt.price }} | Price in local currency | Float | 199.00 |
{{ event.receipt.proceeds }} | Proceeds in local currency | Float | 139.00 |
{{ event.receipt.currency }} | Local currency ISO code | String | USD |
User
| Macro | Description | Format | Example |
|---|---|---|---|
{{ user.user_id }} | User ID | String | abc123xyz |
{{ user.paying }} | Whether the user is currently paying | Boolean | TRUE |
{{ user.payments_count }} | Payments count | Integer | 4 |
{{ user.total_spent }} | Total spent in USD | Float | 23.49 |
{{ user.idfv }} | Device IDFV | String | 12345-12345-12345 |
{{ user.idfa }} | Device IDFA | String | ABCDEF12-3456-7890-ABCD-EF1234567890 |
{{ user.properties.your_key }} | User property | String | myuserpropertyvalue |
{{ user.created_at }} | User Created Date (ISO) | Date | 2022-03-12T09:38:38.081Z |
{{ user.created_at_ts }} | User Created Date (Unix seconds) | Integer | 1743481200 |
{{ user.first_seen_at }} | First seen Date (ISO) | Date | 2022-03-12T09:38:38.081Z |
{{ user.first_seen_at_ts }} | First seen Date (Unix seconds) | Integer | 1743481200 |
{{ user.country_by_ip }} | Country ISO code by IP address | String | US |
{{ user.country_by_store }} | Country ISO code from the store | String | US |
{{ user.time_zone }} | Time zone | String | Asia/Jakarta |
{{ user.language }} | Language | String | en |
{{ user.ip_address }} | IP address | String | 192.168.1.1 |
{{ user.os_version }} | OS version | String | 18.2.1 |
{{ user.push_token }} | Push token | String | ABCD1234TOKEN5678 |
User LTV Predictions (Coming Soon)
| Macro | Description | Format | Example |
|---|---|---|---|
{{ user.pltv_30d }} | 30-day Predicted LTV | Float | 34.00 |
{{ user.pltv_90d }} | 90-day Predicted LTV | Float | 40.54 |
{{ user.pltv_365d }} | 365-day Predicted LTV | Float | 42.55 |
Attribution
| Macro | Description | Format | Example |
|---|---|---|---|
{{ user.attribution.appsflyer_id }} | AppsFlyer ID | String | AF_ID_123456 |
{{ user.attribution.fb_anon_id }} | Facebook Anon ID | String | FBANONID123 |
{{ user.attribution.fb_ext_info }} | Facebook Ext Info | String | EXTINFO_SAMPLE |
{{ user.attribution.firebase_id }} | Firebase ID | String | firebase-user-id |
{{ user.attribution.adjust_id }} | Adjust ID | String | adjust-uuid-xyz |
{{ user.attribution.provider }} | Attribution provider | String | Apple Search Ads Integration |
{{ user.attribution.ad_network }} | Ad Network | String | Meta Ads |
{{ user.attribution.channel }} | Channel | String | Instagram |
{{ user.attribution.campaign }} | Campaign | String | my-us-campaign |
{{ user.attribution.fbc }} | FBC | String | fb.1.1234567890.111 |
{{ user.attribution.fbp }} | FBP | String | fb.1.1234567890.222 |
Click Event
| Macro | Description | Format | Example |
|---|---|---|---|
{{ user.attribution.ttclid }} | TikTok Click ID | String | tiktok-click-id-xyz |
{{ user.attribution.gclid }} | Google Click ID | String | GOOGLE123CLICK |
{{ user.click_event.properties.custom_param }} | Click event custom param | String | value |
{{ user.click_event.properties.click_id }} | Click ID | String | click1234 |
{{ user.click_event.user_agent }} | User Agent from click event | String | Mozilla... |
{{ user.click_event.properties.utm_campaign }} | UTM Campaign | String | spring_sale |
{{ user.flow_properties.any_custom_param }} | Flow custom param | String | value2 |
Special Functions
Check the Remove null values setting under the Request body field to ensure null parameters are not sent.
Conditional Logic in JSON
With Connection Builder, you can embed conditional logic directly in your request body using Liquid if/else tags.
Example — send a has_idfa flag based on the availability of IDFA:
"has_idfa": {% if user.idfa %} 1 {% else %} 0 {% endif %}You can also apply conditions to multi-line blocks or entire JSON payloads:
{% if user.country == "US" %}
{ "region": "NA" }
{% else %}
{ "region": "Other" }
{% endif %}
Value Modifiers
Transform values on the fly using built-in modifiers. Examples include arithmetic, string case formatting, and date formatting.
Arithmetic:
"revenue_x2": {{ event.receipt.price | times: 2 }}String case formatting:
"product": "{{ event.receipt.product_id | upcase }}"Date formatting:
"event_time": "{{ event.created_at | date: "%Y-%m-%d %H:%M:%S.000" }}"UNIX timestamp:
"timestamp": "{{ event.created_at | date: "%s" }}"For more on date formatting, see the Liquid date format guide.
Preview a Payload
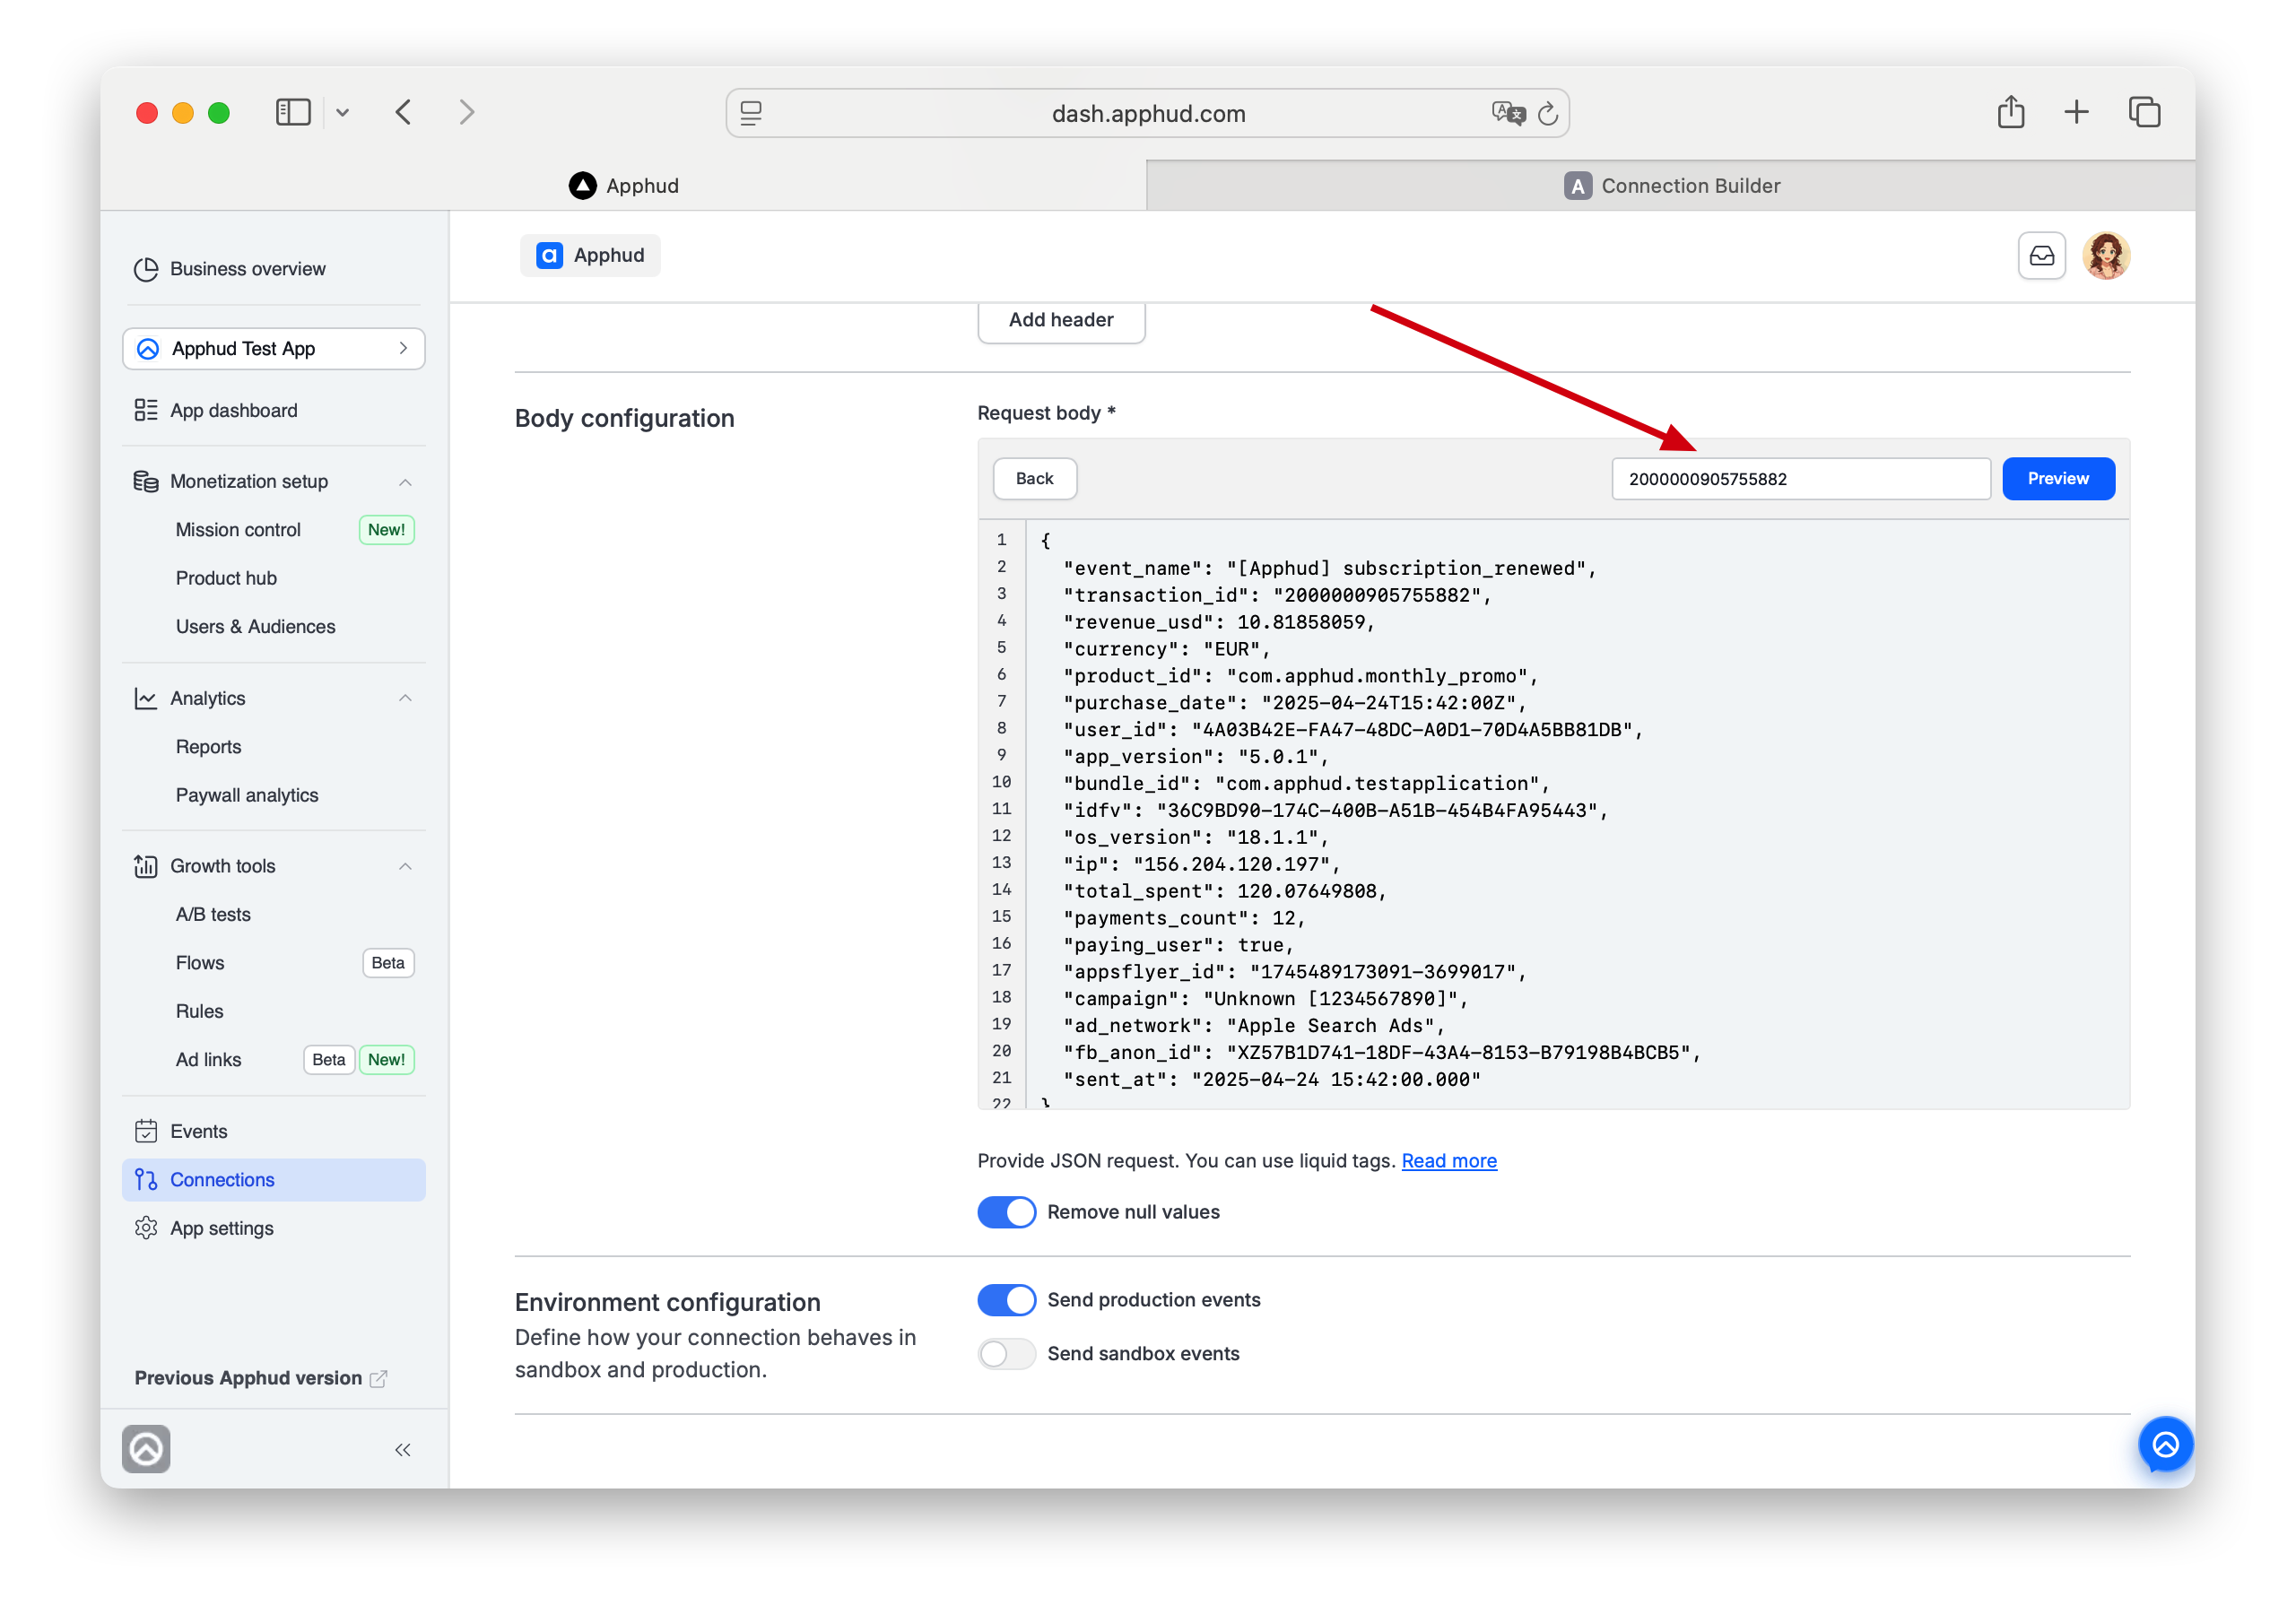
While setting up your integration, you can preview the generated payload at any time. Click the 👁️ icon in the JSON editor toolbar, then enter an Event ID or Transaction ID to view the payload.
- Event ID — Apphud's internal event ID, which can be found in the Events tab. Enable the ID column in the table. If the ID column doesn't exist, try clearing browser cache first.
- Transaction ID — store's Transaction ID.
NoteThis preview does not trigger an actual HTTP request.
Test a Connection
Once a new integration configuration is saved, Test connection button will be enabled.
To simulate a real connection, click on it and enter a valid Transaction ID from your app. Apphud will fetch the corresponding event, receipt, and user data, then send a test POST request using your configuration. All configured filters are applied during the test.
Sandbox transactionsIf you're using a sandbox transaction, be sure to include the filter
Environment = Sandbox. Otherwise, the event will be skipped.
- If the transaction is invalid or belongs to a different app, an error message will appear: "Transaction was not found."
- If the test is successful, a popup will display the response payload.
Important NoteThe test result is shown only once and cannot be accessed again after closing the popup.
Updated 5 days ago