
Google Ads (Firebase & Google Analytics)
This guide describes how to add and configure Firebase and Google Analytics integration.
The Google Ads (Firebase & Google Analytics) integration sends Apphud subscription and non-renewing purchase events to Google Analytics 4 — enabling conversion export to Google Ads campaigns and product analysis directly in Google Analytics.
Apphud can deliver events using either Measurement Protocol or the newer Data Manager API. See Authentication for both methods.
What is it used for?
- Export conversion events to Google Ads.
- Product analysis in Google Analytics.
Limitations
- Events will not show up in Firebase A/B testing results due to a Google Analytics 4 Measurement Protocol API limitation.
- Since it is not possible to disable automatic in-app purchase tracking from the Firebase SDK, you may see increased LTV value for your customers in Google Analytics.
Requirements
- Apphud iOS SDK 2.2.0 or higher.
- Apphud Android SDK 1.2.0 or higher.
- Some code is required to match users sent from Firebase SDK and Apphud — see Match Users below.
How to Add Integration?
Install SDKs
- Install Apphud SDK.
- Integrate Firebase.
- Match Users between Firebase and Apphud and pass the App Instance ID to Apphud. See below.
Authentication
Apphud supports two authentication methods for this integration:
- Measurement Protocol — existing setup using Firebase App ID and API Secret.
- Data Manager API (recommended) — newer method for sending audience and conversion data to Google advertising products.
Configure at least one method below, then continue with Additional Configuration.
Measurement Protocol
Complete the following in your Google Analytics project before configuring Measurement Protocol authentication in Apphud. Open Admin settings of your project.
Firebase App ID
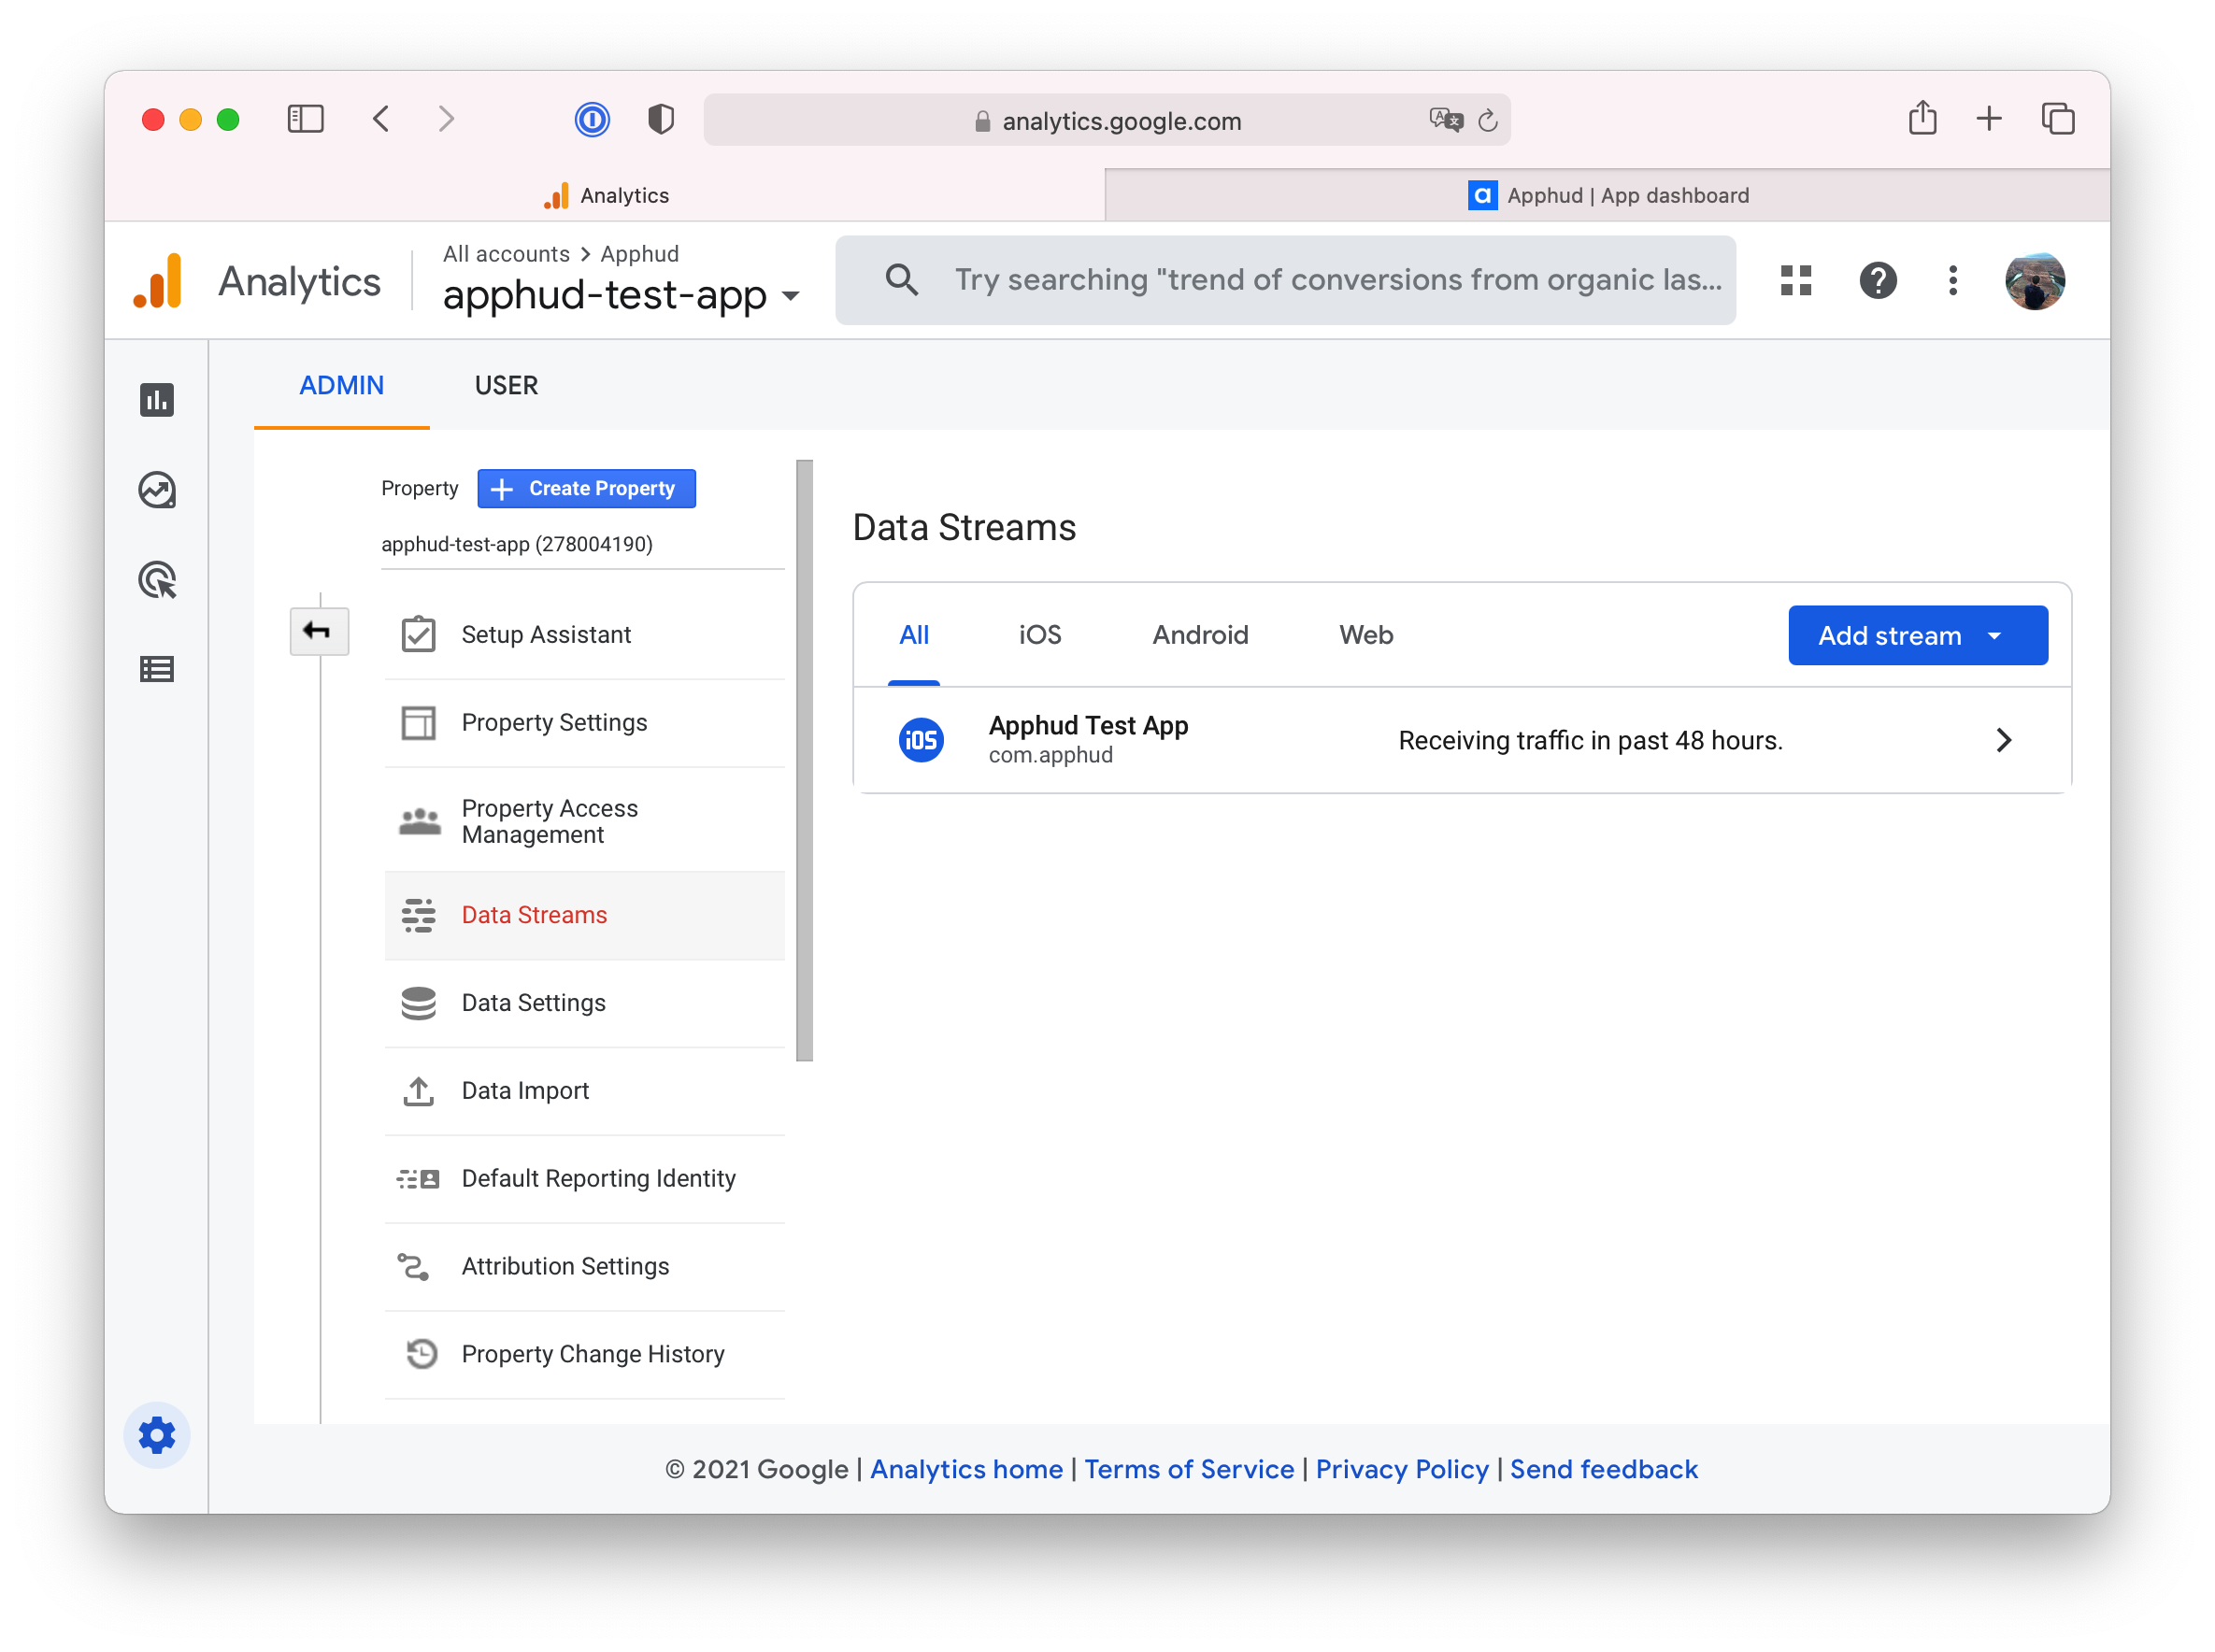
Go to Data Streams and open your App's Stream details page.
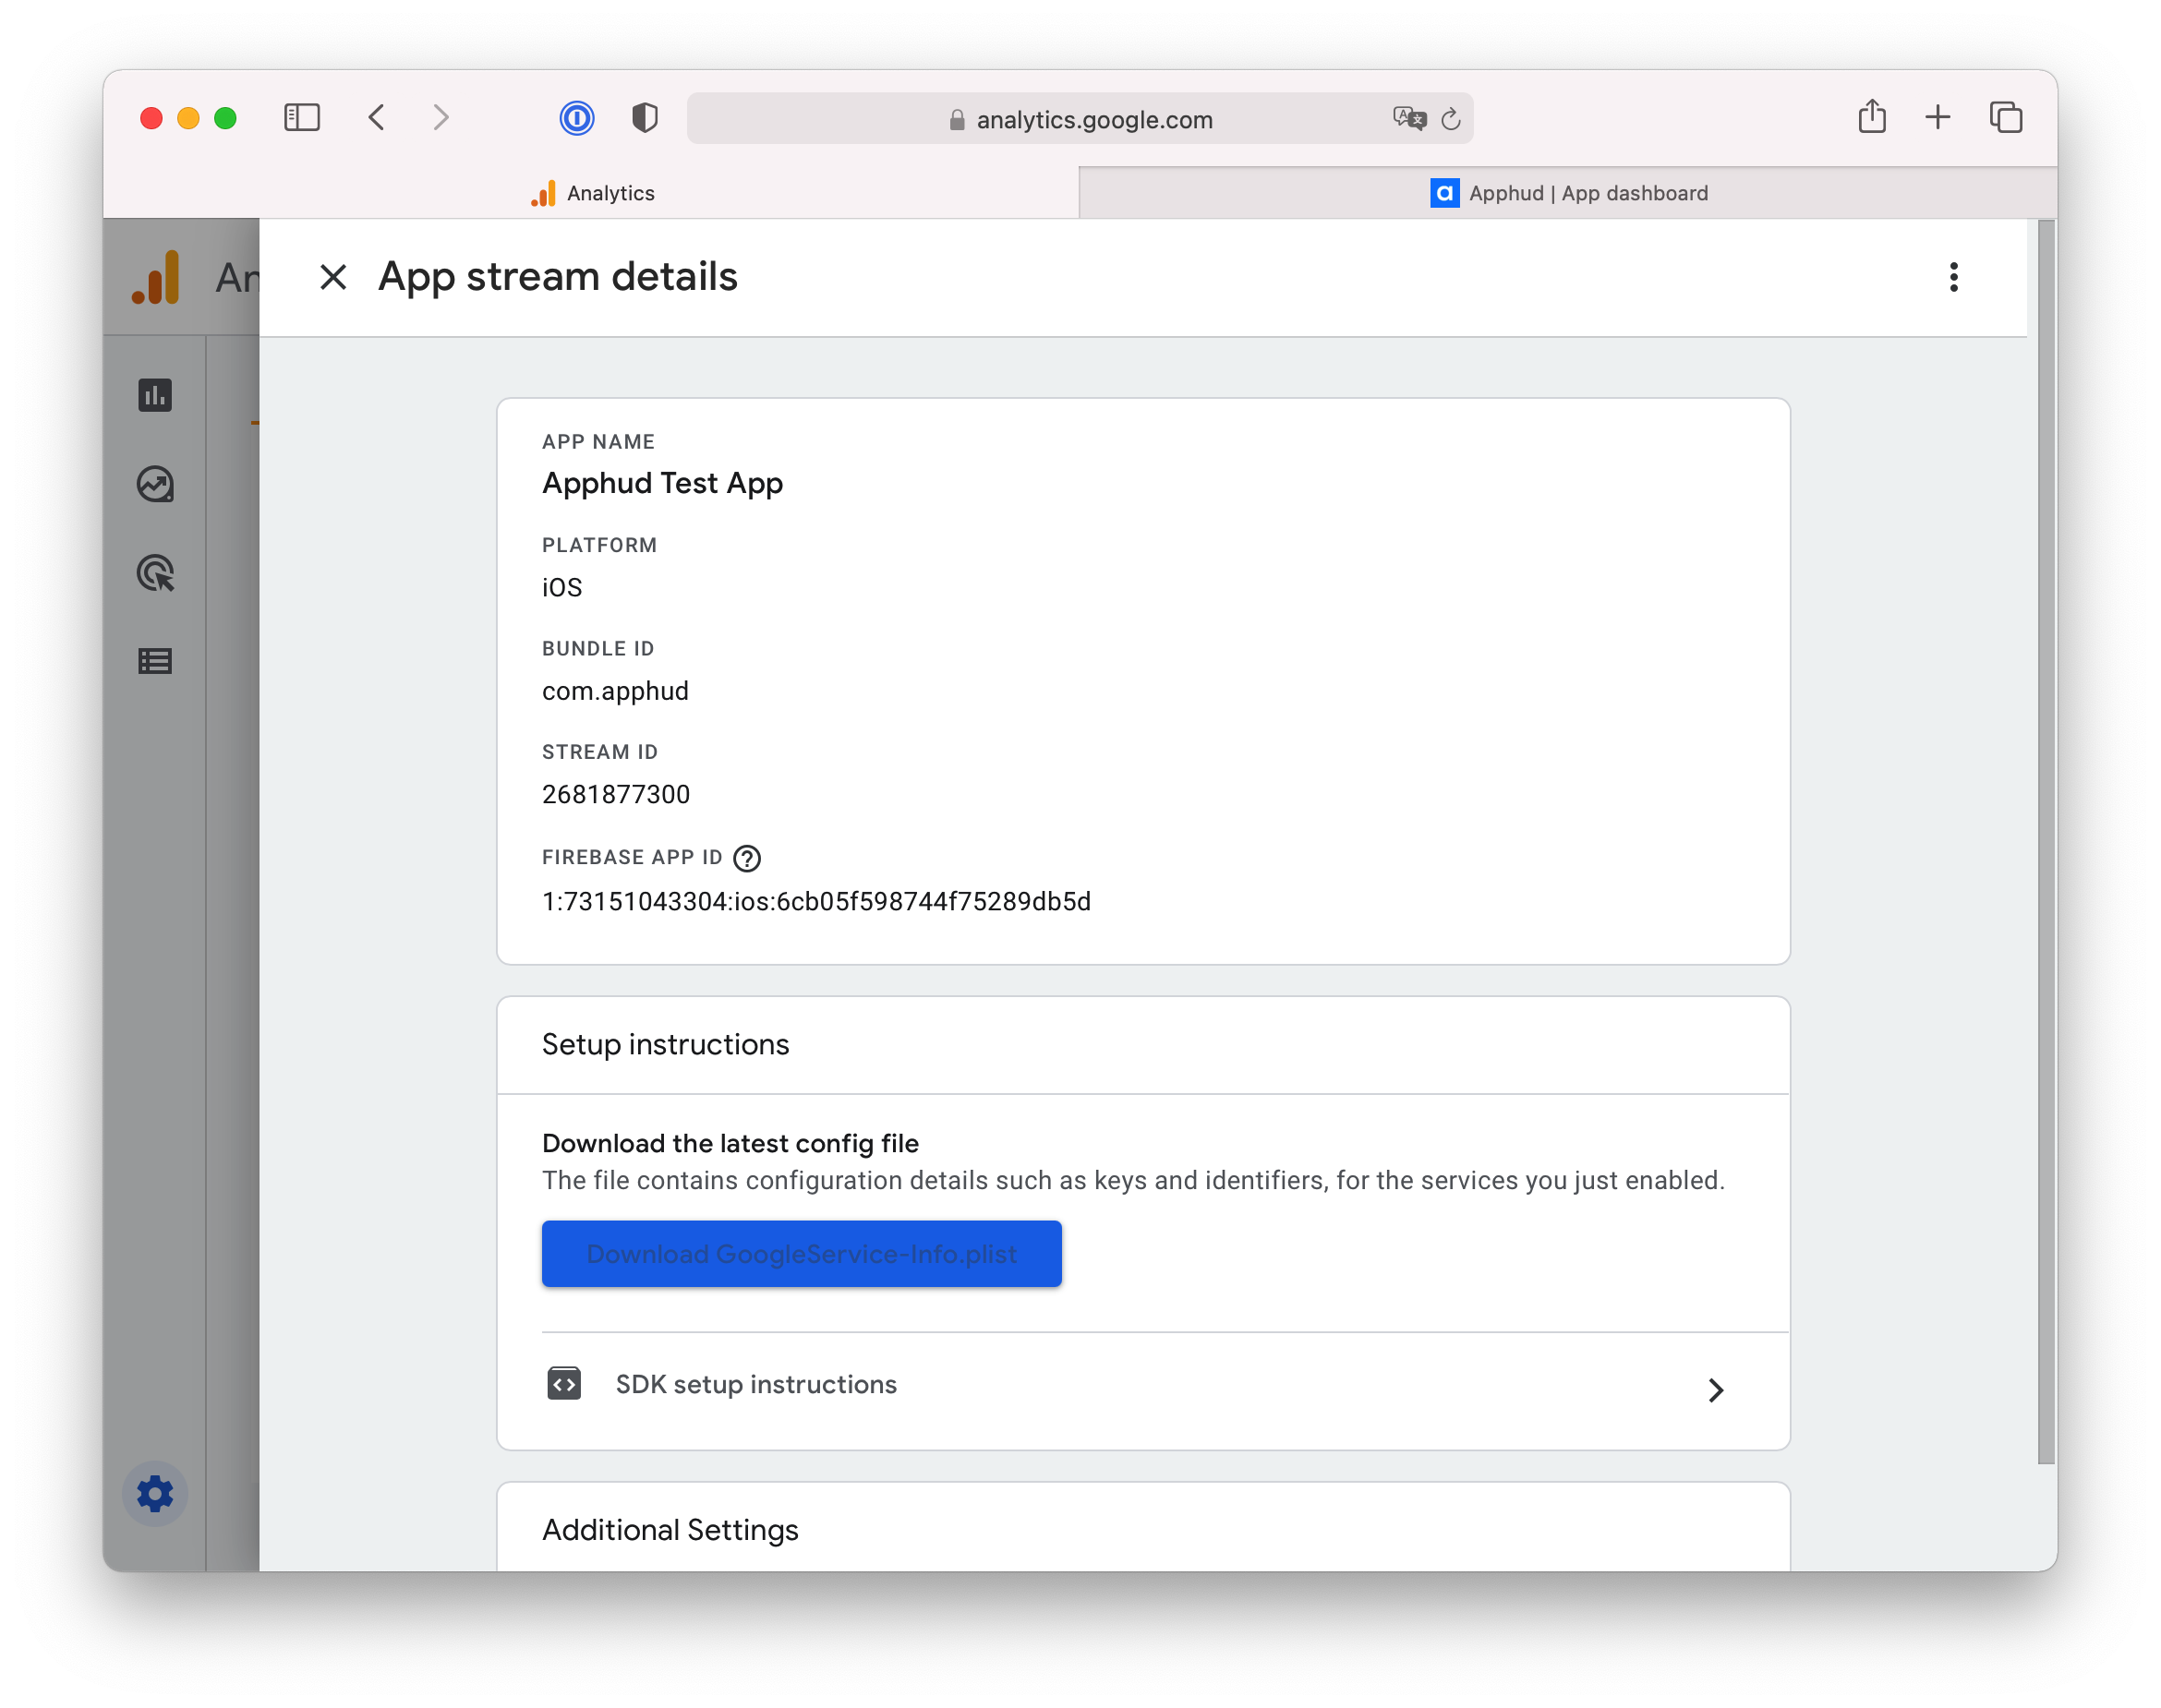
On the App stream details page, find and copy the Firebase App ID.
Measurement Protocol API Secret
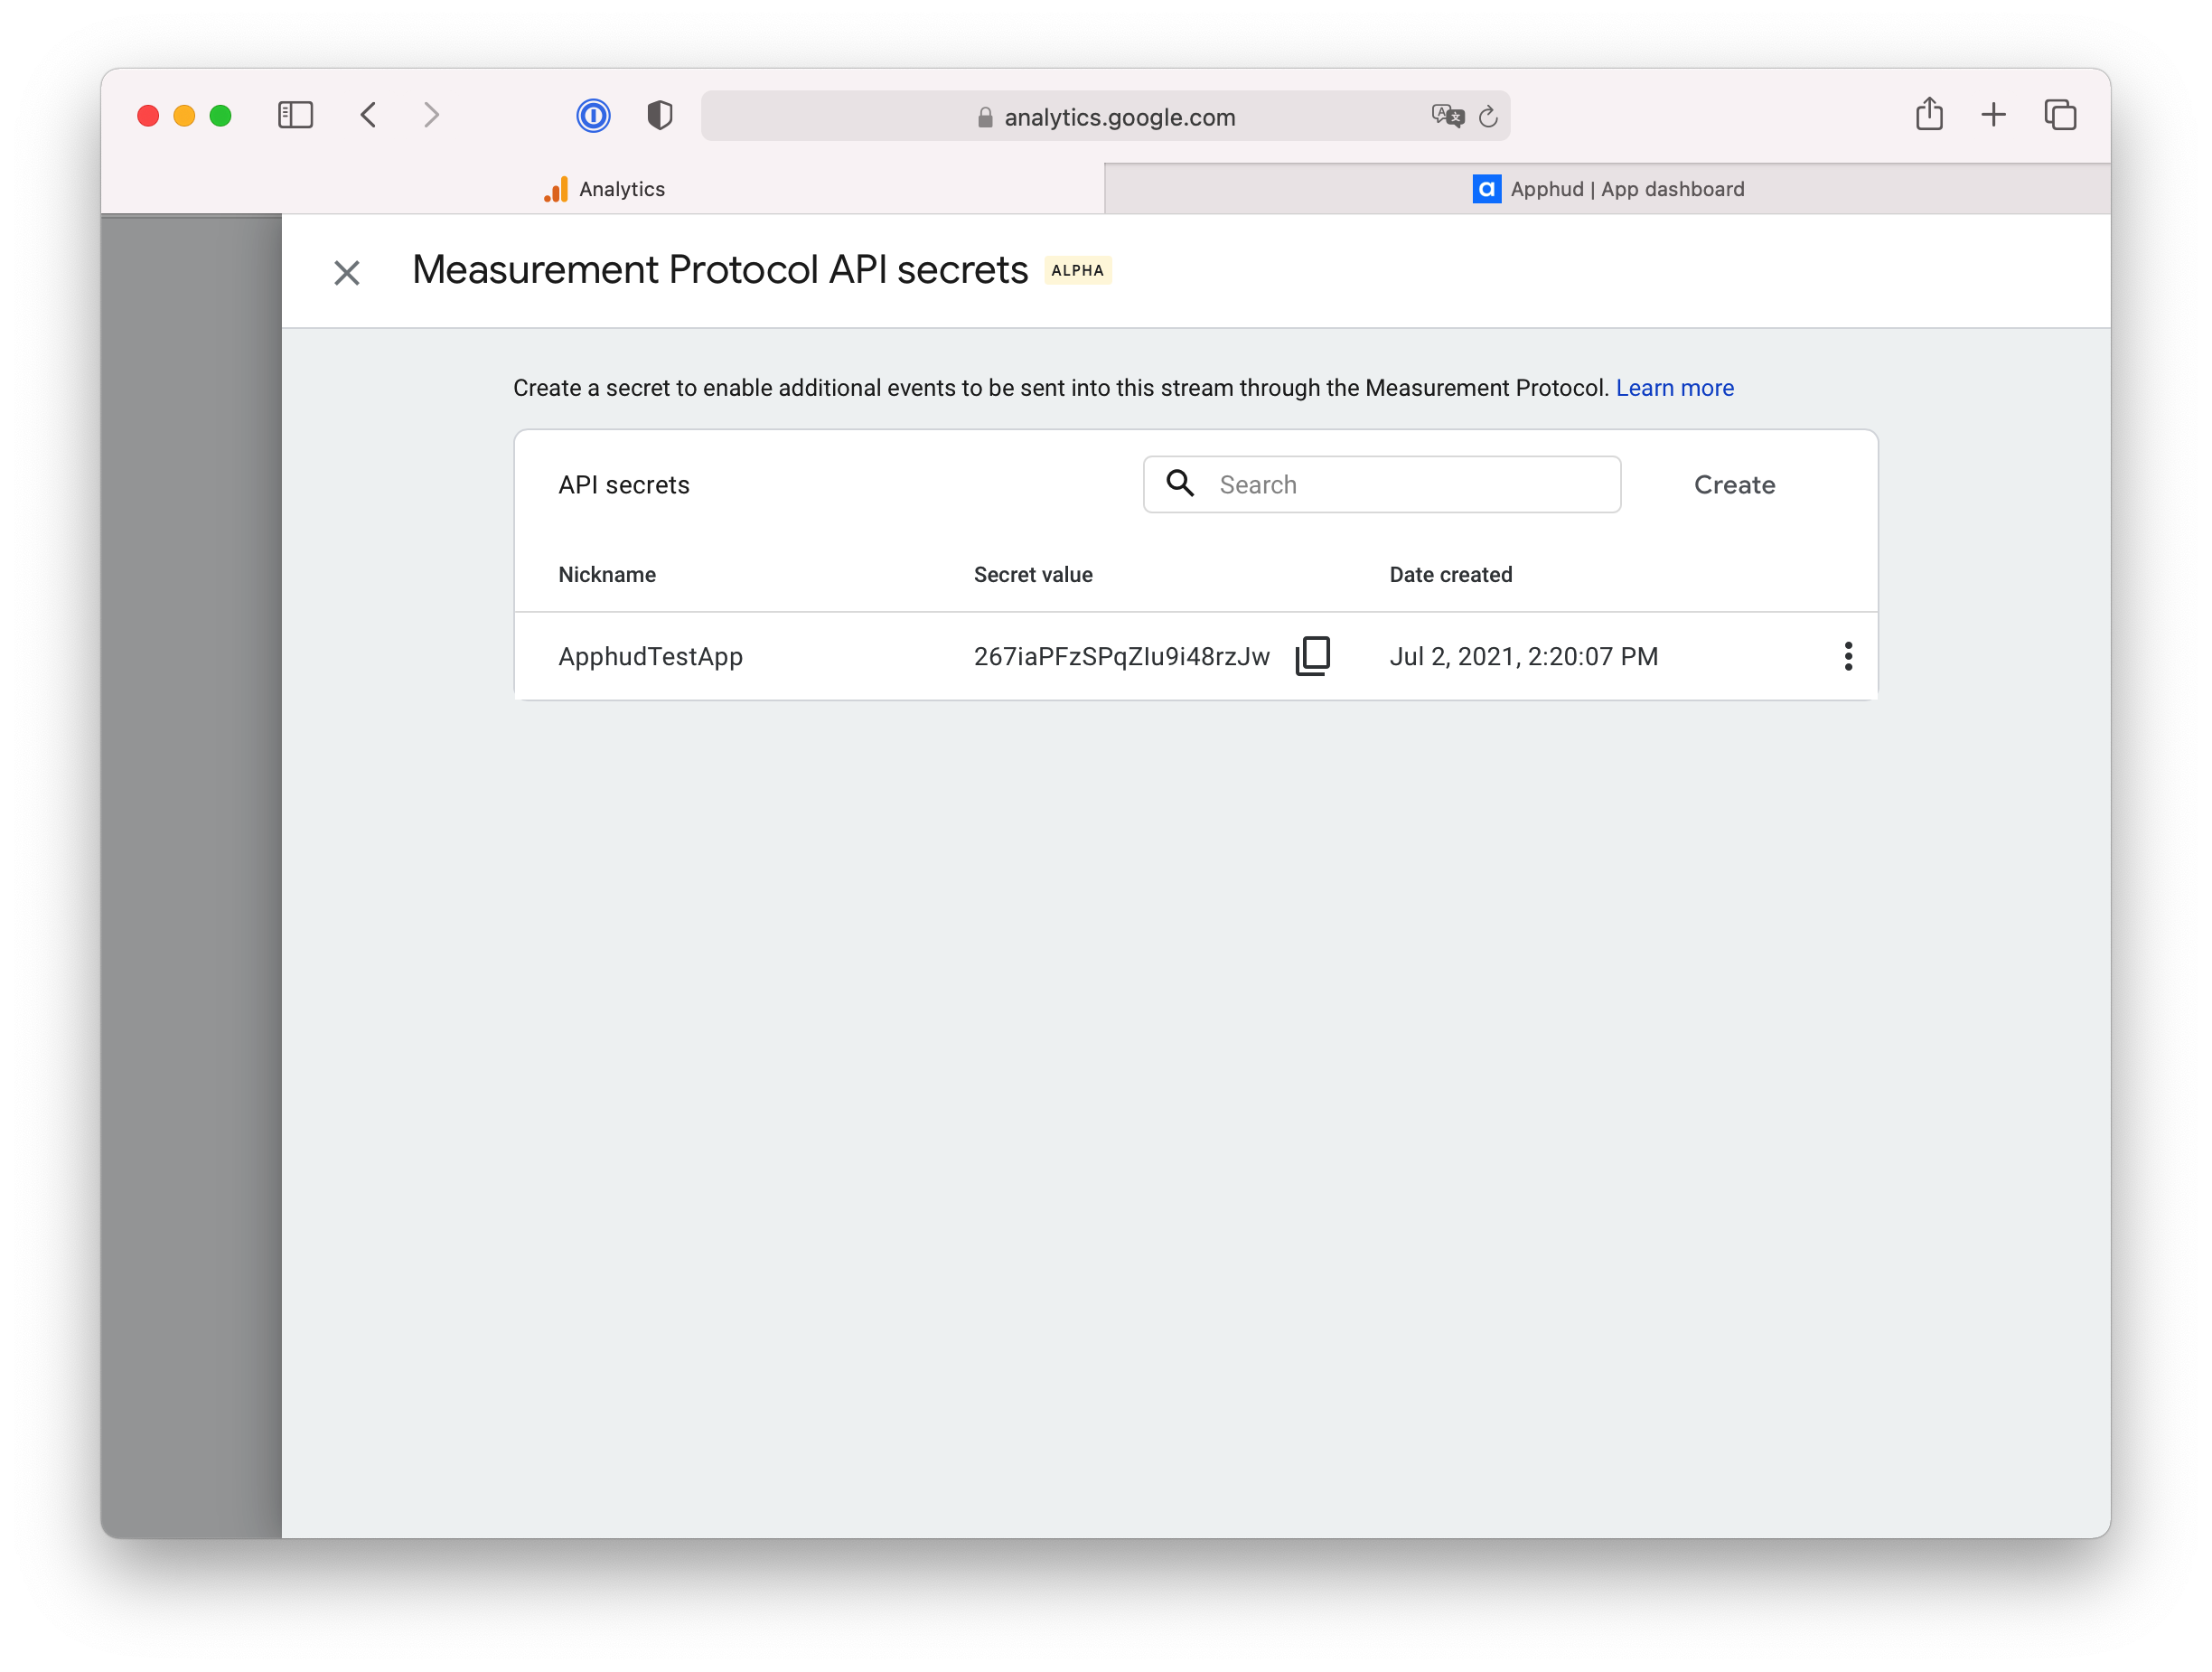
Under Additional settings, go to Measurement Protocol API secrets and create a new API Secret if one doesn't already exist. Copy the value.
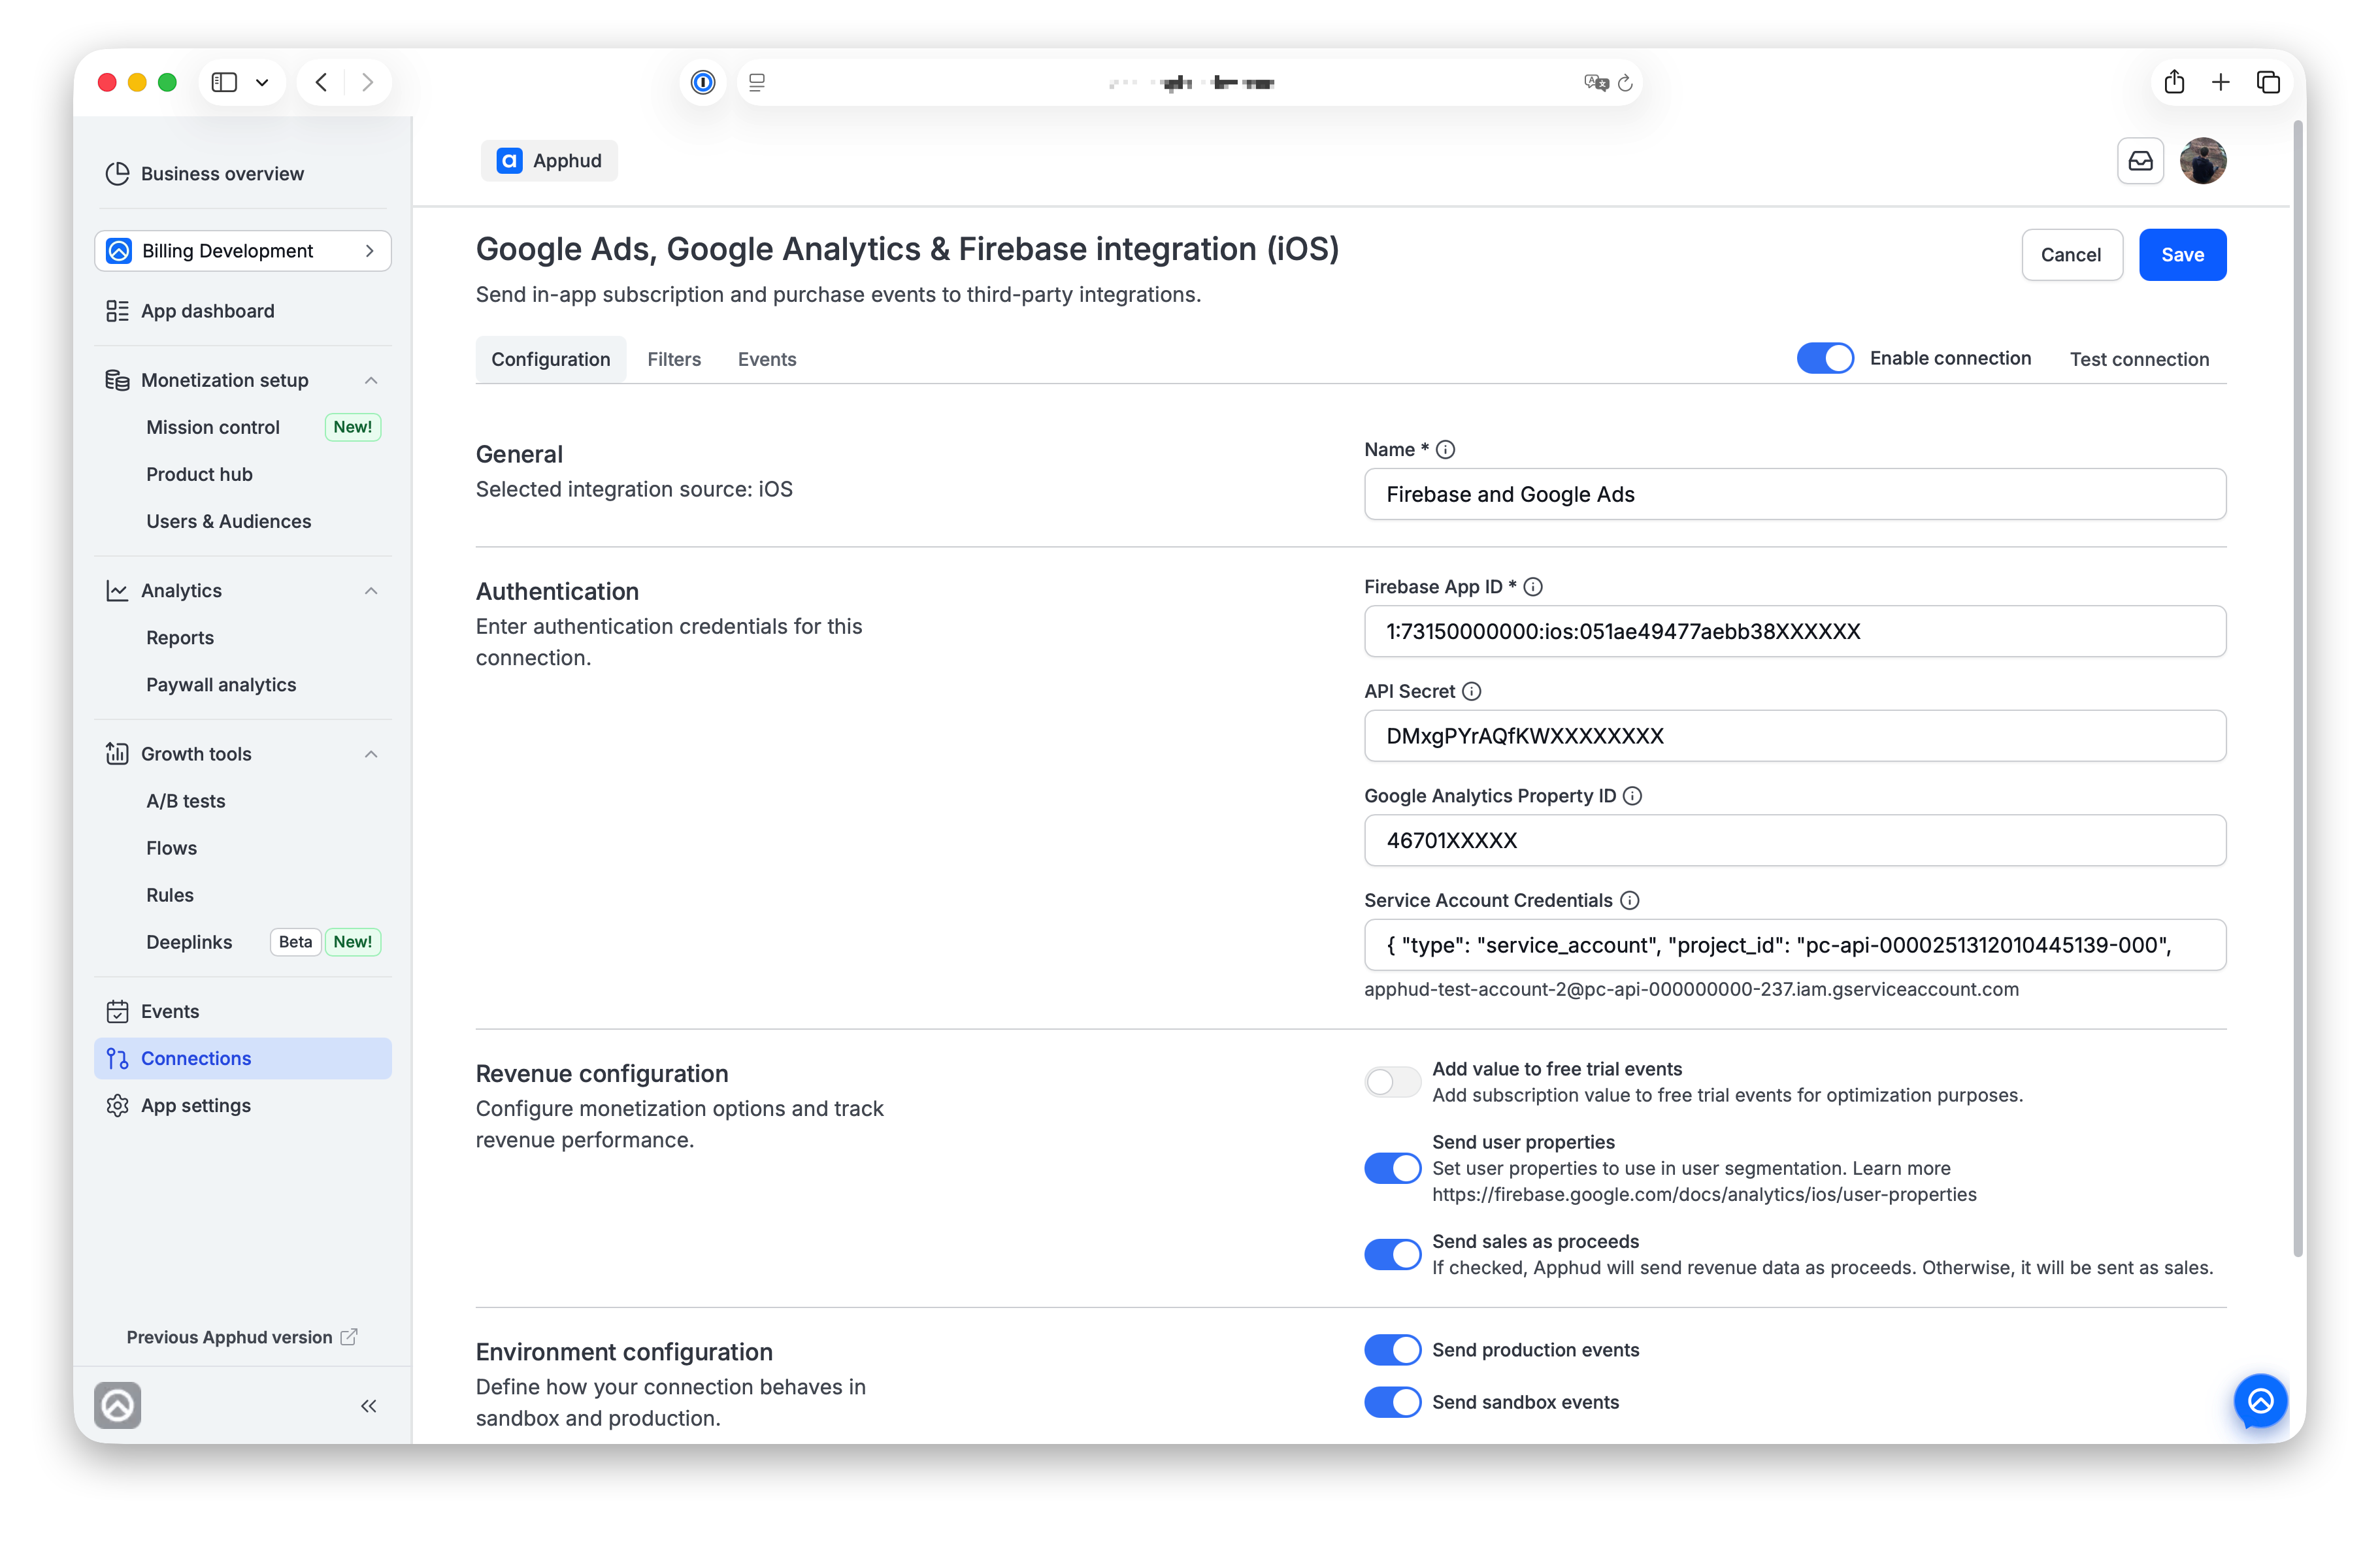
In Apphud, open Connections → Integrations (the All or Analytics tab). Click Add connection for Google Ads (Firebase & Google Analytics) and choose a Source in the pop-up.
Enter the Measurement Protocol credentials:
- Firebase App ID (required) — copied from Google Analytics above.
- Client API Secret (required) — the Measurement Protocol API Secret copied above.
Data Manager API
Data Manager API lets you send audience and conversion data to multiple Google advertising products with a single call. Use this method for stronger Google Ads measurement.
Follow Google's Set up API access guide to:
-
Enable the Data Manager API in your Google Cloud Console.
-
Create a service account with any name.
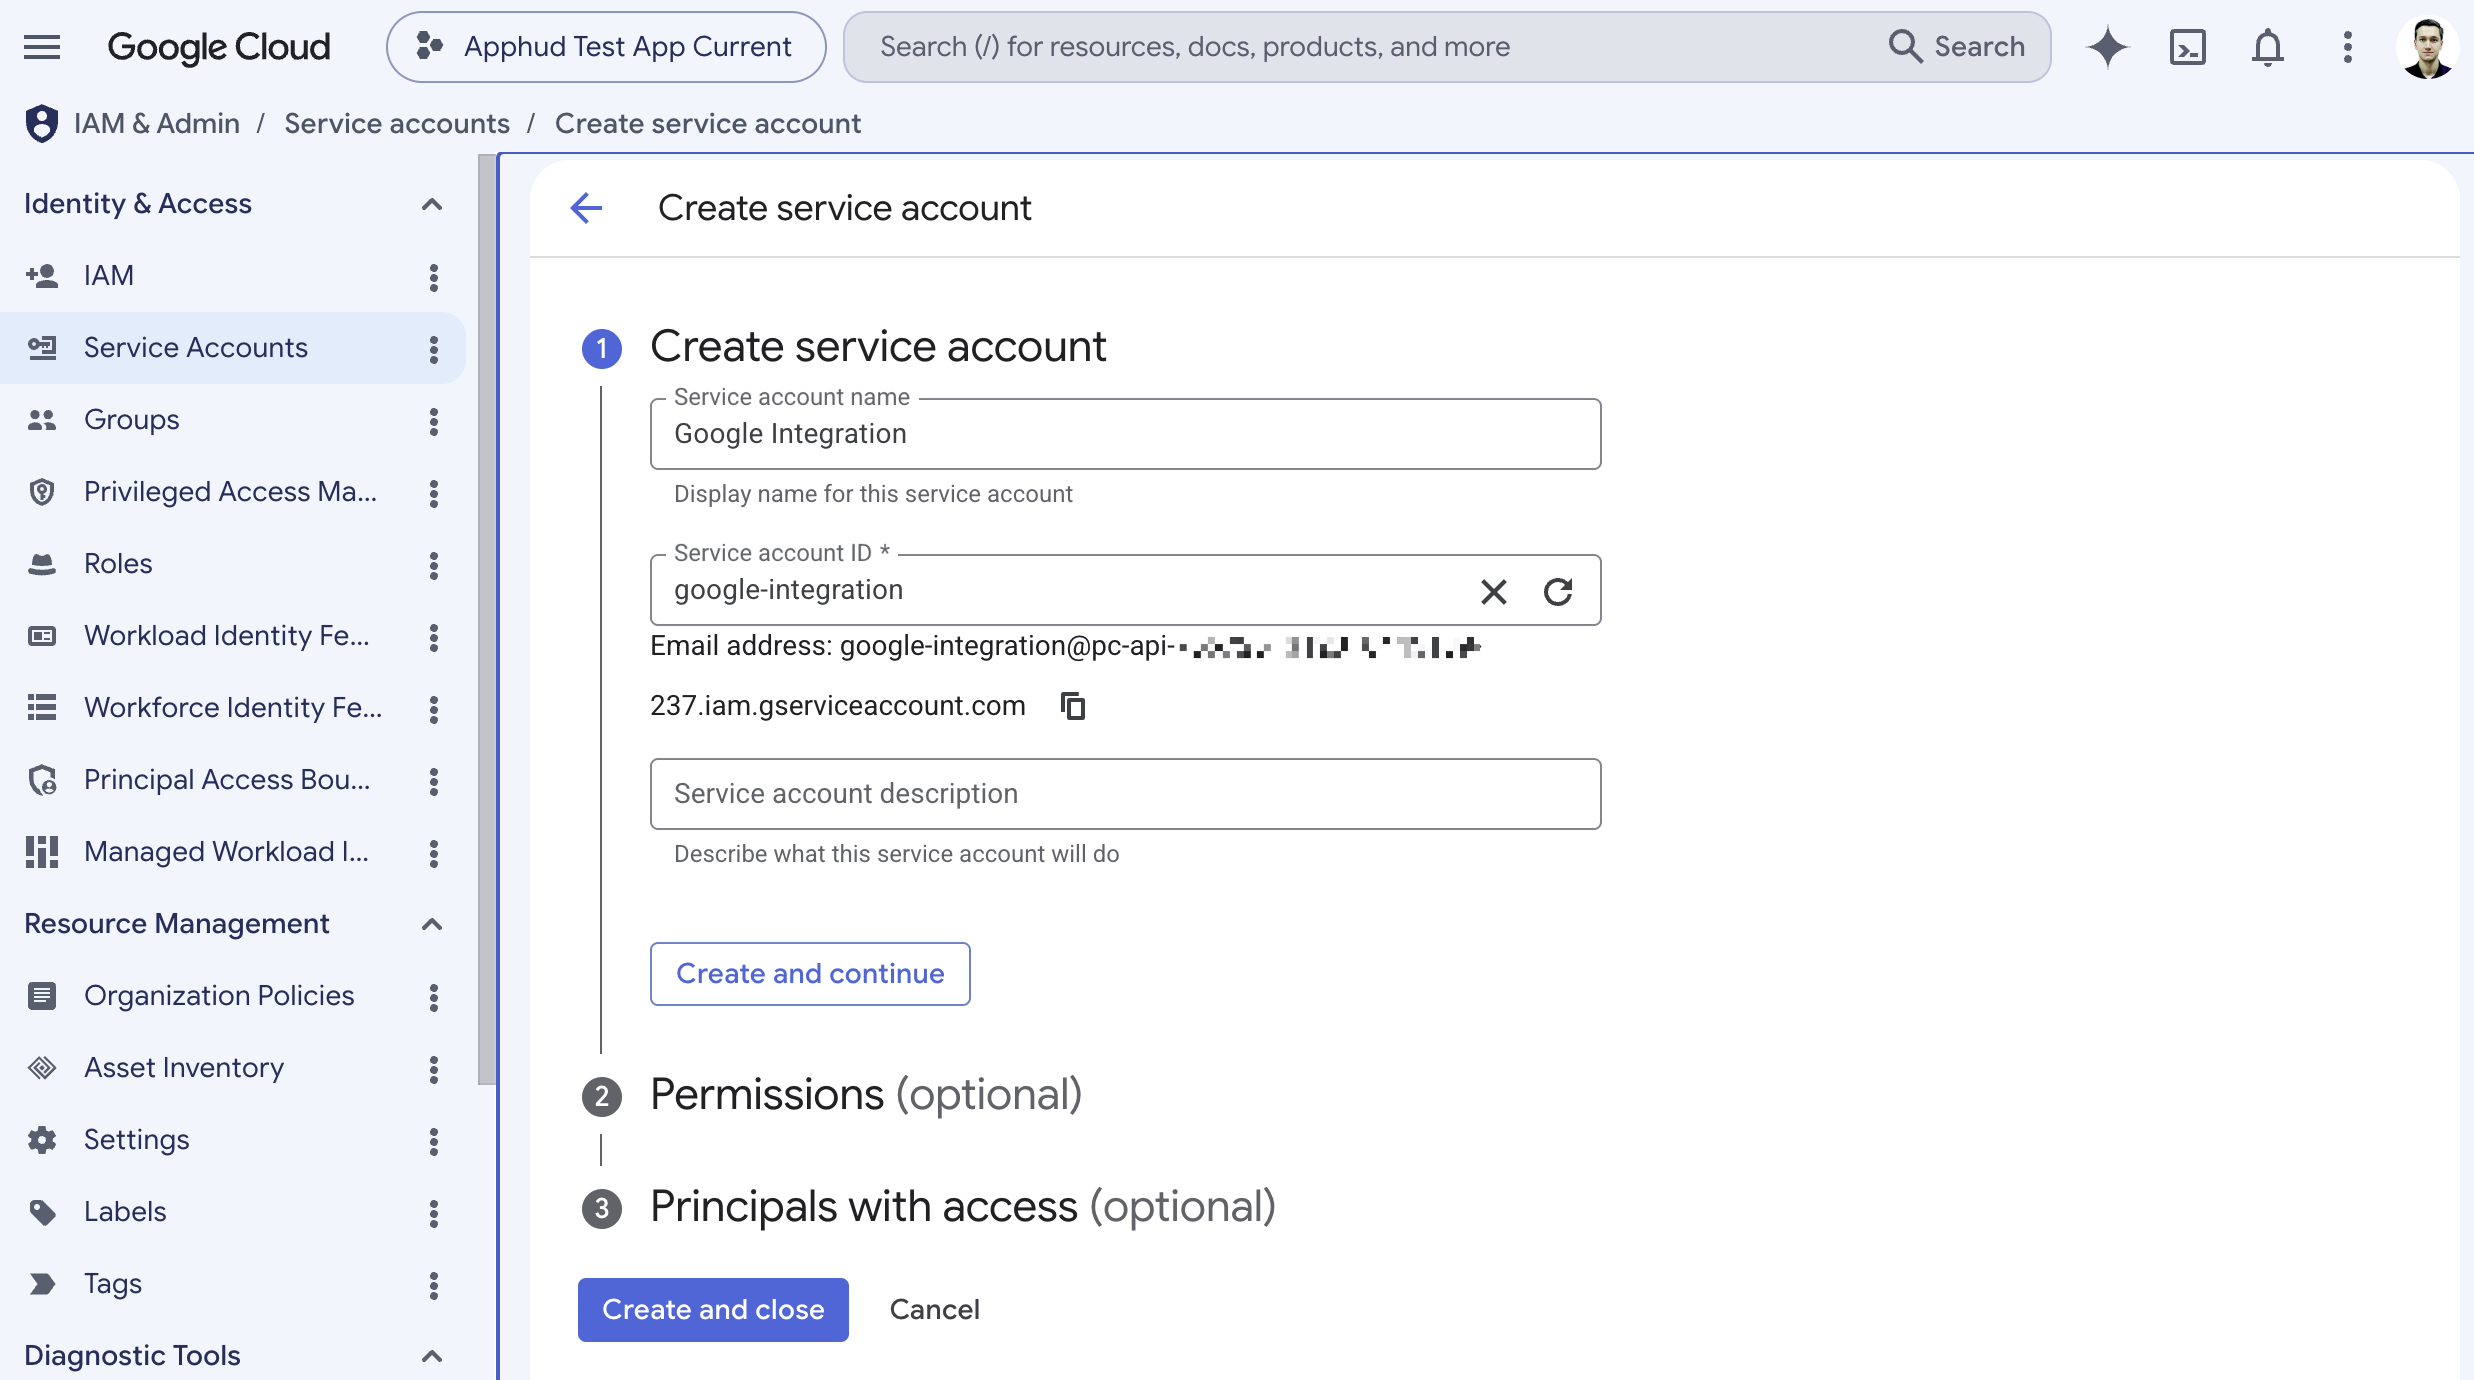
Grant it the Service Usage Consumer and Service Account Token Creator IAM roles.
-
Open the newly created service account page. In the keys section add new private key as JSON file.
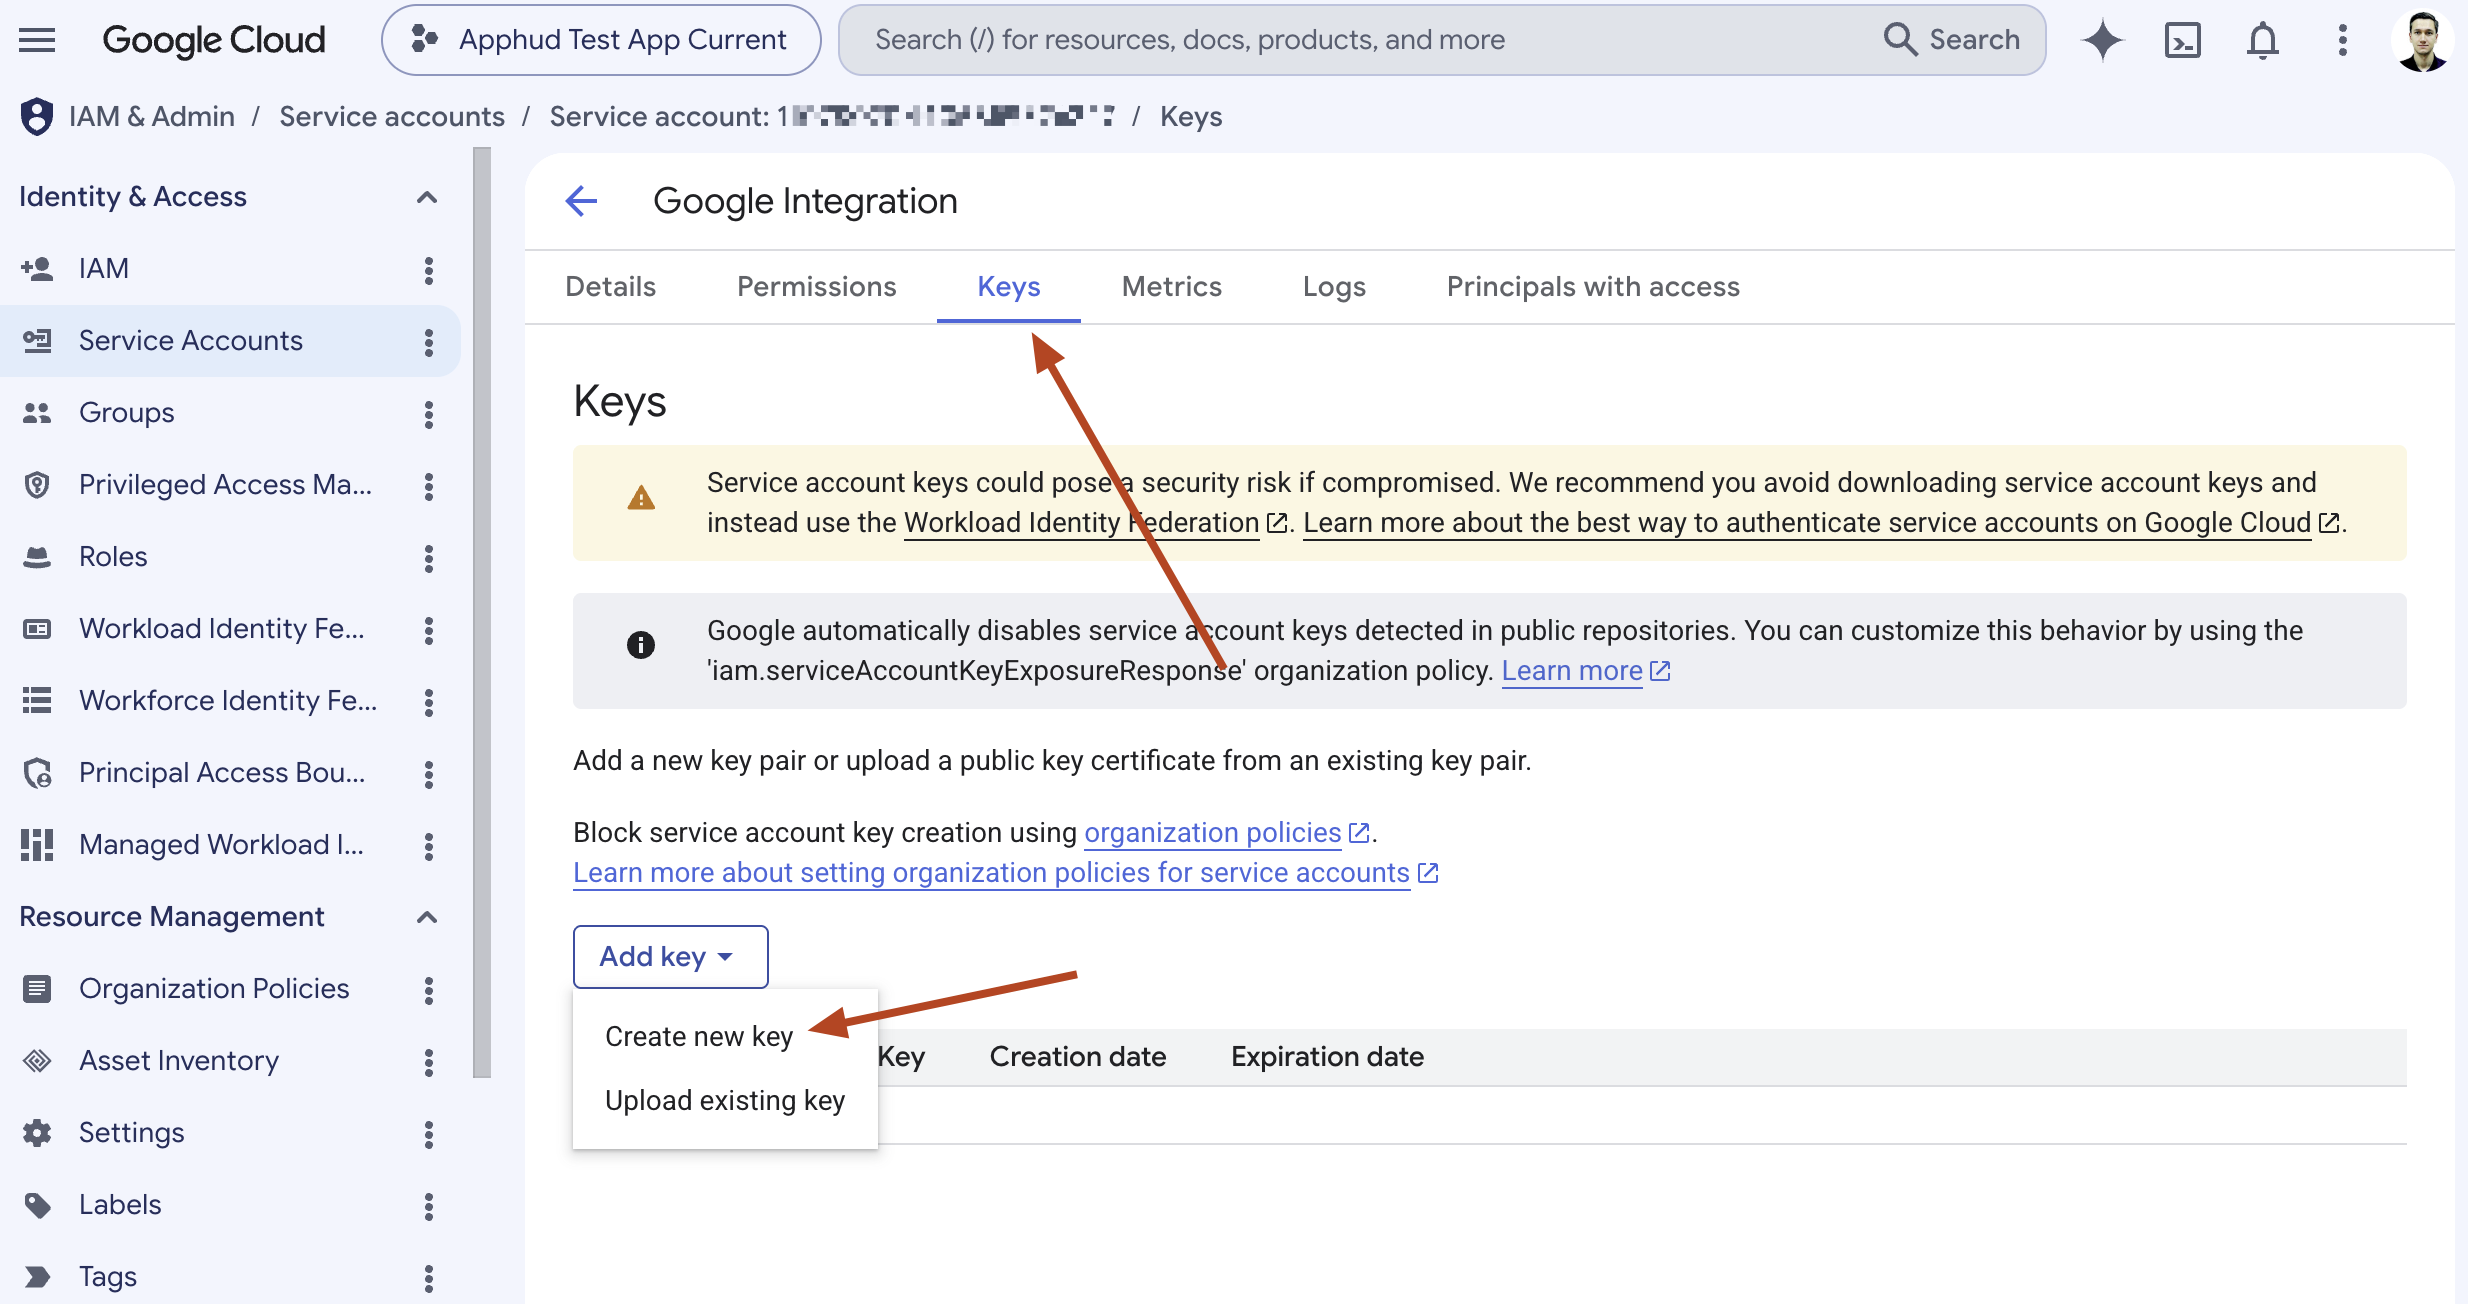
-
Invite the
client_emailfrom that JSON file to your Google Analytics property as Editor.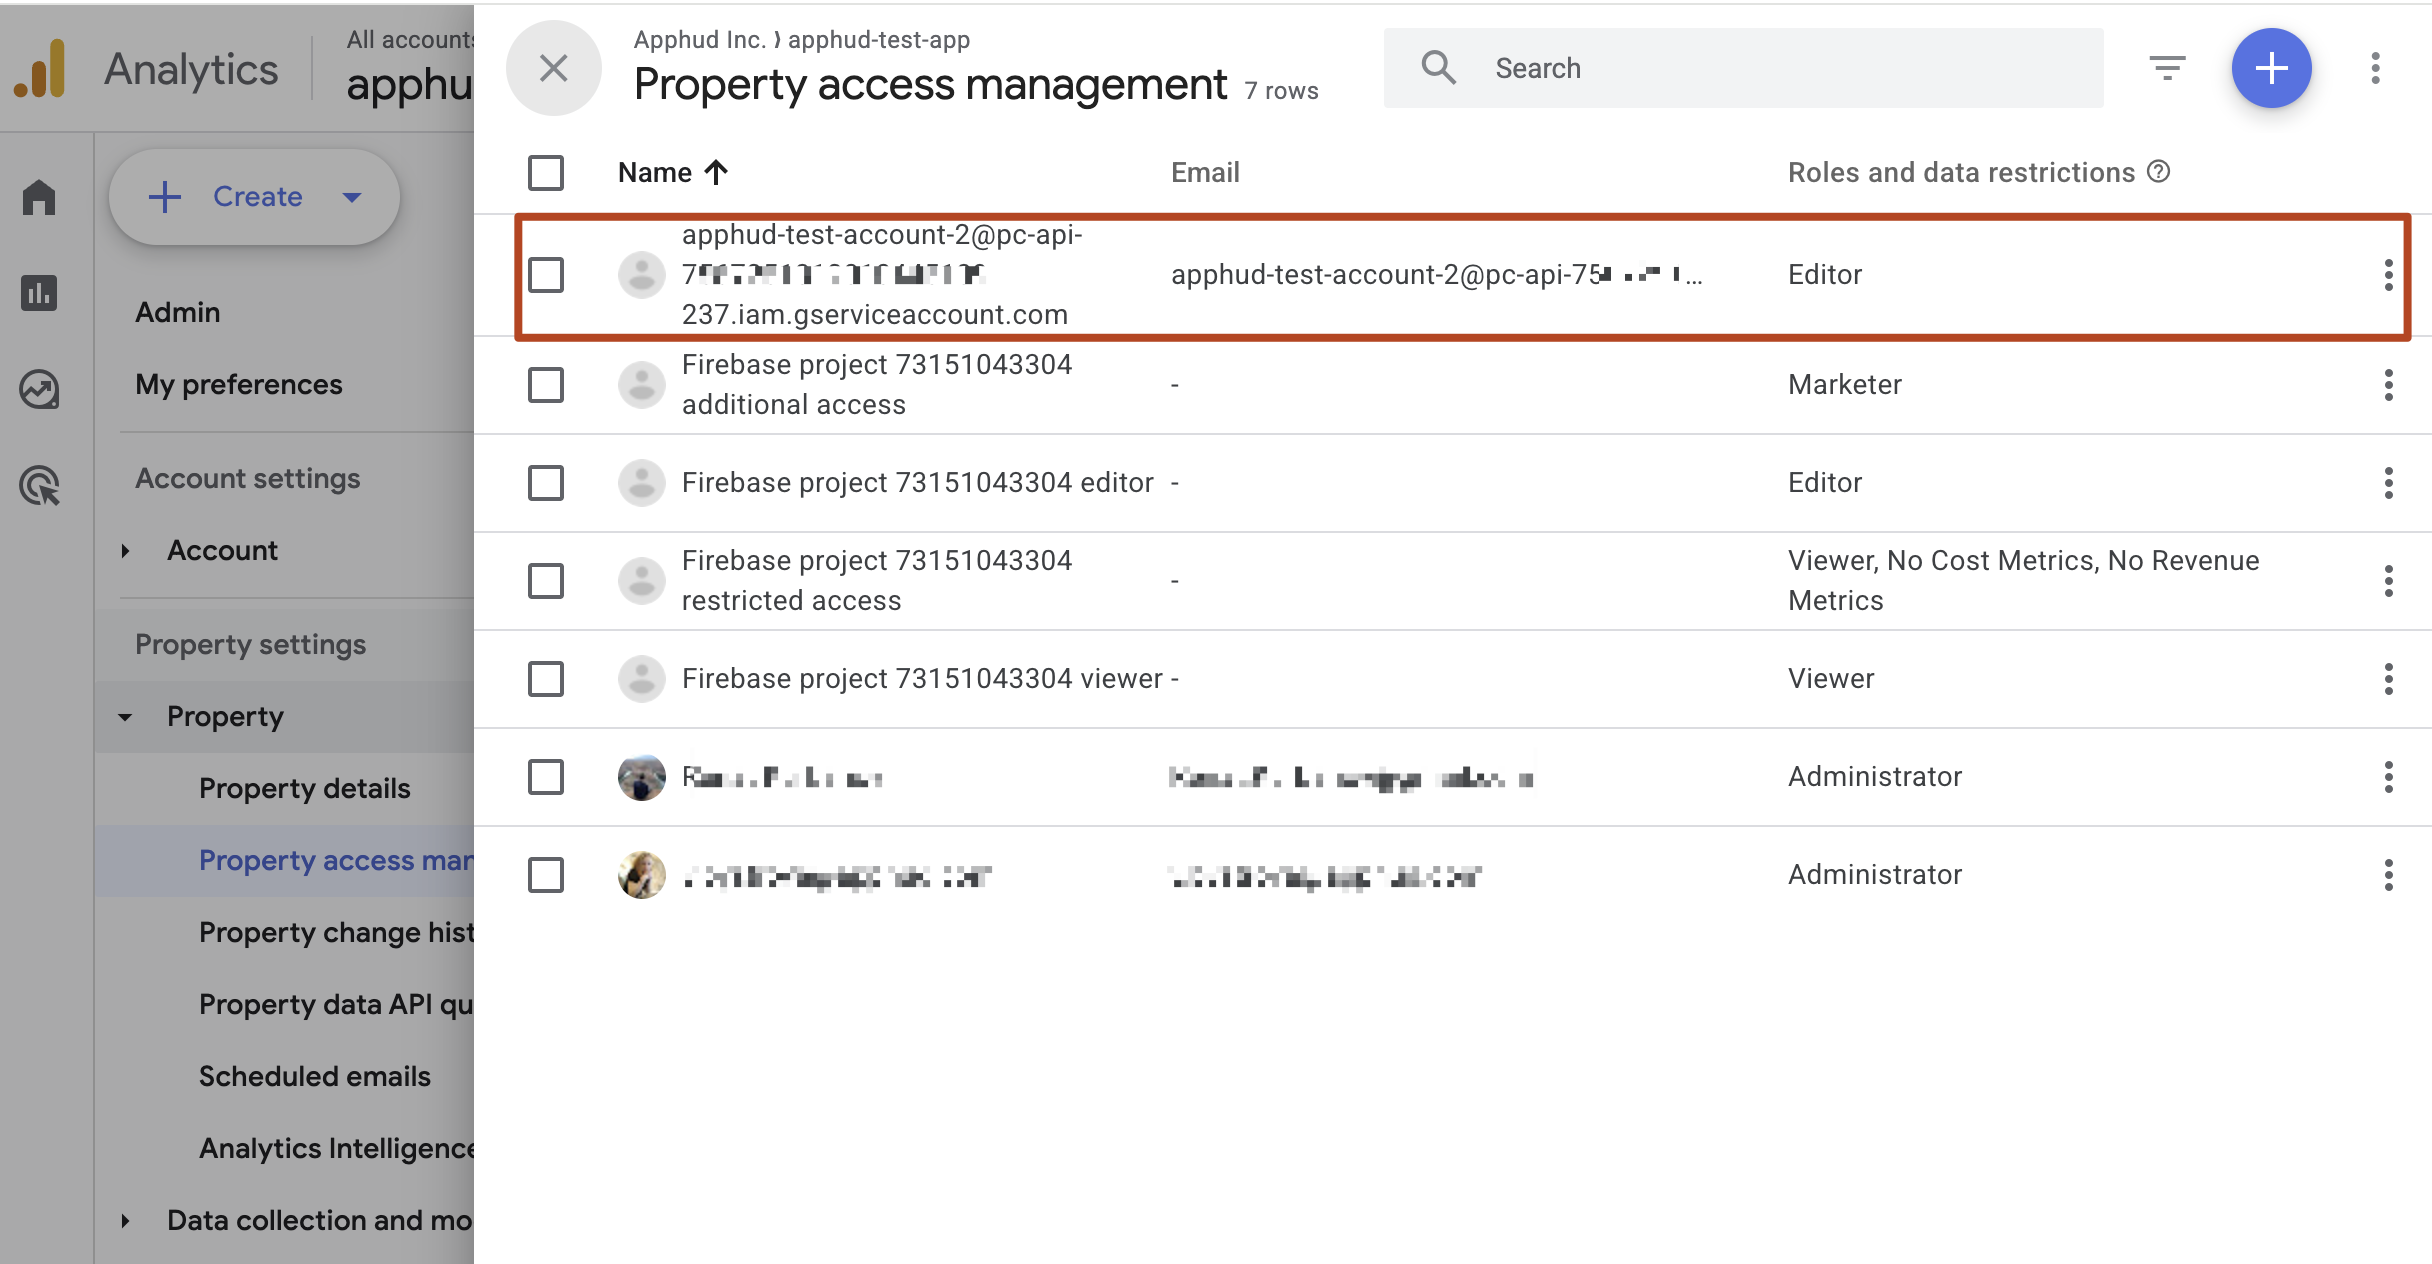
-
In the Apphud integration configuration page, fill in the two Data Manager API fields:
- Google Analytics Property ID
- Service account JSON (paste the full JSON file contents)
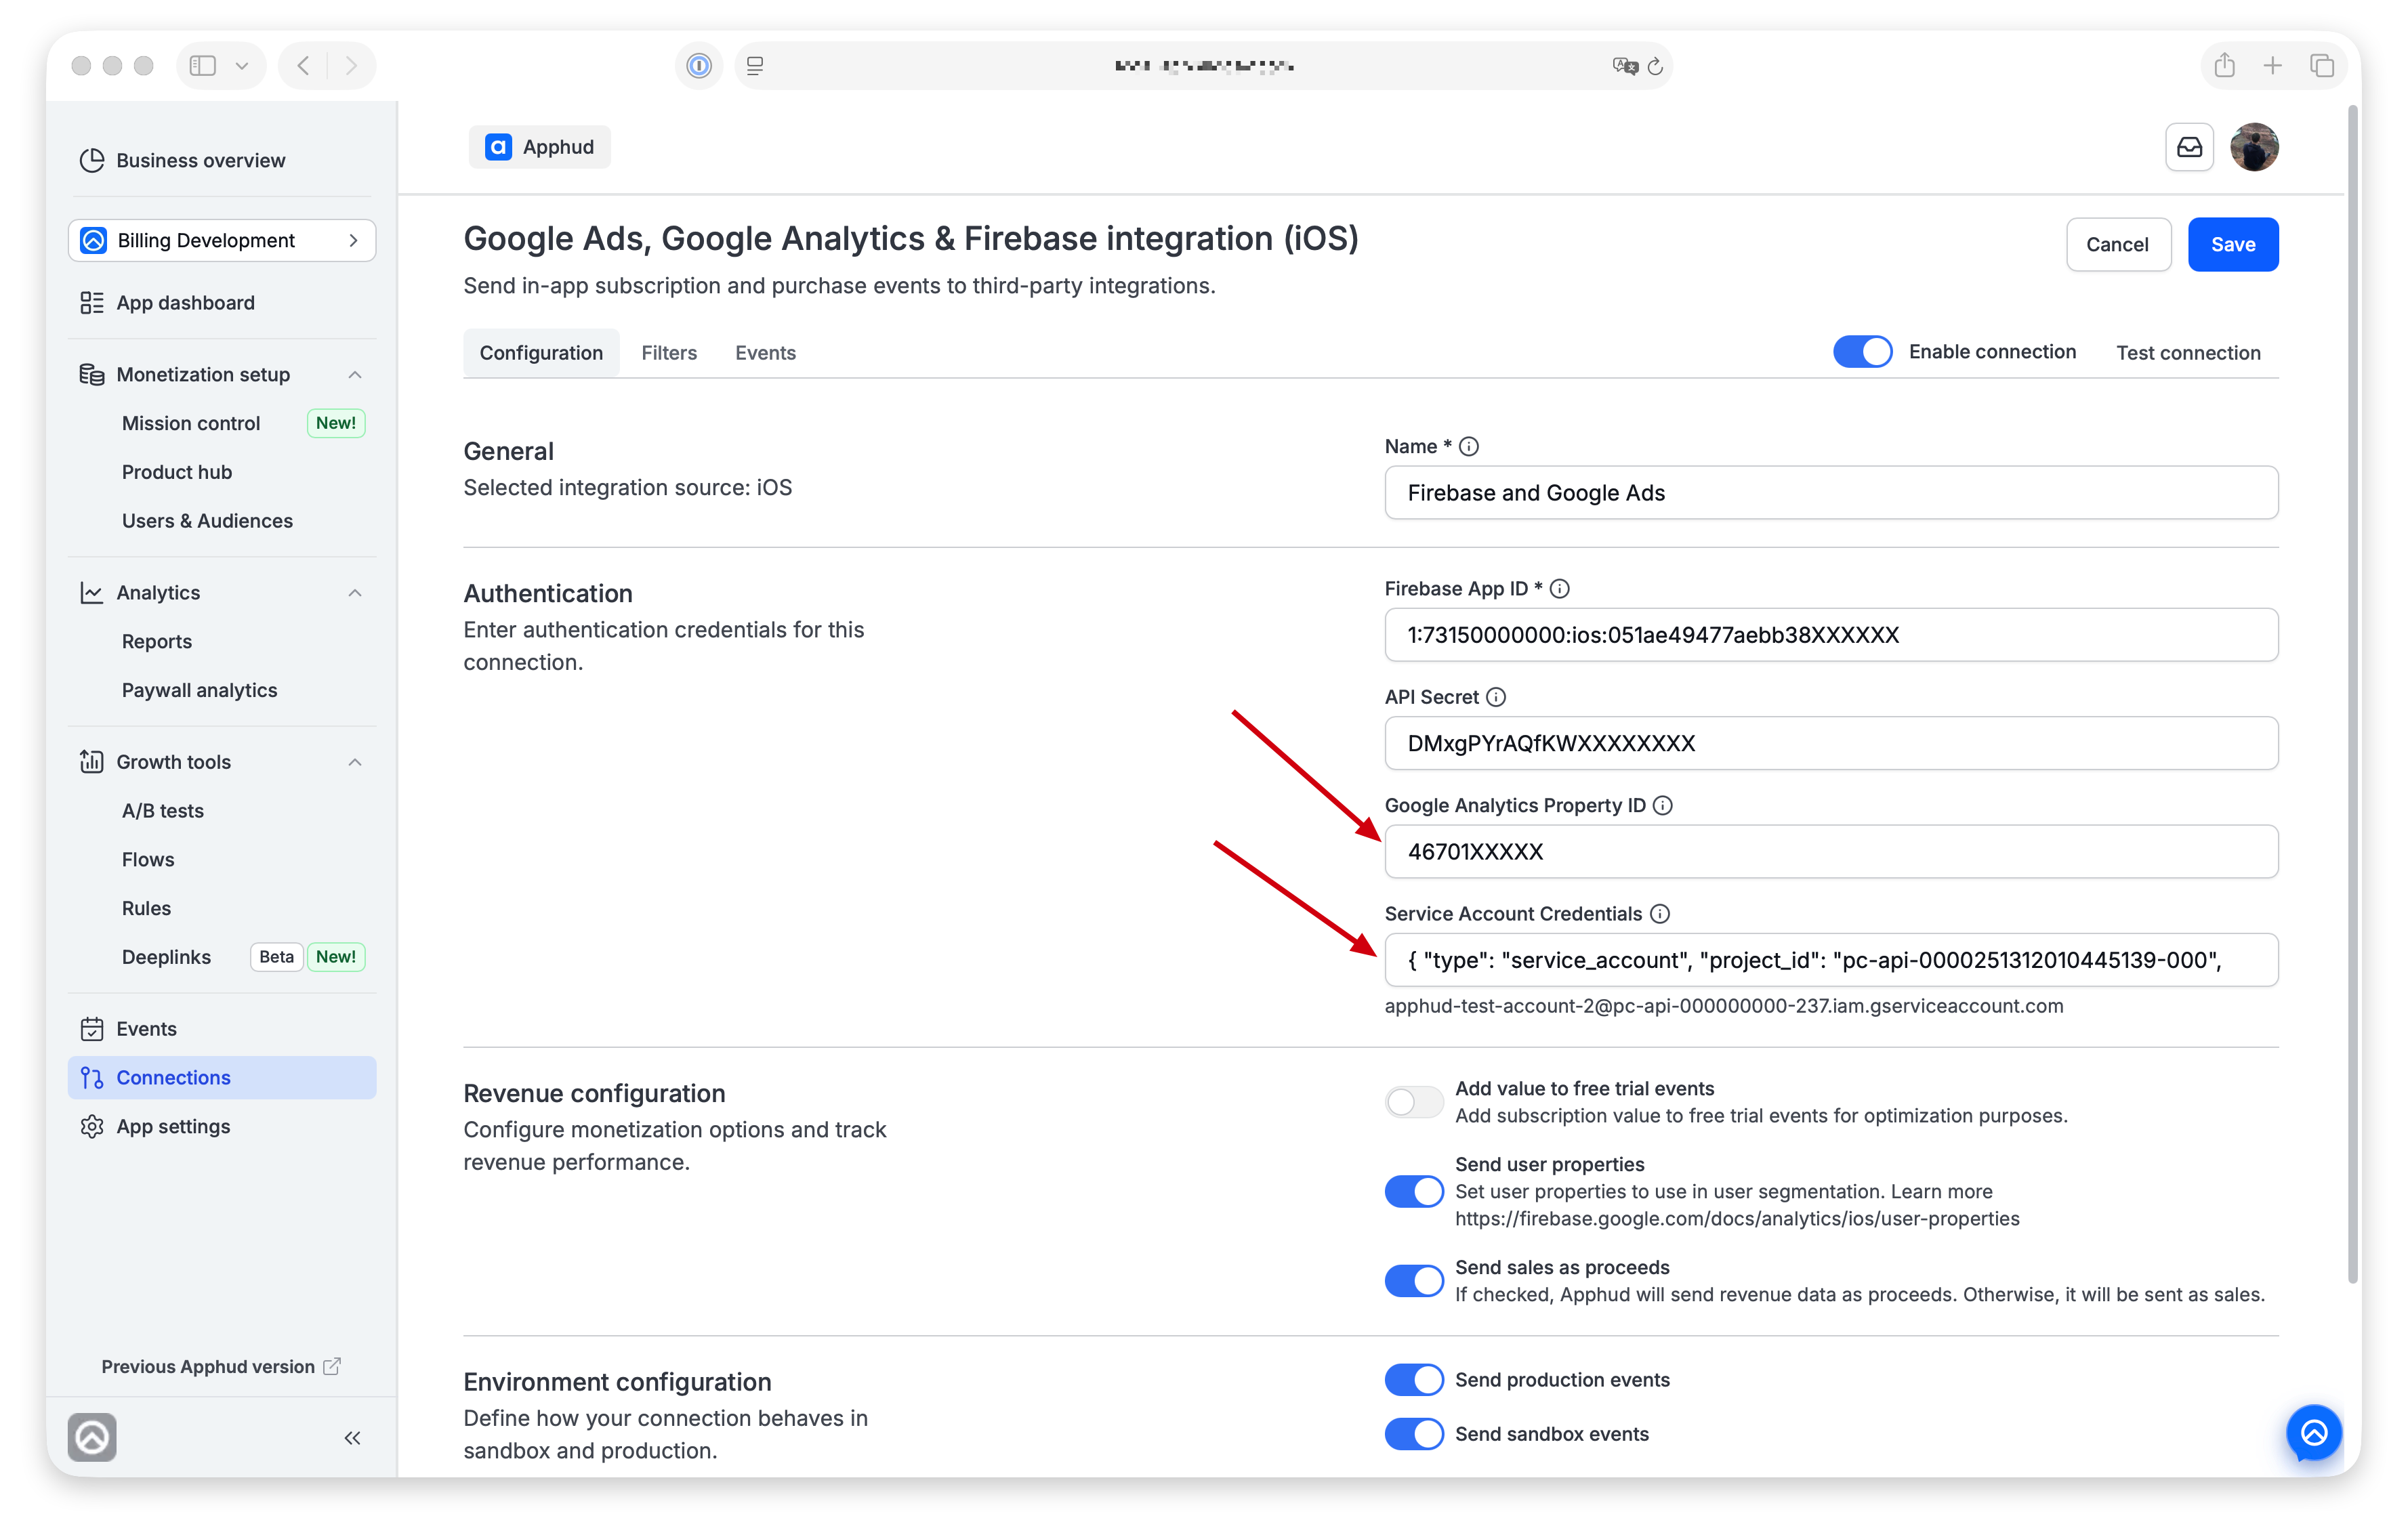
- Validate integration by using the Test connection feature. Simply enter any recent Transaction ID and view the results.
Events not showing up in Google Ads?If events are not appearing in Google Ads after you configure Data Manager API, the Google Analytics transaction-ID measurement feature may still be in closed beta by that time. Fill out the allowlist form to request access.
Additional Configuration
Environment and Revenue
Configure generic Environment and Revenue settings as described on Integrations overview → Configuration tab.
The Revenue configuration section has two Firebase-specific option:
- Add Value to Free Trial Events — when enabled, assigns a subscription value to free trial events, helping improve optimization. See Events Mapping for why this matters.
- Send user properties — enabled by default. When enabled, Apphud includes Apphud user properties in Firebase / Google Analytics events so you can use them for segmentation, Custom Definitions, and audiences. Disable it if you do not want Apphud to send user properties with Firebase events. For more details check official documentation.
Set up filters (optional)
Navigate to Filters tab. Set up filters if needed as described on Integrations overview → Filters tab.
Set up Events list
Open the Events tab of the configuration. You can enable, disable, or rename individual events.
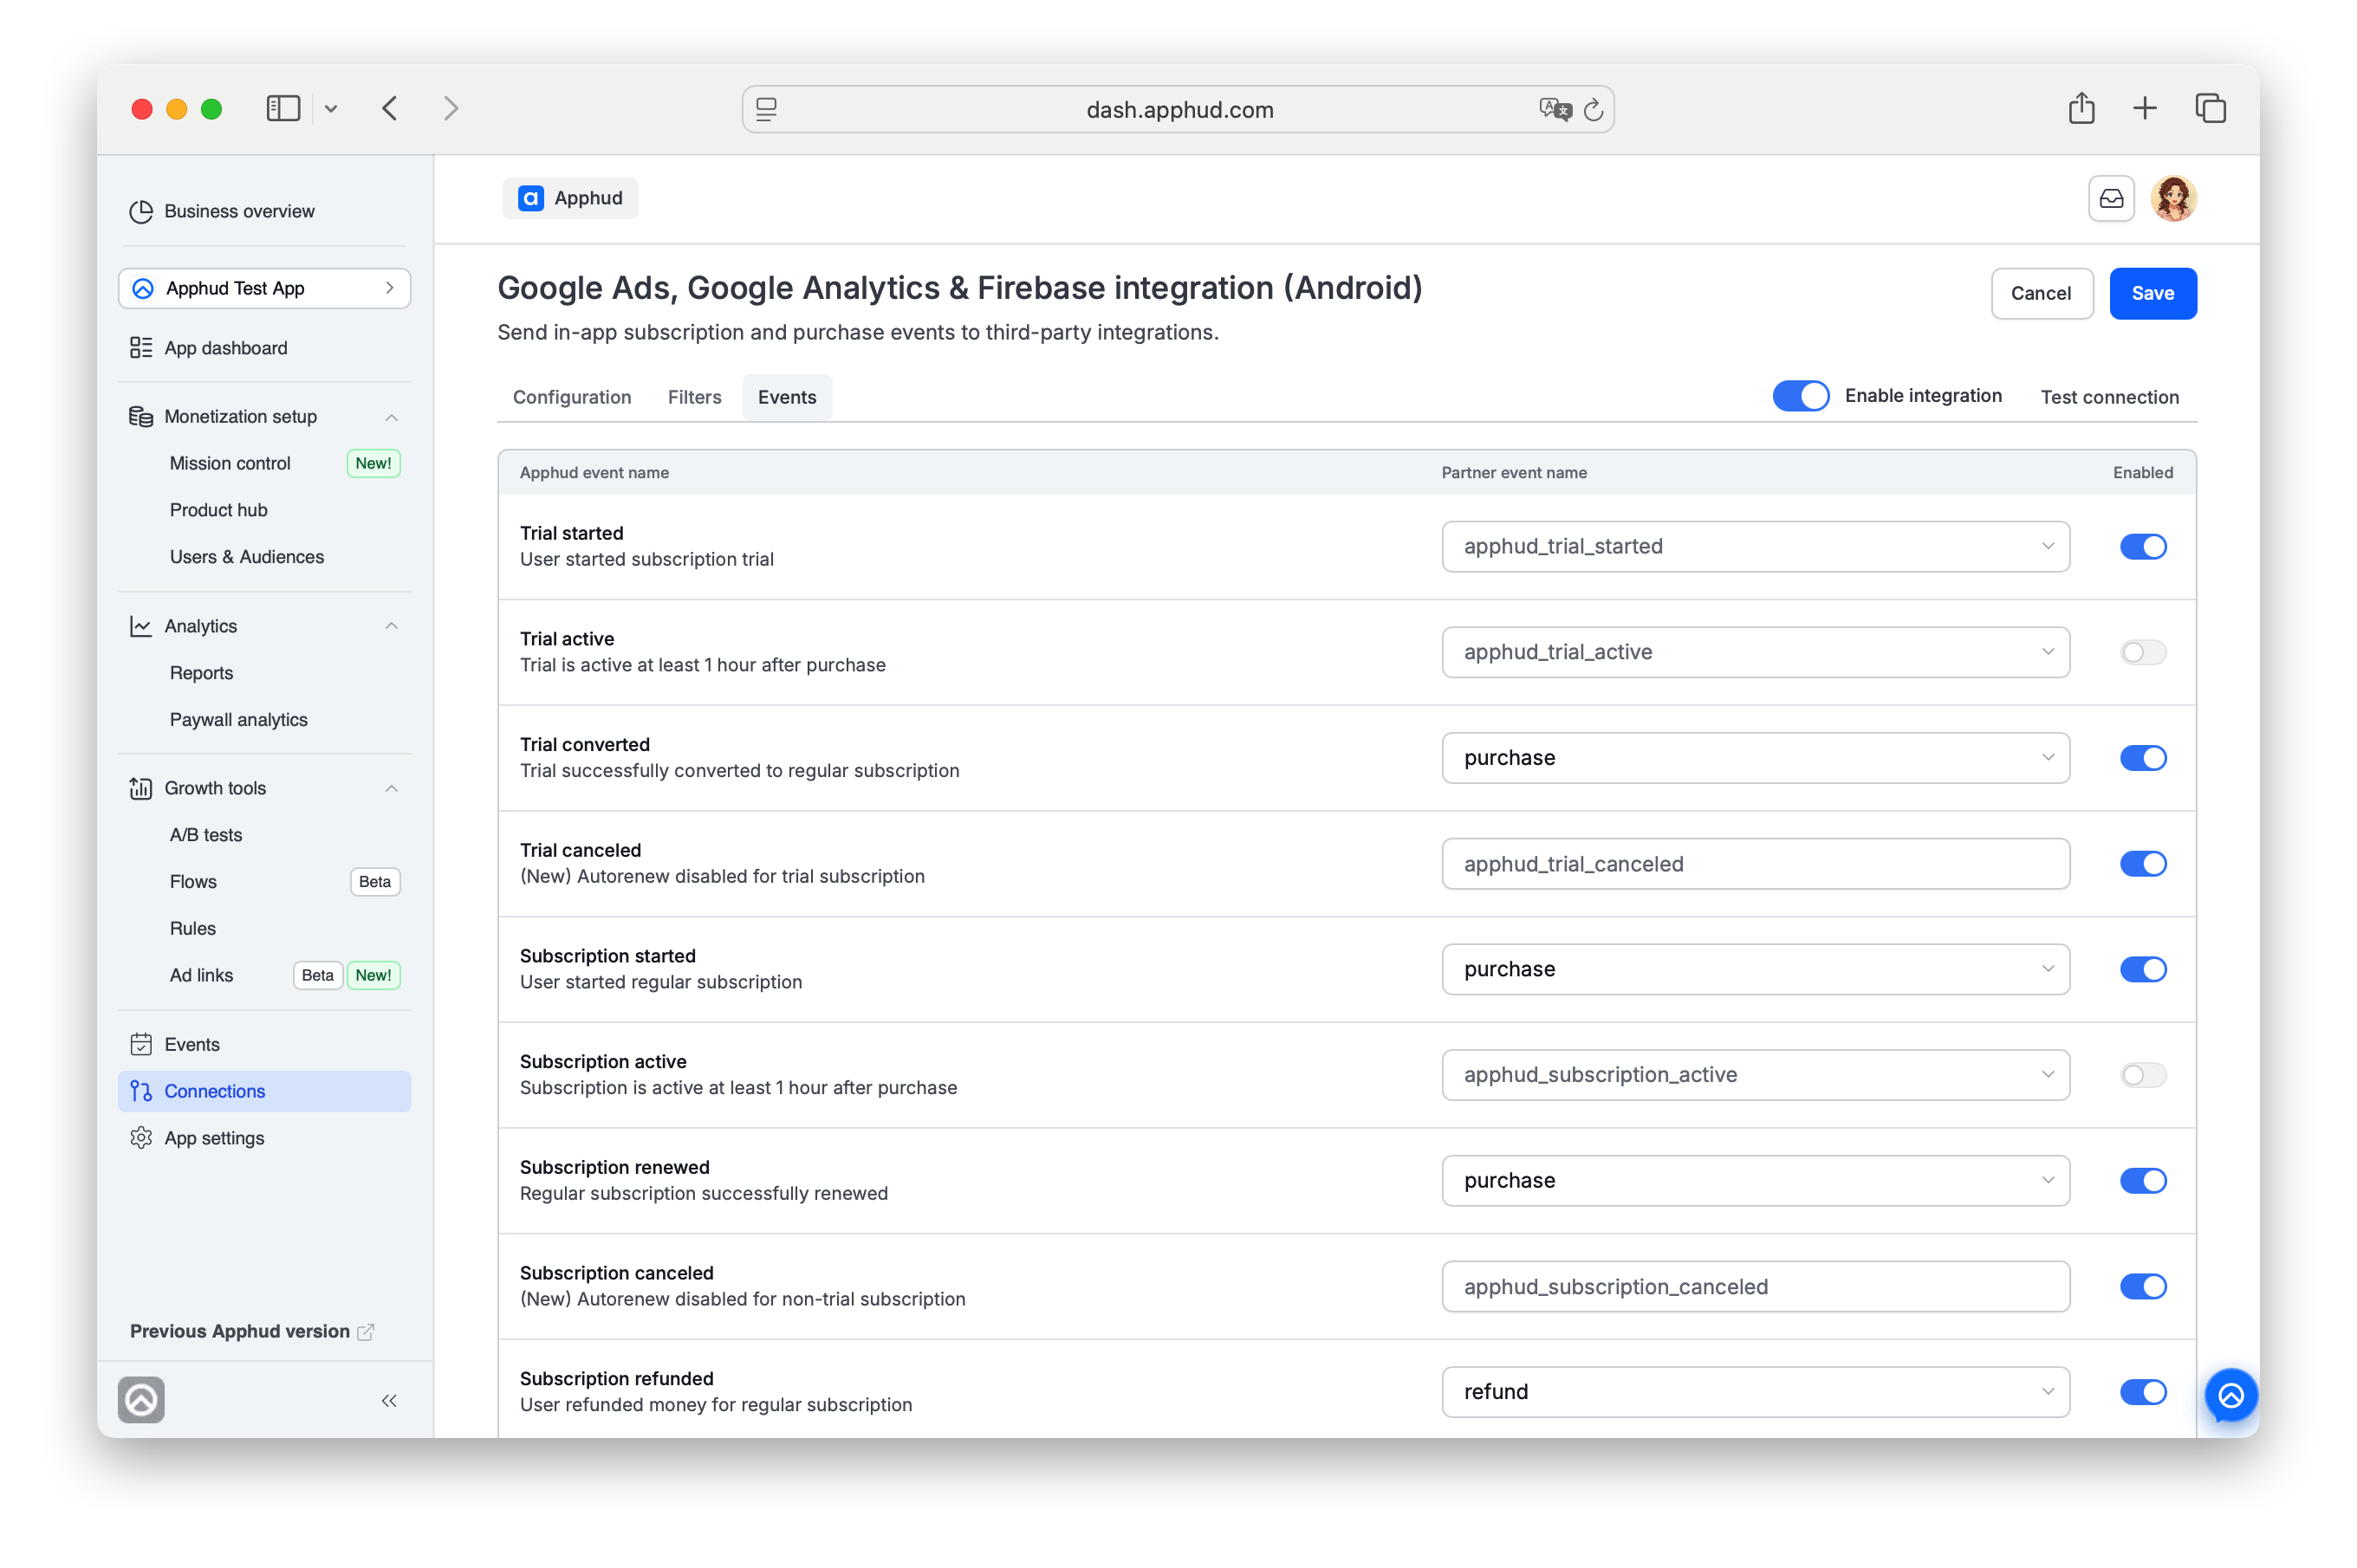
Apphud uses the following default mapping:
| Apphud Event Name | Firebase Event Name |
|---|---|
| Trial Started | apphud_trial_started |
| Trial Converted, Subscription Started, Subscription Renewed, and other revenue events | purchase |
| Trial Canceled, Subscription Canceled, Paywall Checkout Initiated, etc. | apphud_trial_canceled, apphud_subscription_canceled, apphud_paywall_checkount_initiated, etc. |
| Subscription Refunded | refund |
See Events Mapping below for rules on renaming events.
Test connection (optional)
Save the connection.
For the general integration configuration testing flow see Integrations overview → Test connection.
Measurement Protocol
When Measurement Protocol credentials are configured and you click Test connection, Apphud sends the test event to Google Analytics 4 Measurement Protocol's debug validation endpoint. This checks the event's parameters and your event mapping without waiting for normal GA4 processing. Open the Response tab: an empty "validationMessages": [] with HTTP 200 means the event is valid; any entries describe what's wrong — decode them with Google's Validating events reference and fix the mapping before making a real test purchase.
The test request is only for validation — it's not a regular production event and is not recorded in your reports. Production Firebase / Google Analytics events can still take 3–6 hours to appear.
A passing test doesn't verify Measurement Protocol credentialsGA4's validation endpoint accepts the request even when the Firebase App ID or API Secret is wrong — it returns an empty
validationMessageseither way. So a green result confirms the event format, not that your Measurement Protocol credentials are correct. To confirm real delivery, make a test purchase and check it reaches GA4.
Will test / sandbox events show up in Google Analytics?These are two different things:
- Test connection (Measurement Protocol) hits GA4's validation endpoint — it only checks the event and is never recorded in your reports (this is the "test events don't show" note in Google's docs).
- Real events are recorded in GA4 whether you use Measurement Protocol or Data Manager API. If you enabled Sandbox in the integration's Environment settings, sandbox purchases are real events too — they appear in GA4 (Realtime first, then standard reports after the usual few hours).
Data Manager API
If you use Data Manager API, confirm delivery with a real test purchase and check that the event appears in Google Analytics (and in Google Ads after import). If events do not show up in Google Ads, see the allowlist note above.
End-to-end check
To verify the integration end-to-end:
- Make sure Firebase SDK is properly integrated and the Apphud Google Ads (Firebase & Google Analytics) integration is configured with your chosen authentication method.
- Make sure user matching code (
Analytics.setUserID(Apphud.userID())) is called on every app launch. - Make a test purchase.
- Events typically take 3–6 hours to appear in Firebase and Google Analytics.
Enable and save
Once you confirmed the connection works — Enable integration and Save.
Match Users (required)
To correctly collect events sent from both the Firebase SDK and the Apphud server, you must match User IDs between Apphud and Firebase. For every app launch, call:
Analytics.setUserID(Apphud.userID())
if let instanceID = Analytics.appInstanceID() {
    Apphud.setAttribution(data: nil, from: .firebase, identifer: instanceID,  callback: nil)
} else {
  // app instance id is nil, unable to match user
}
FirebaseAnalytics.getInstance(this).setUserId(Apphud.userId())
FirebaseAnalytics.getInstance(this).appInstanceId.addOnSuccessListener { instanceID ->
Apphud.setAttribution(ApphudAttributionProvider.firebase, null, instanceID)
}.addOnFailureListener {
// Optional - Show some error
}.addOnCanceledListener {
//Optional - Show some error
}Future<void> _initFirebase() async {
final userId = await Apphud.userID();
await FirebaseAnalytics.instance.setUserId(id: userId);
final identifier = await FirebaseAnalytics.instance.appInstanceId;
await Apphud.setAttribution(provider: ApphudAttributionProvider.firebase, identifier: identifier);
}More information about User ID matching: Google Analytics — User ID.
Import Conversions to Google Ads
Follow these steps:
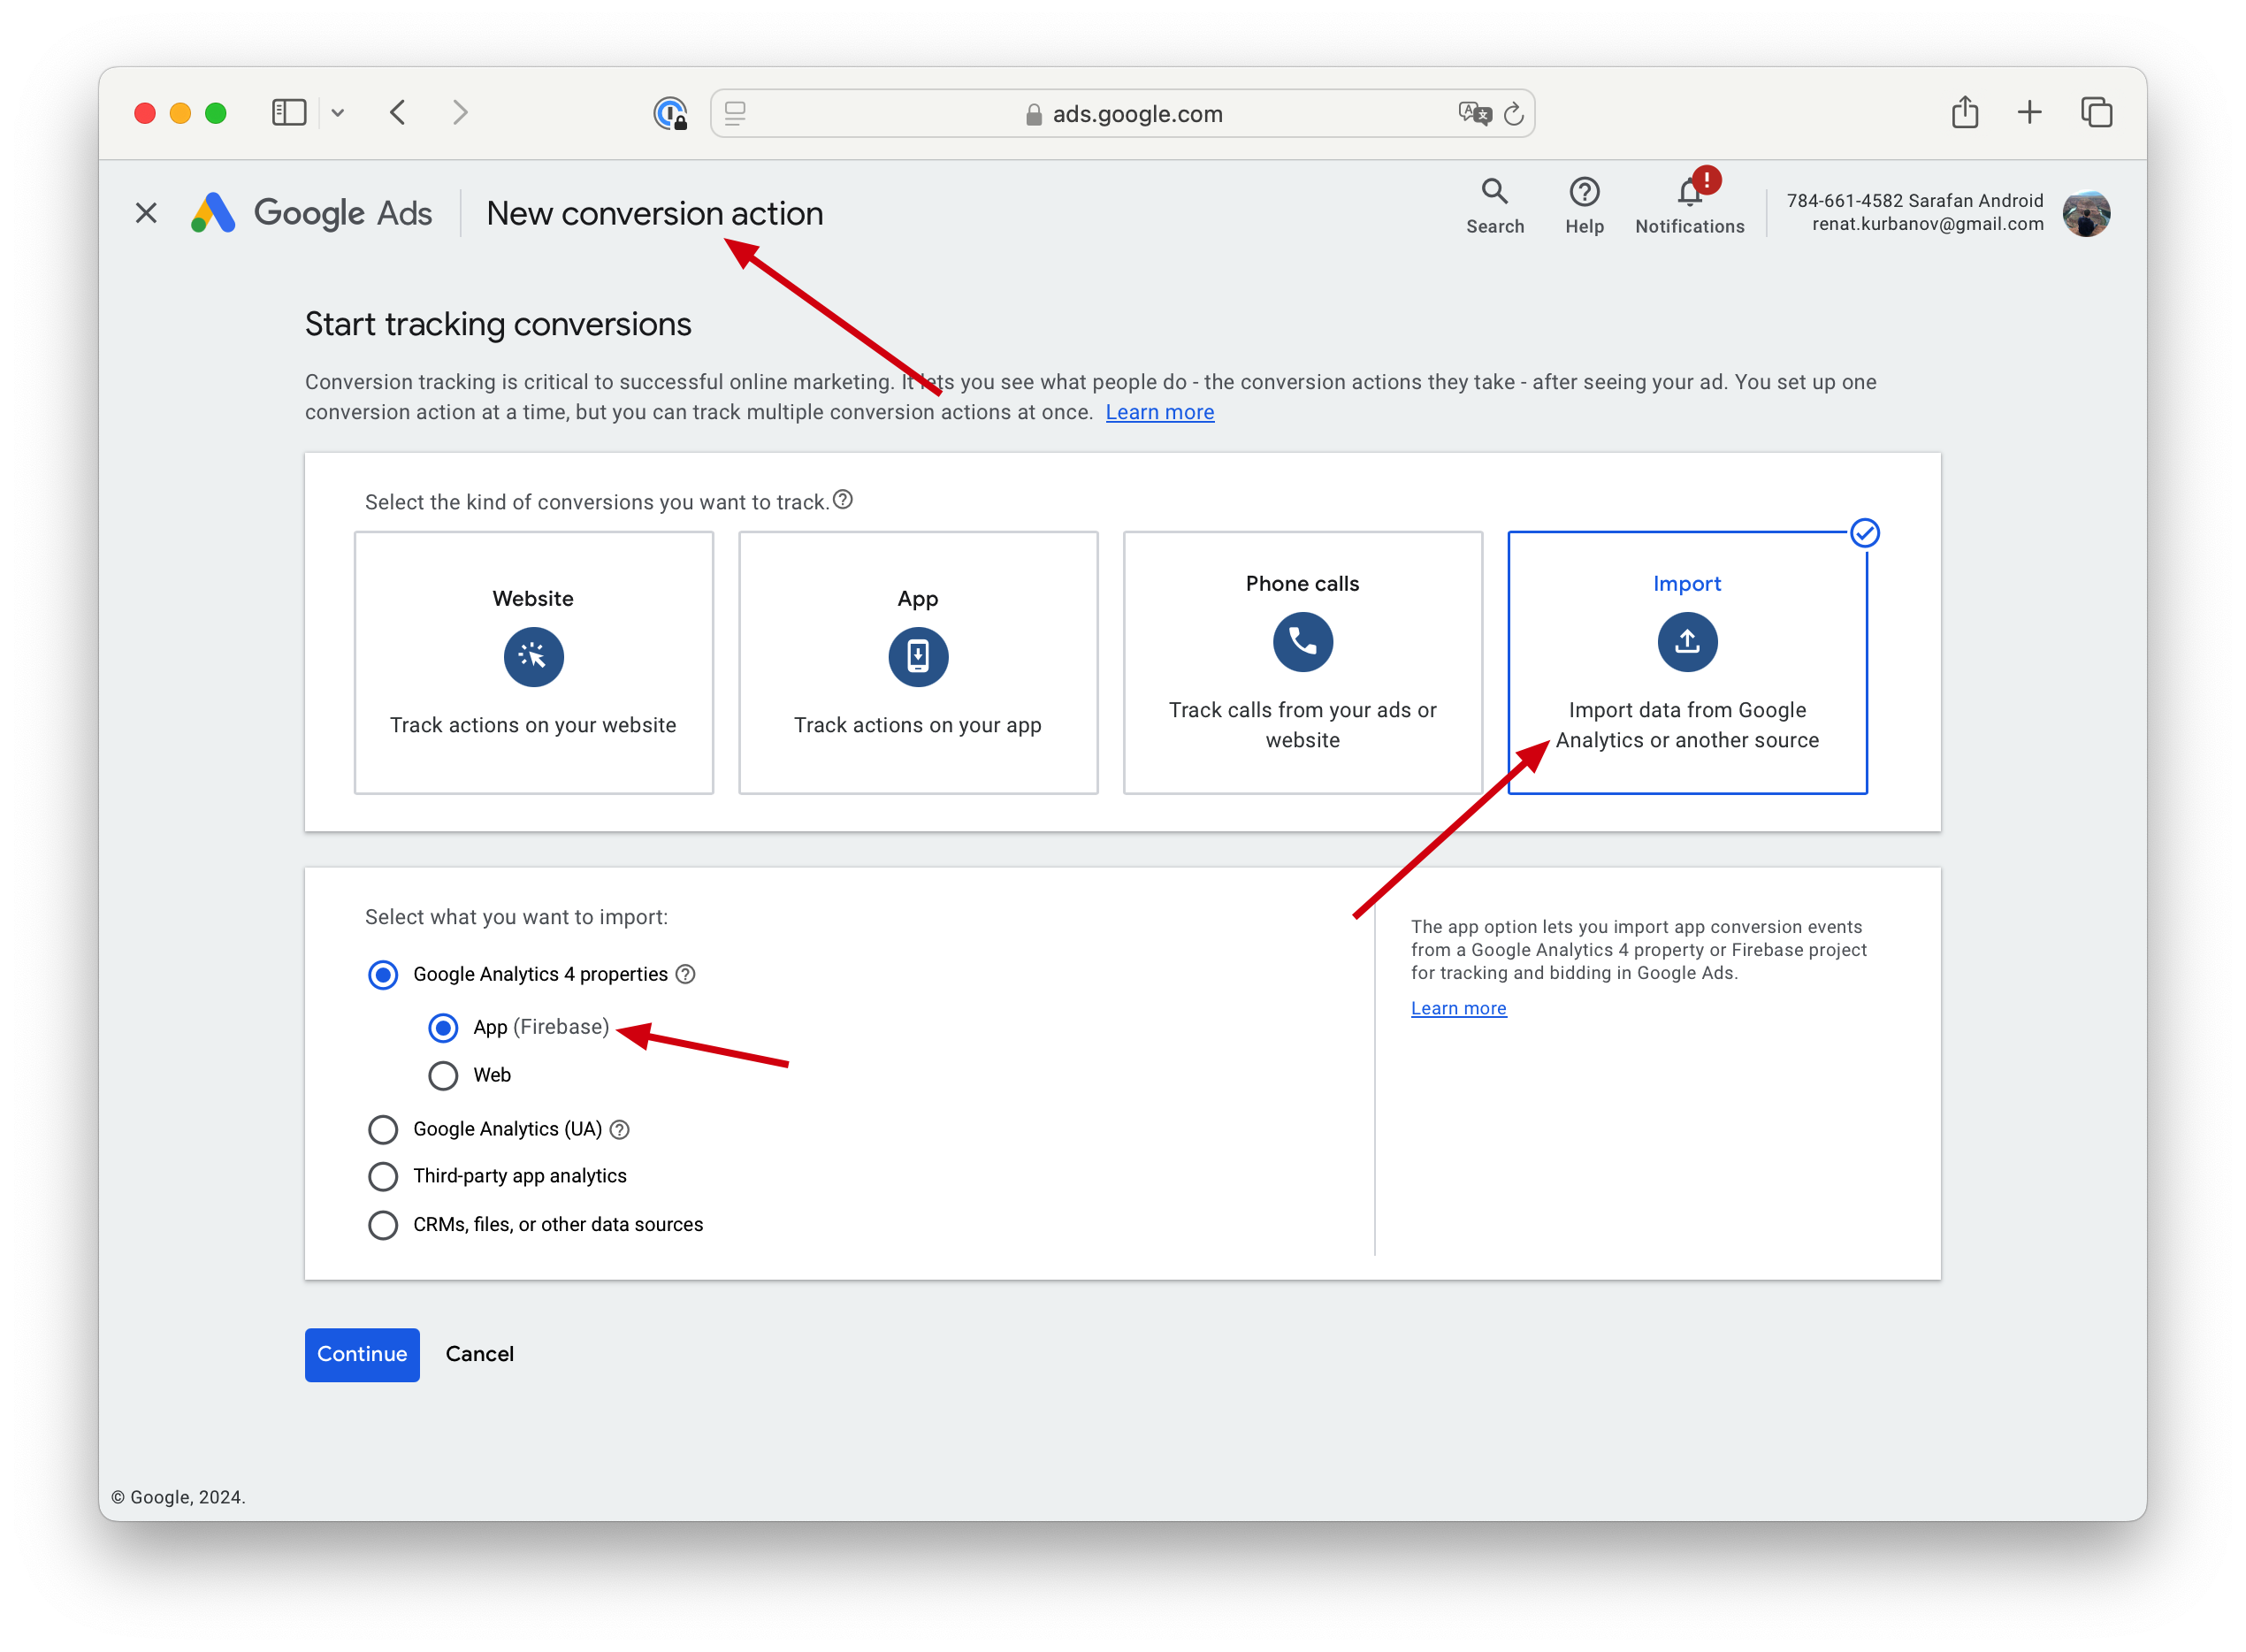
- Open your Google Ads account and go to Goals → New Conversion Action.
- Select Import from Google Analytics.
- Select Google Analytics 4 properties.
- Select App (Firebase).
- Click Continue.
- Select a conversion action from the list and save.
- Your events will now show up in Google Ads.
Missing Conversion Event?If you don't see the desired conversion event, check the following:
- Check if your event mapping is one of the standard events list. Note that the free trial event doesn't have
currencyandvalueparameters, and subscription renewal events must havecurrencyandvalue.- Ask for user tracking permission (Collect IDFA) in your app.
- Collect more events.
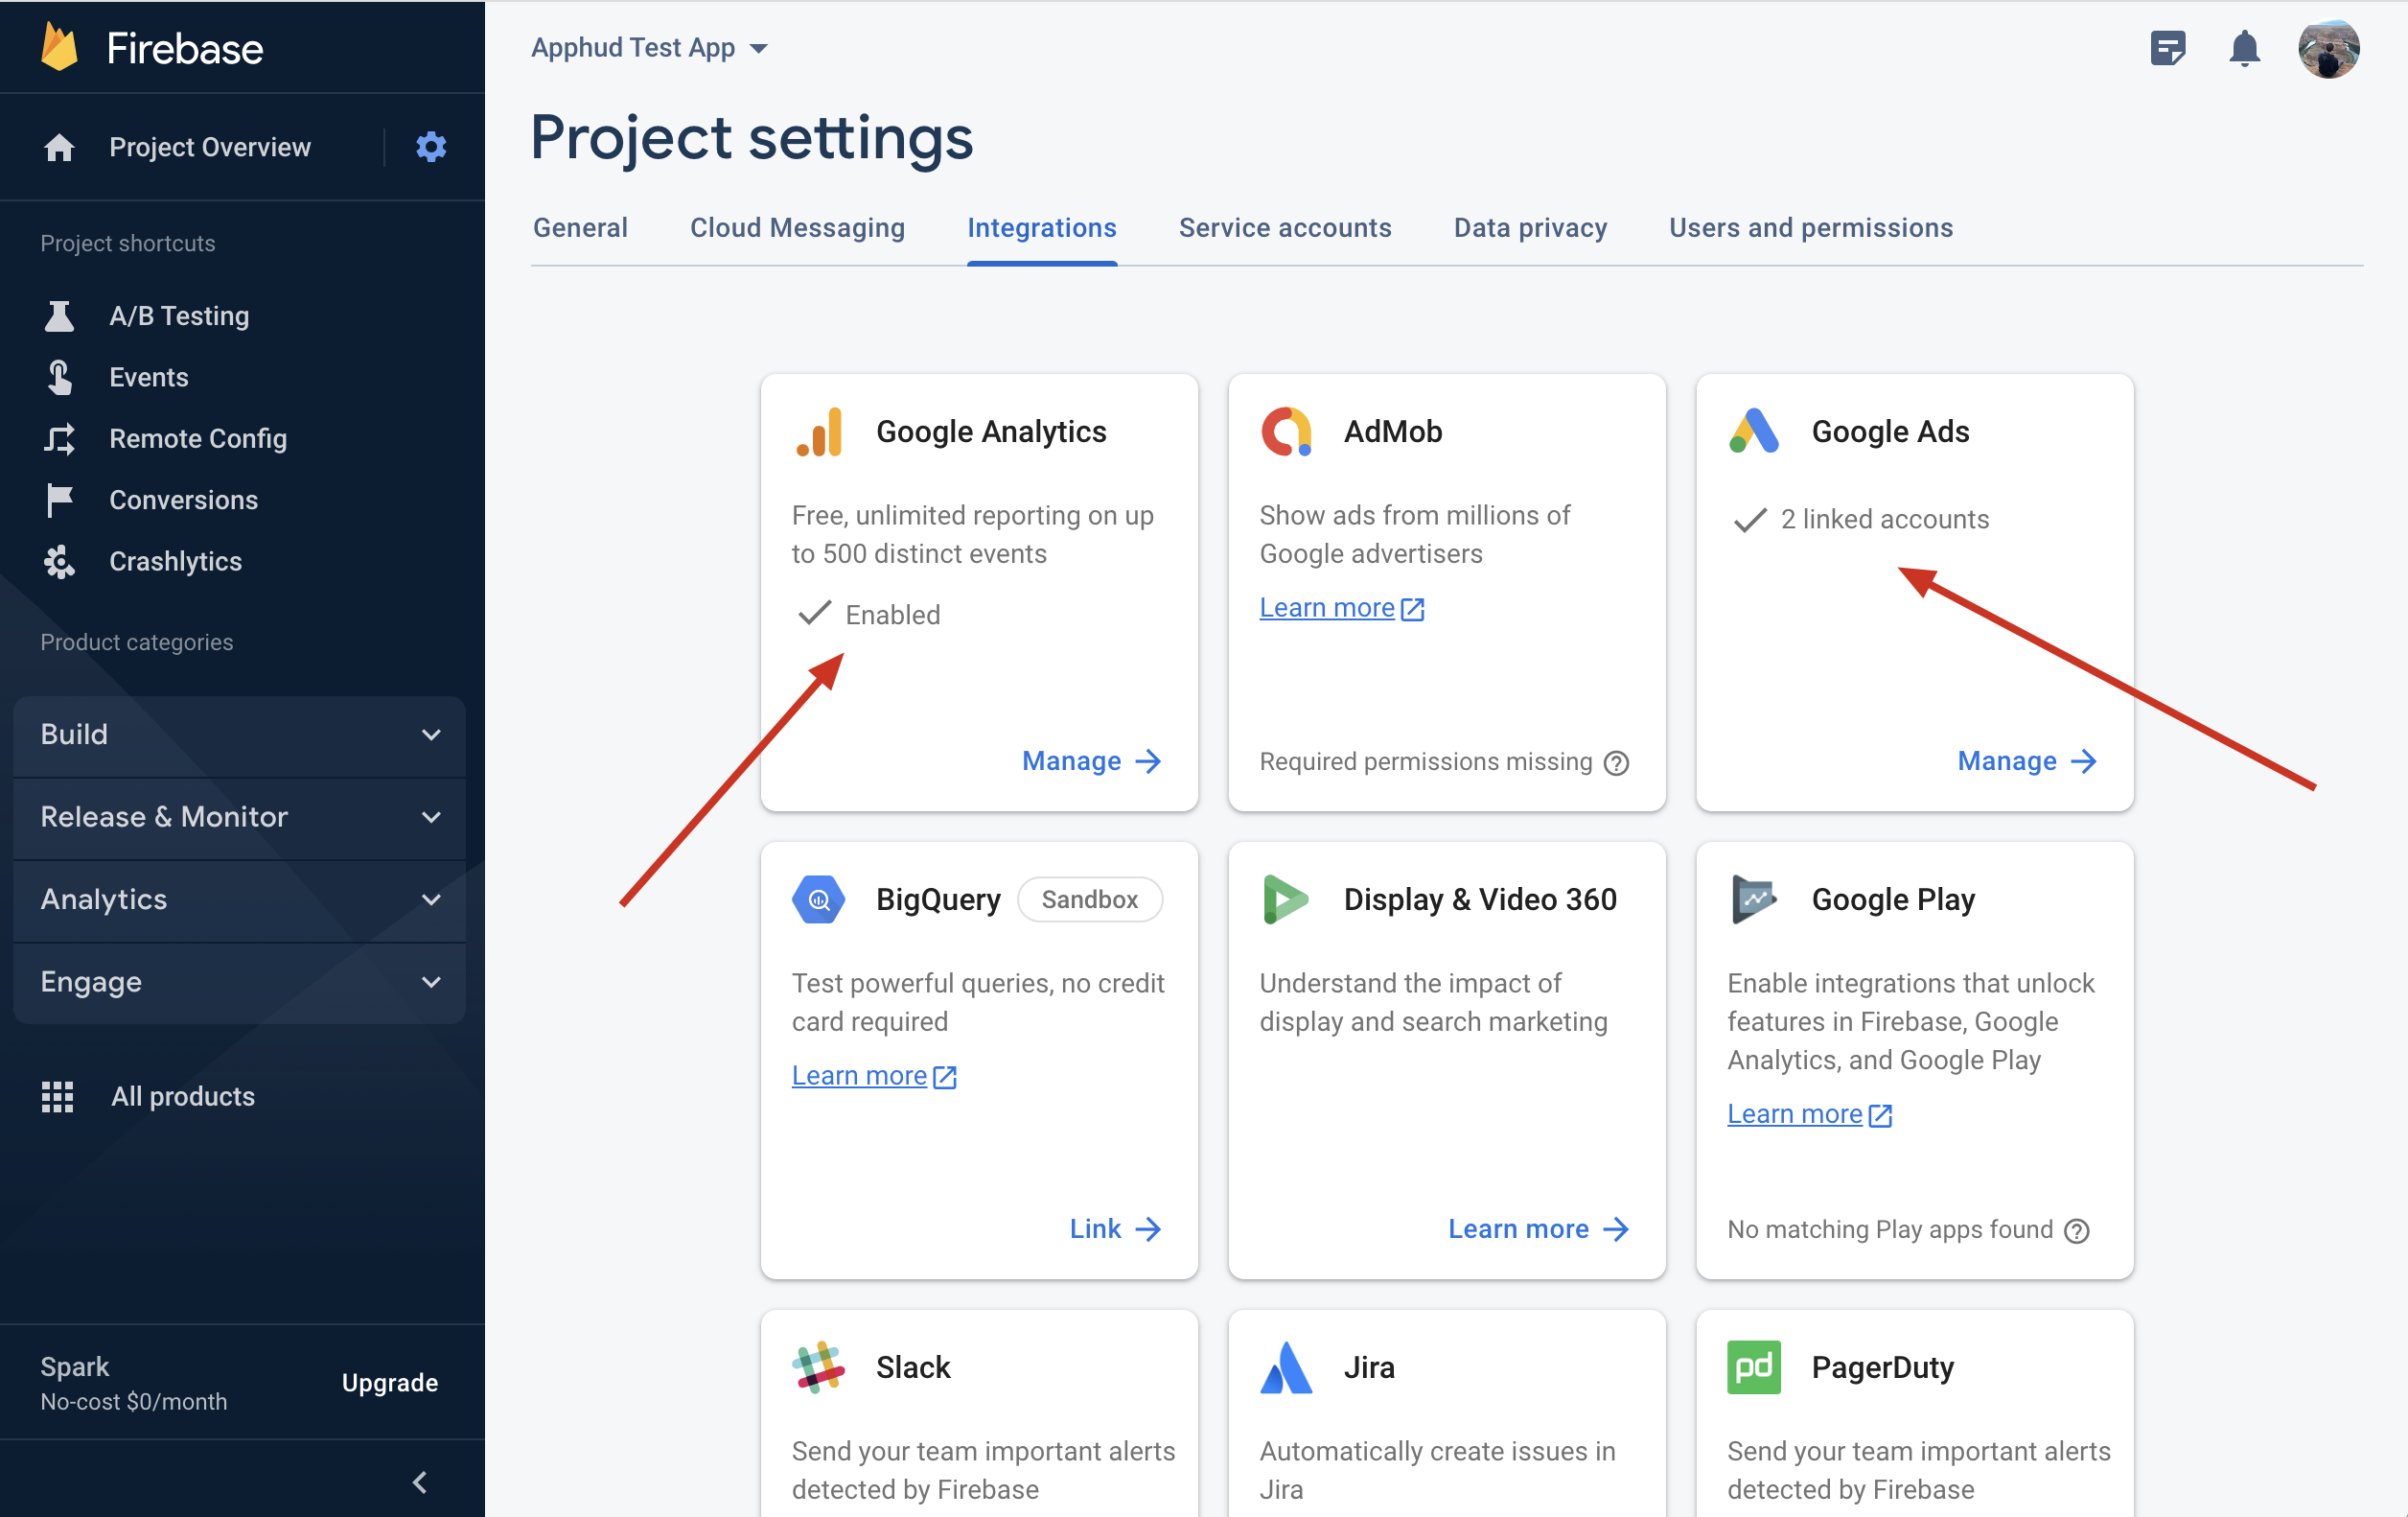
- Ensure Firebase is linked with Google Analytics and Google Ads.
- If you use Data Manager API and events still do not appear in Google Ads, fill out the closed beta allowlist form.
Link Firebase with Google Analytics and Google Ads
In Firebase, open Project Settings → Integrations and set up Google Analytics and (optionally) Google Ads integrations.
Events Mapping
Each Apphud event is sent to GA4 under a Partner event name:
- Revenue events (Trial started, Subscription started, renewals, refunds, and so on) let you pick a standard Google event from a selector — all standard names (
purchase,refund,login,tutorial_begin, …), with your Apphud name (e.g.apphud_trial_started) at the end of the list — plus an optional Event alias to override it with any custom name. - Non-revenue events (cancellations, subscription changes, and so on) have no standard GA4 equivalent, so they use a single free-text field: it defaults to
apphud_<event>but you can rename it to anything.
GA4 accepts any event name, but Google Ads only accepts Standard Google Events — keep that in mind when renaming.
Match the parameters when renaming. Revenue GA4 events like purchase and refund require currency and value, so only map Apphud revenue events to them. Mapping a non-revenue event (e.g. apphud_trial_started) to purchase fails — it carries no currency / value. To rename a non-revenue event, choose a standard event that needs no special parameters, such as tutorial_begin.
Free-trial value. Enable Add Value to Free Trial Events (in Additional Configuration → Revenue configuration) to send the subscription value on free-trial events, improving optimization. When it's off, trial events (such as trial_active) are still sent — with a revenue value of 0.
Altering event mappings can break dataAltering event mappings without a clear understanding of the implications can lead to data inaccuracies and integration issues. If you are considering any adjustments to event names or mappings, we recommend consulting with our support team first.
Using Google Ads Integration for Web-to-App and Web-to-Web
Beta — results may be uncertainGoogle Web-to-App attribution is in beta. Apphud sends events to Google, but Google does not always provide enough attribution data for reliable user matching between web and app, so results may be uncertain.
Setting up the Google Ads Integration for web-to-web and web-to-app is similar to the app integration process, utilizing the same iOS or Android integration depending on the device platform.
- Select the appropriate platform.
- For web campaigns targeting an iOS app, create a Google Ads integration for iOS.
- For Android campaigns, create an integration for Android.
- If you already have an existing Google Ads integration, no additional action is required.
- Enable Web Events. Ensure the checkbox "Enable if the integration will also be used to attribute in-app events to web campaigns" is selected.
- Install Google Tag. Install Google Tag on your website through Framer page settings or your preferred web editor. For Web-to-App landings hosted on Apphud's domain, the script code is installed automatically. If you use Web-to-App with your own landing page, you must install the
gtag.jsscript code. - Ensure auto-tagging is on in your Google Ads account settings. Learn more.
The Apphud Web SDK will automatically capture the Google Click ID parameter (client_id) from Google Tag and use it for sending purchase events.
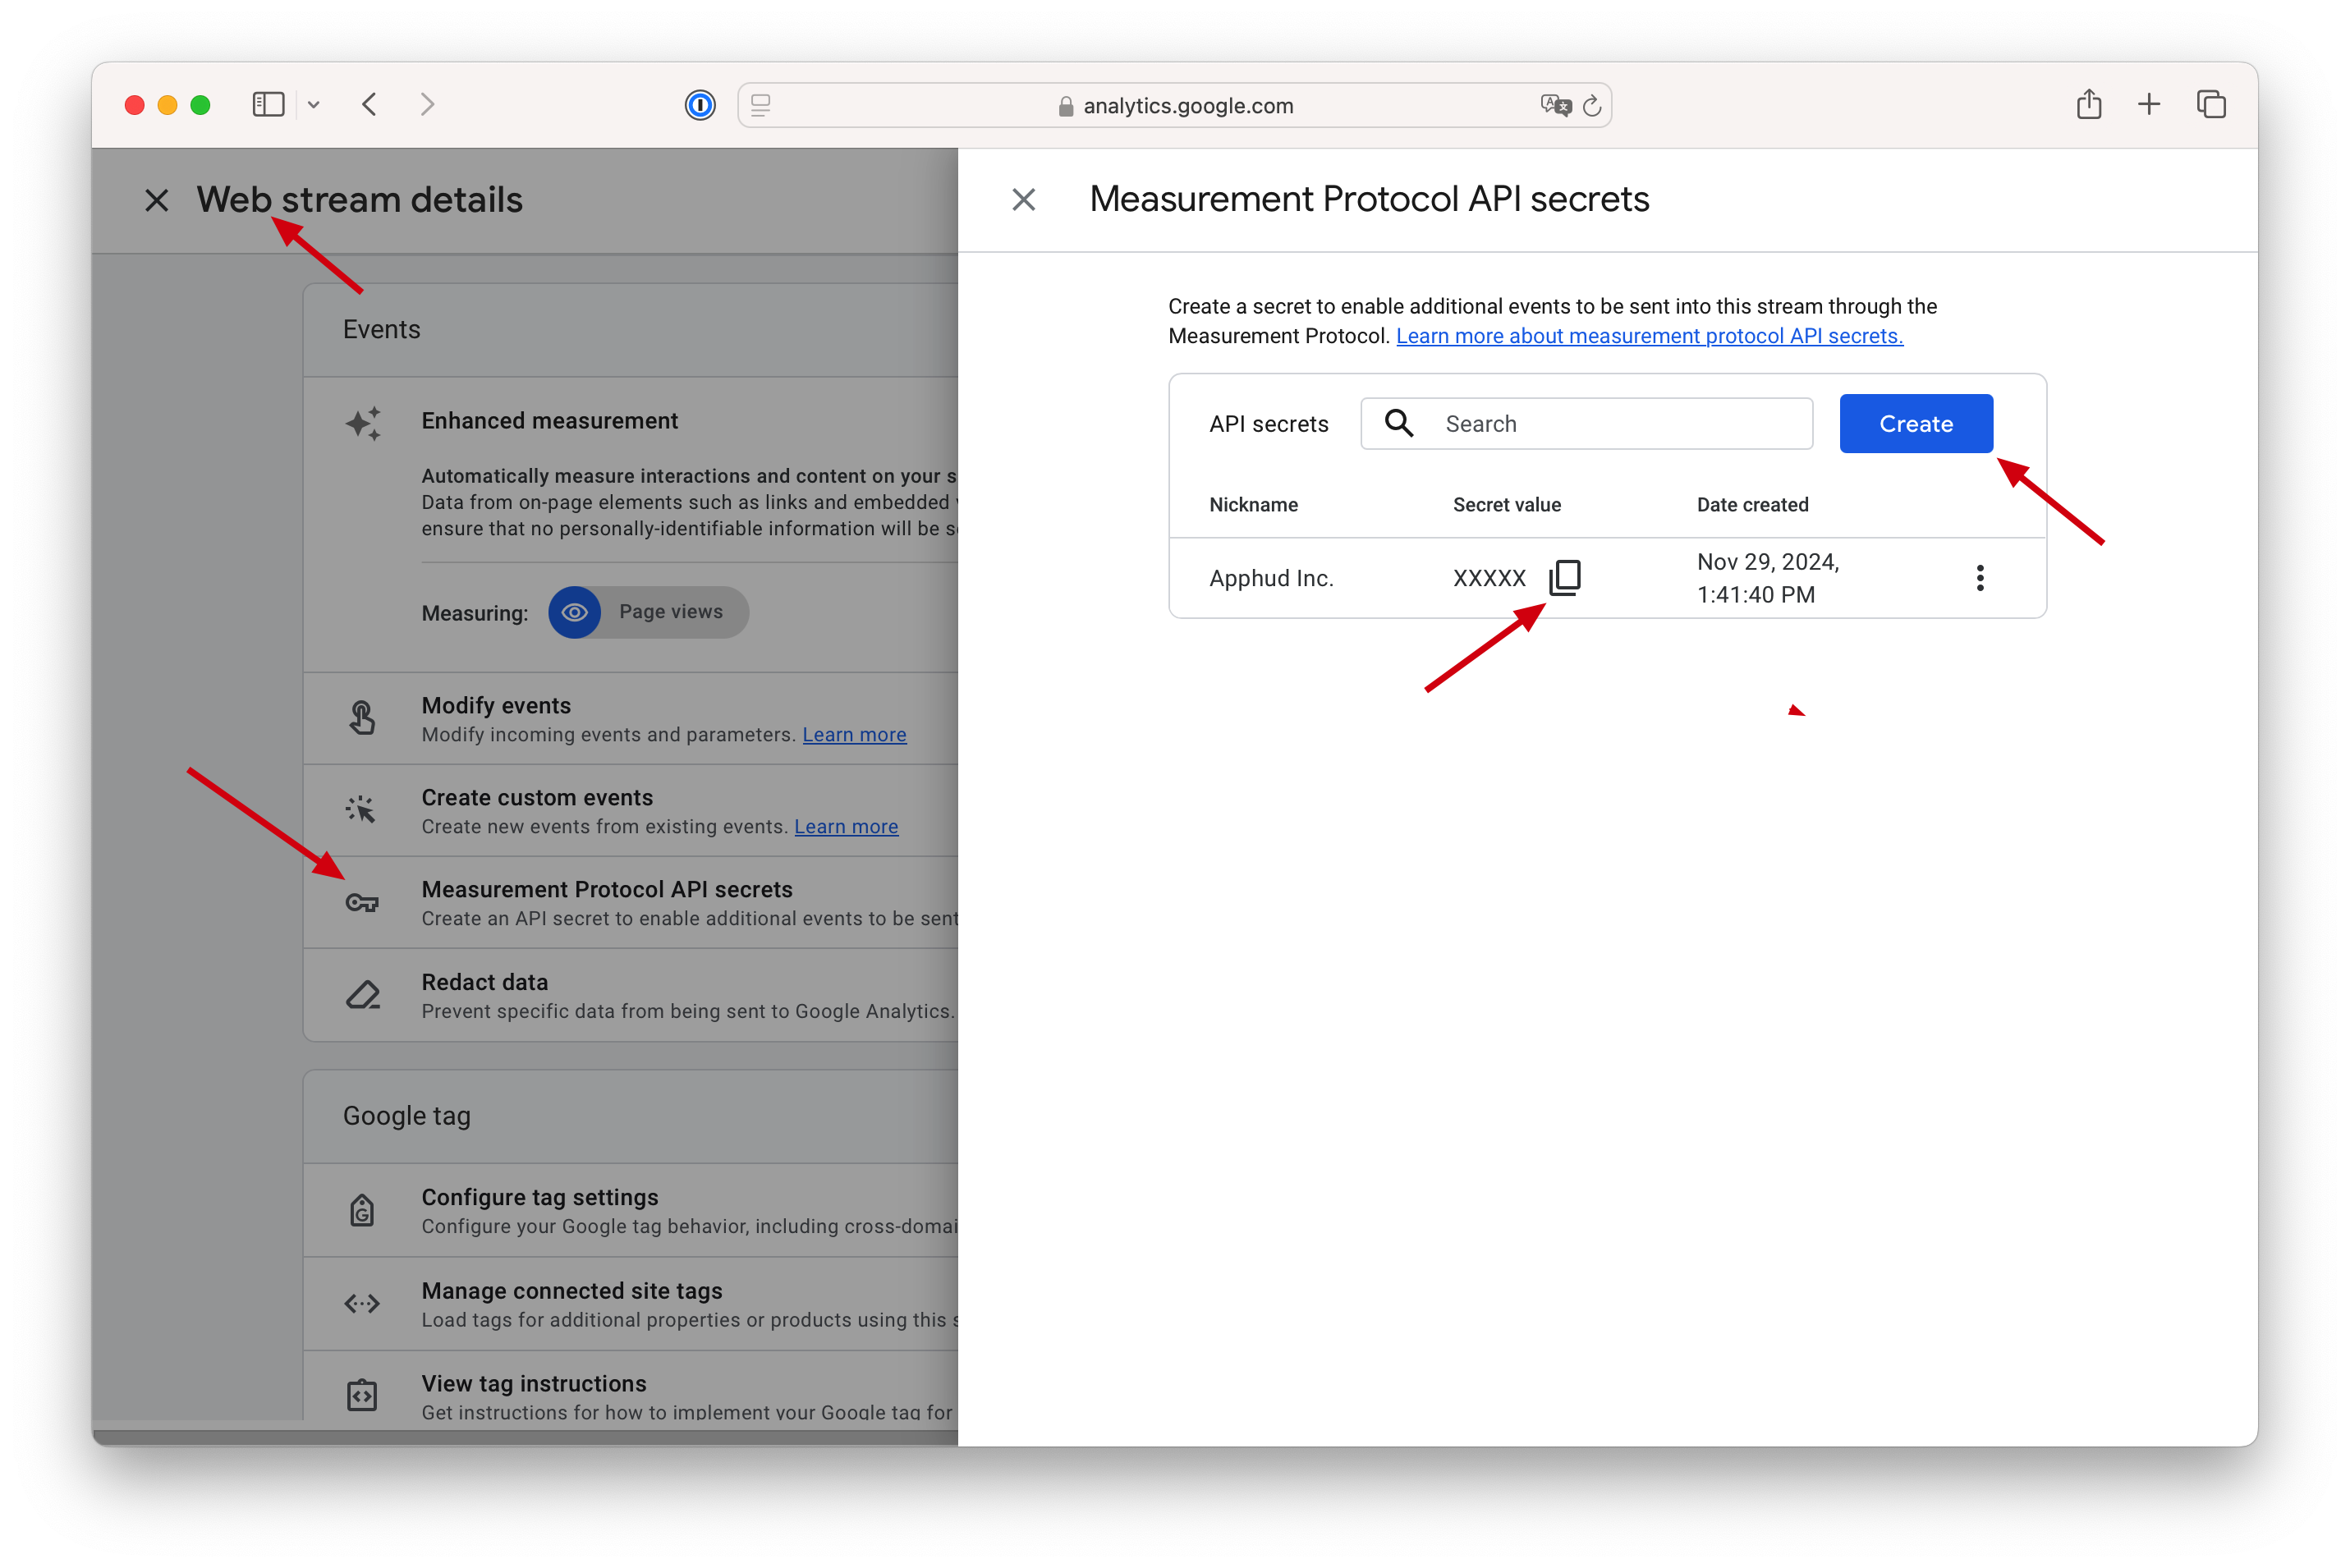
How to get Measurement ID and Web API Secret
Web-to-App / Web-to-Web still uses Measurement Protocol credentials for the web data stream (separate from the app authentication method above).
-
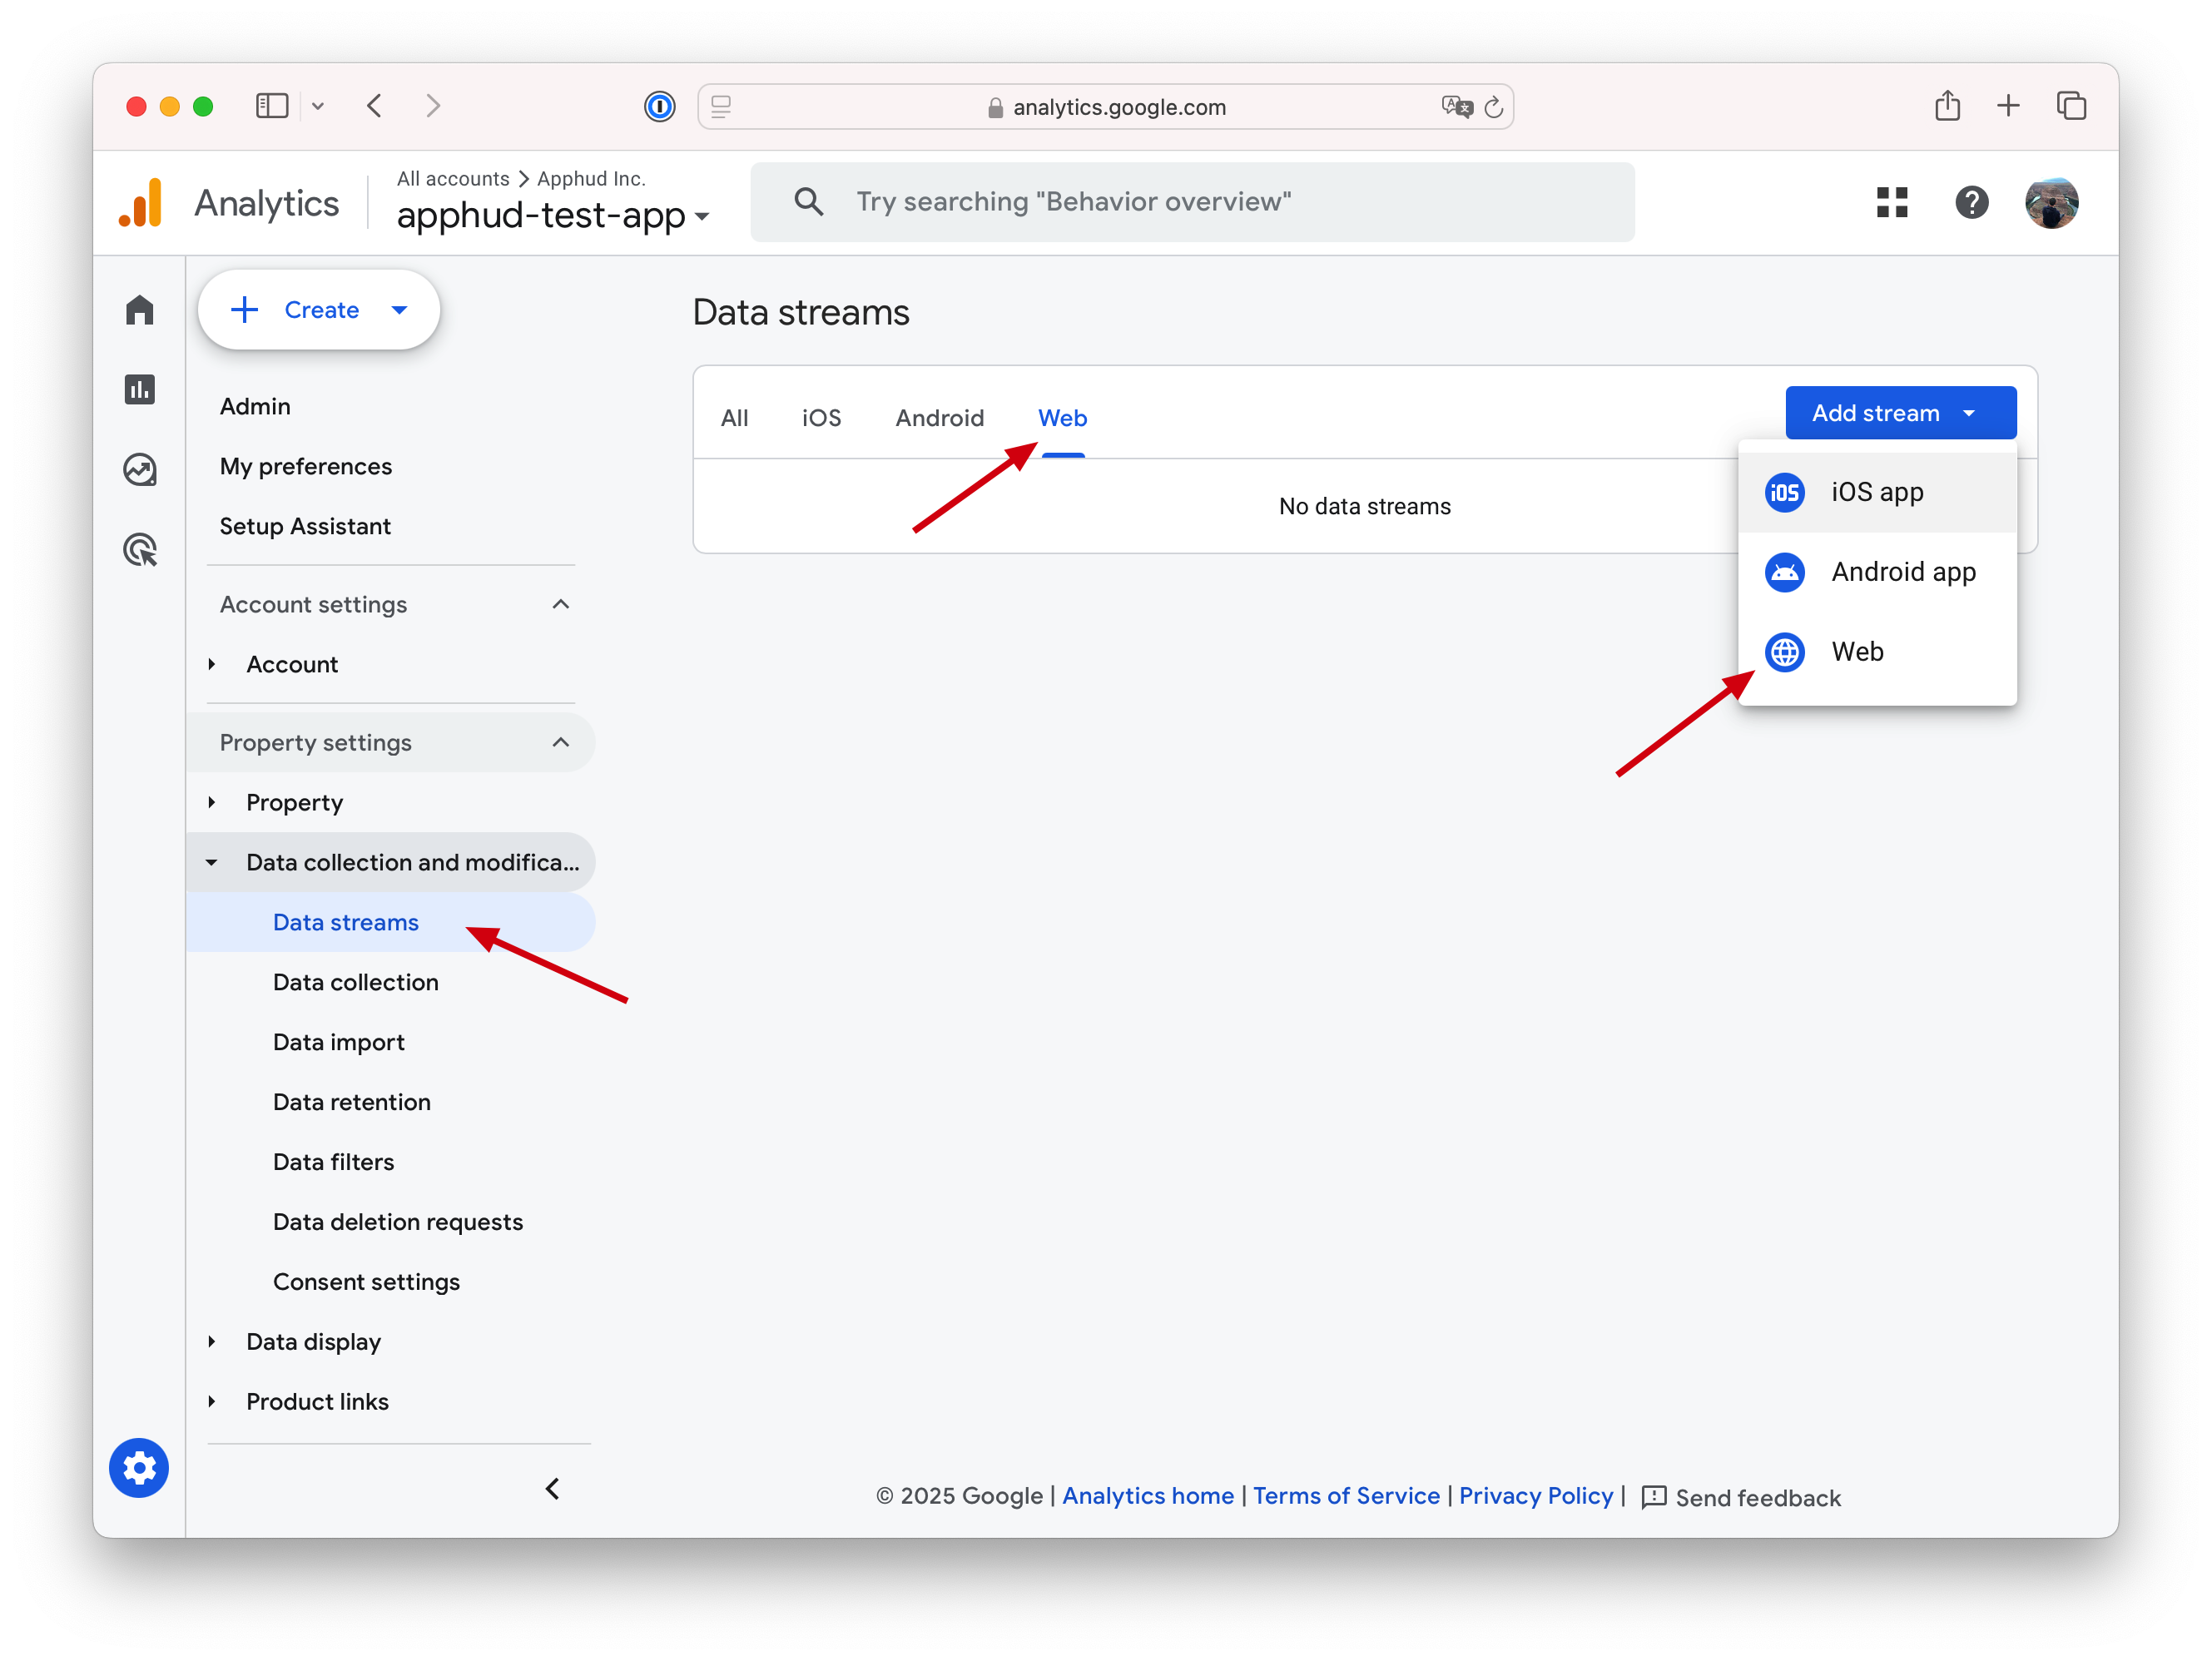
Open your Google Analytics account and select Admin → Data Streams → Web.
-
Create your web stream and provide your production website URL (example:
myappsubdomain.siiites.comfor Apphud Web-to-App landings,myapp.comfor your own domain, etc.). Learn more. On the stream details page, find your Measurement ID. -
Go to Measurement Protocol API Secrets and create your secret.
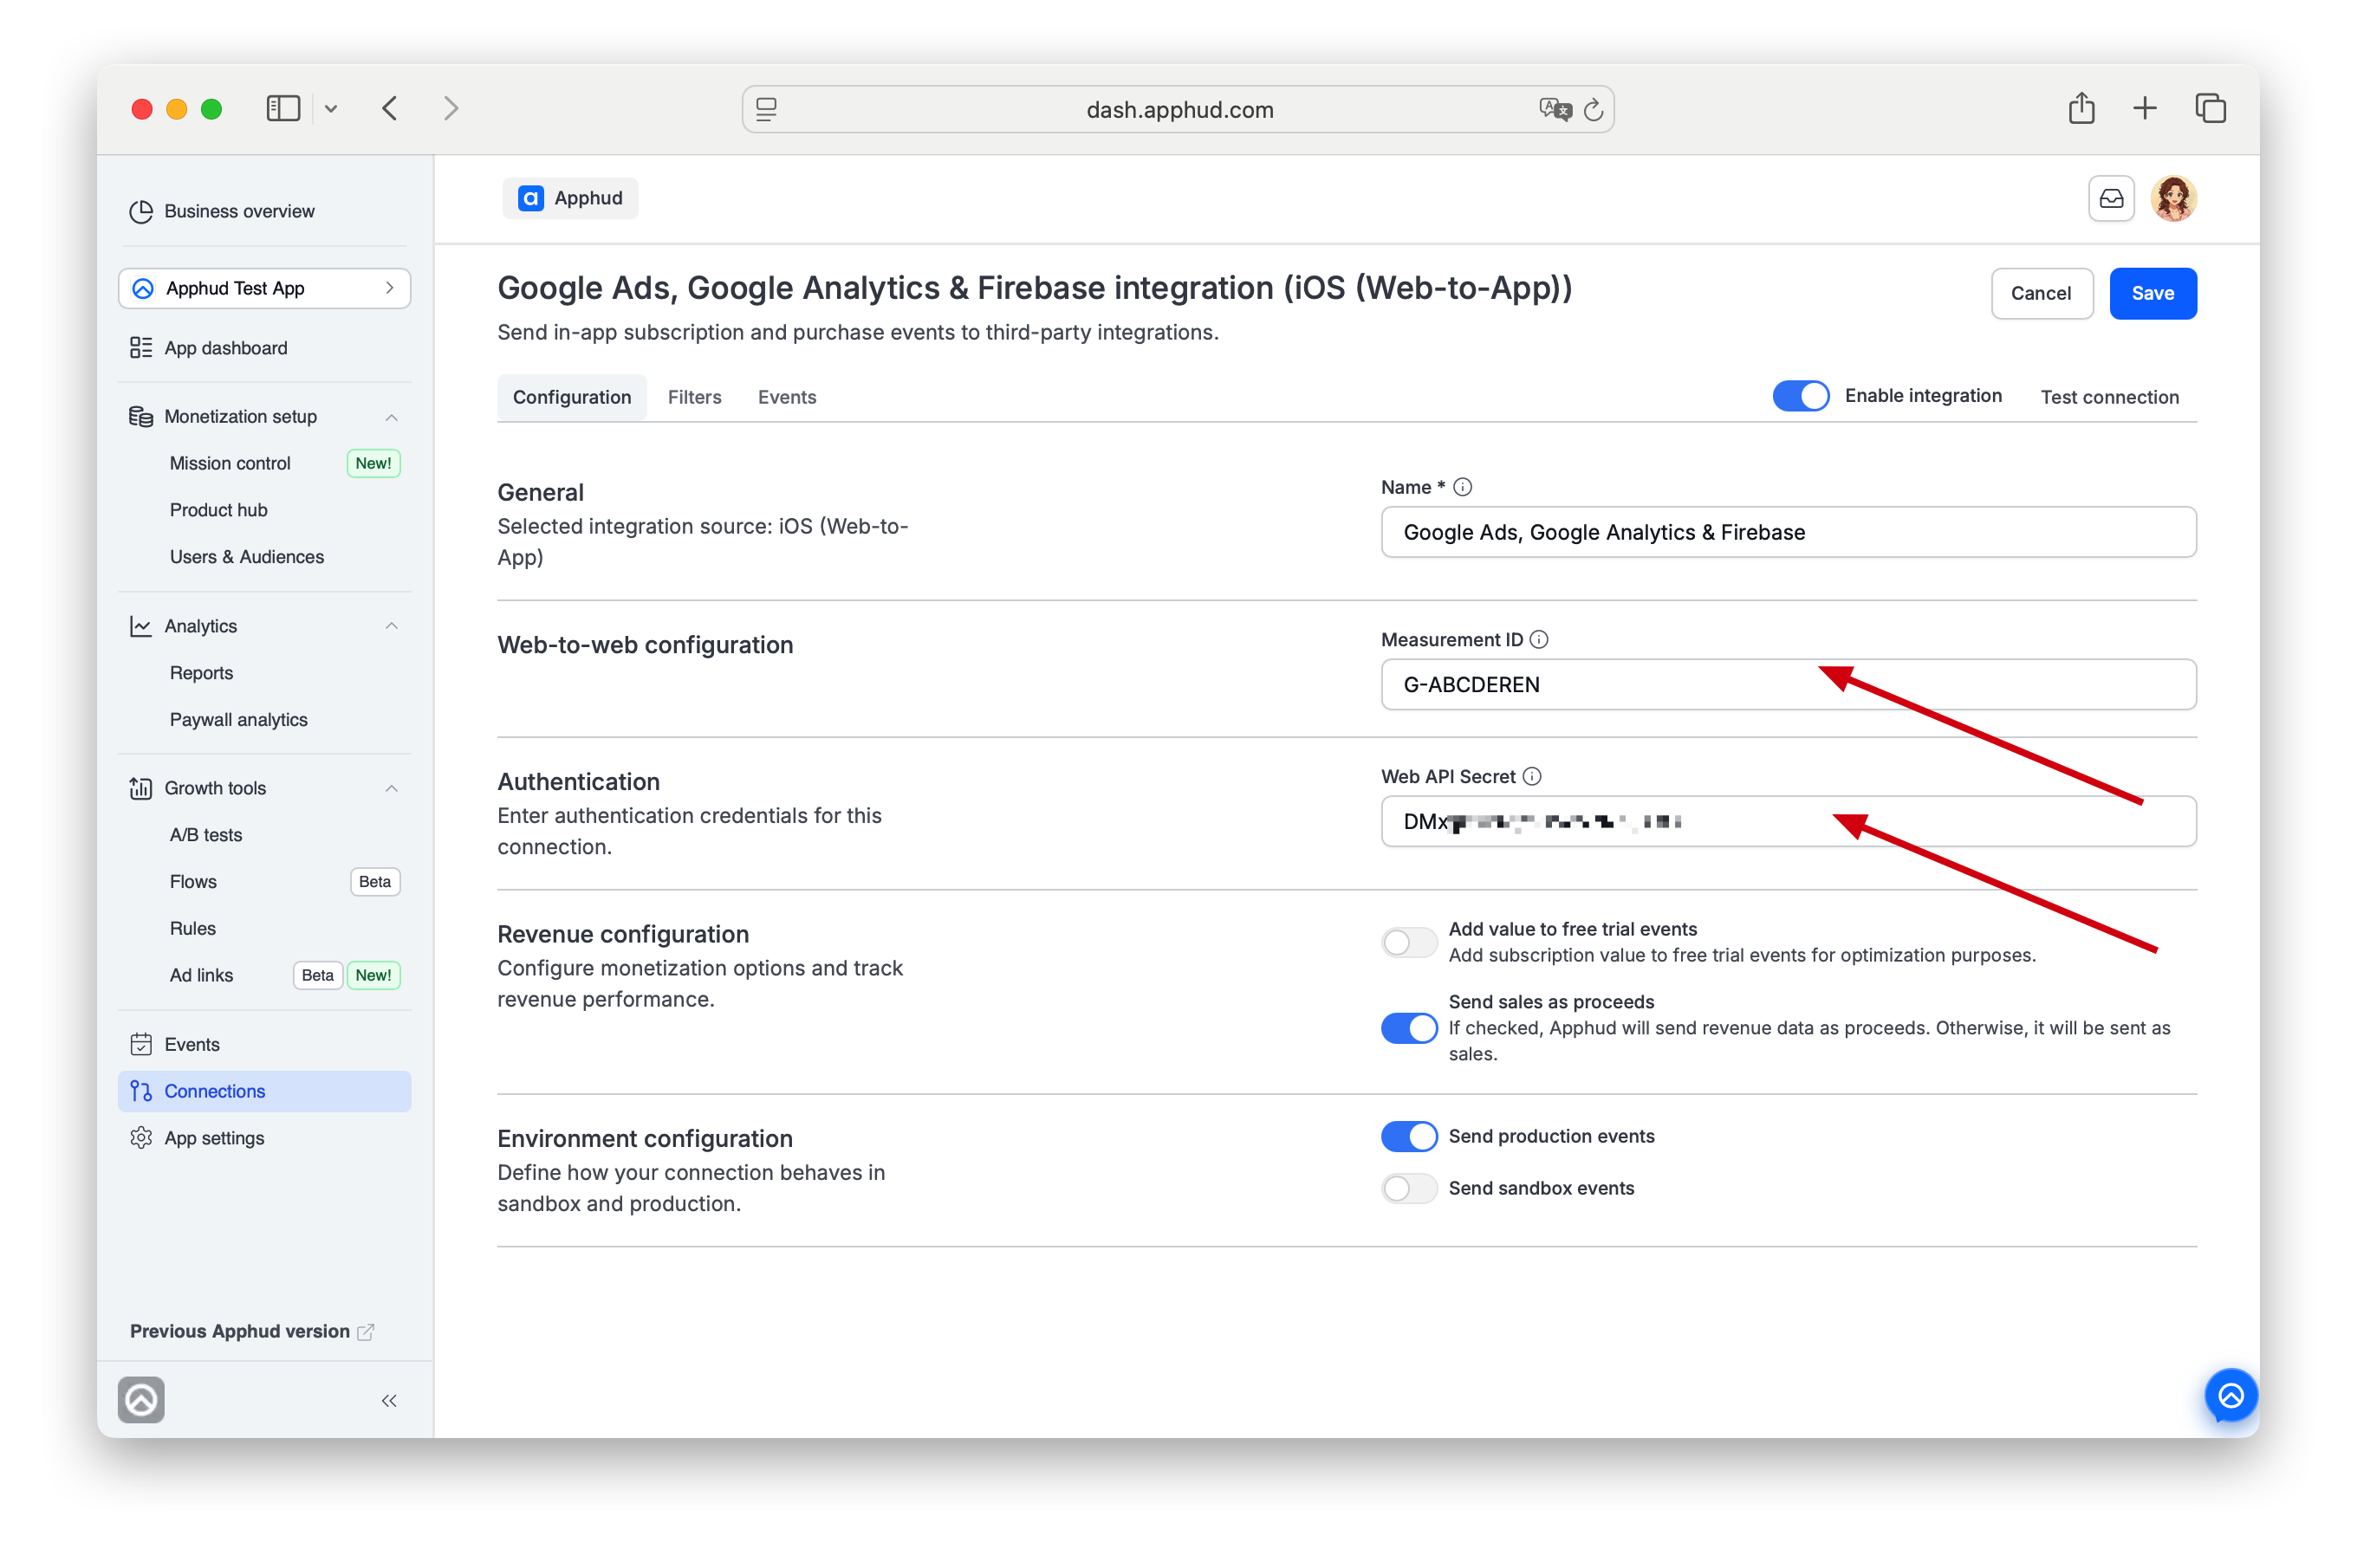
-
Paste and save both Measurement ID and Web API Secret values in the Apphud integration settings.
How to create Google Ads Conversions based on Google Analytics events
Before you begin, ensure that Apphud events are mapped to one of the Google standard events. Subscription revenue events must be mapped to a standard event that includes currency and value as required parameters.
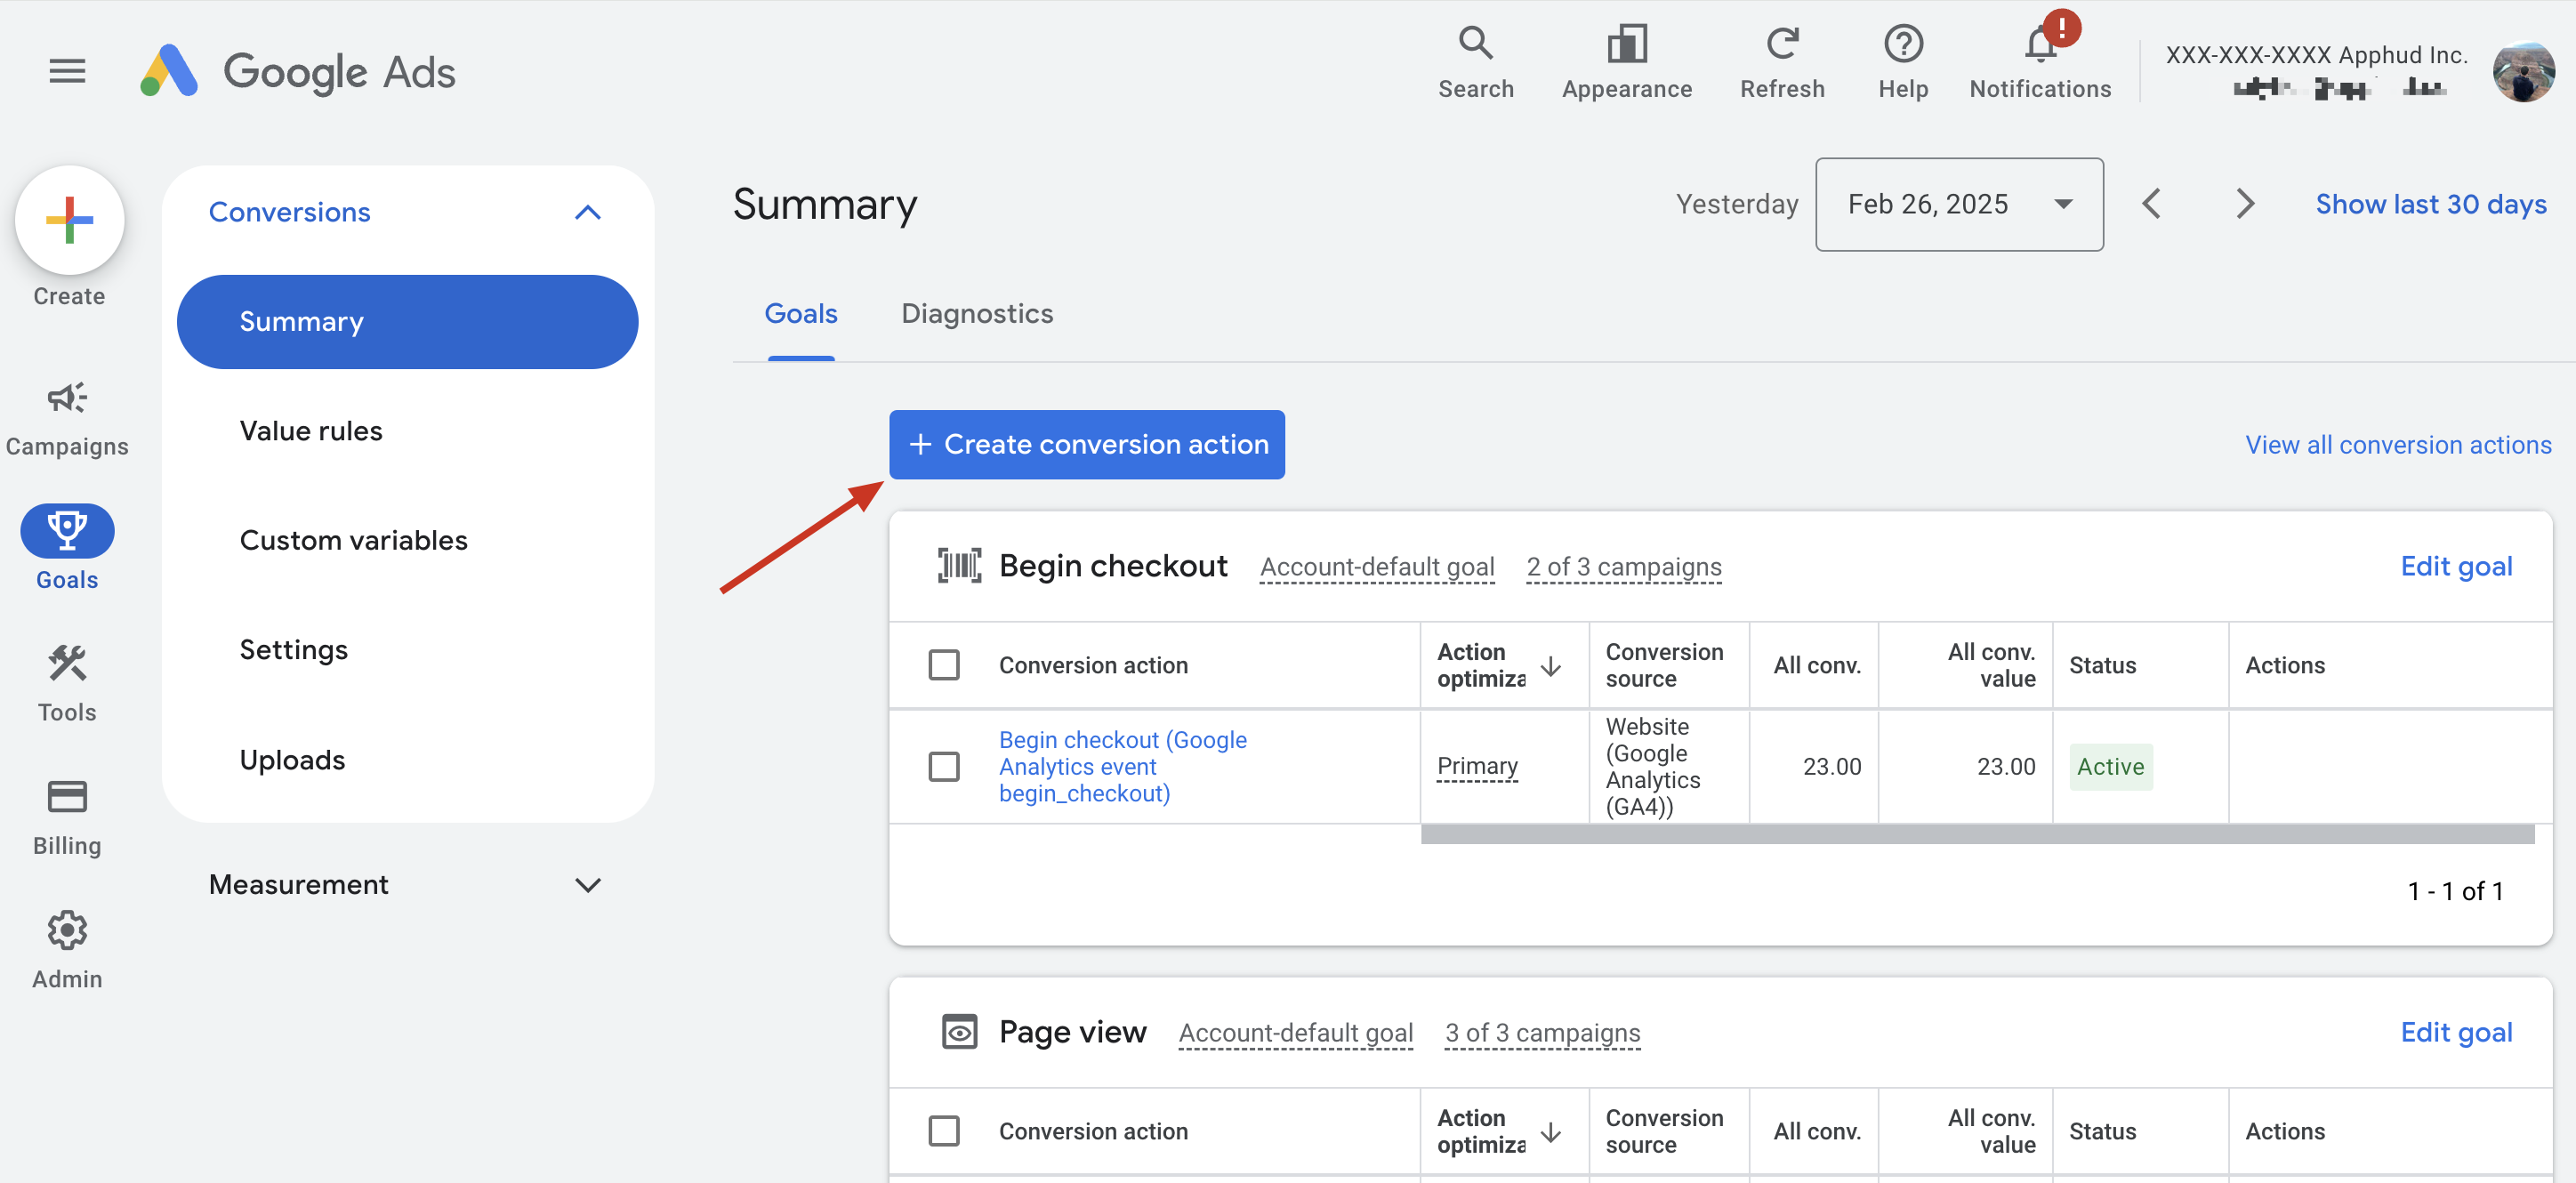
Step 1: Start Creating a New Conversion Action
- Navigate to Goals → Summary in your Google Ads account.
- Click Create Conversion Action to start the conversion action creation wizard.
Step 2: Select Conversion Sources
- If you are tracking conversions for an app, select Conversions on an app.
- For Web-to-App and Web-to-Web campaigns, select Conversions on a website.
- In both cases, make sure to choose the Google Analytics property (not the Google Tag).
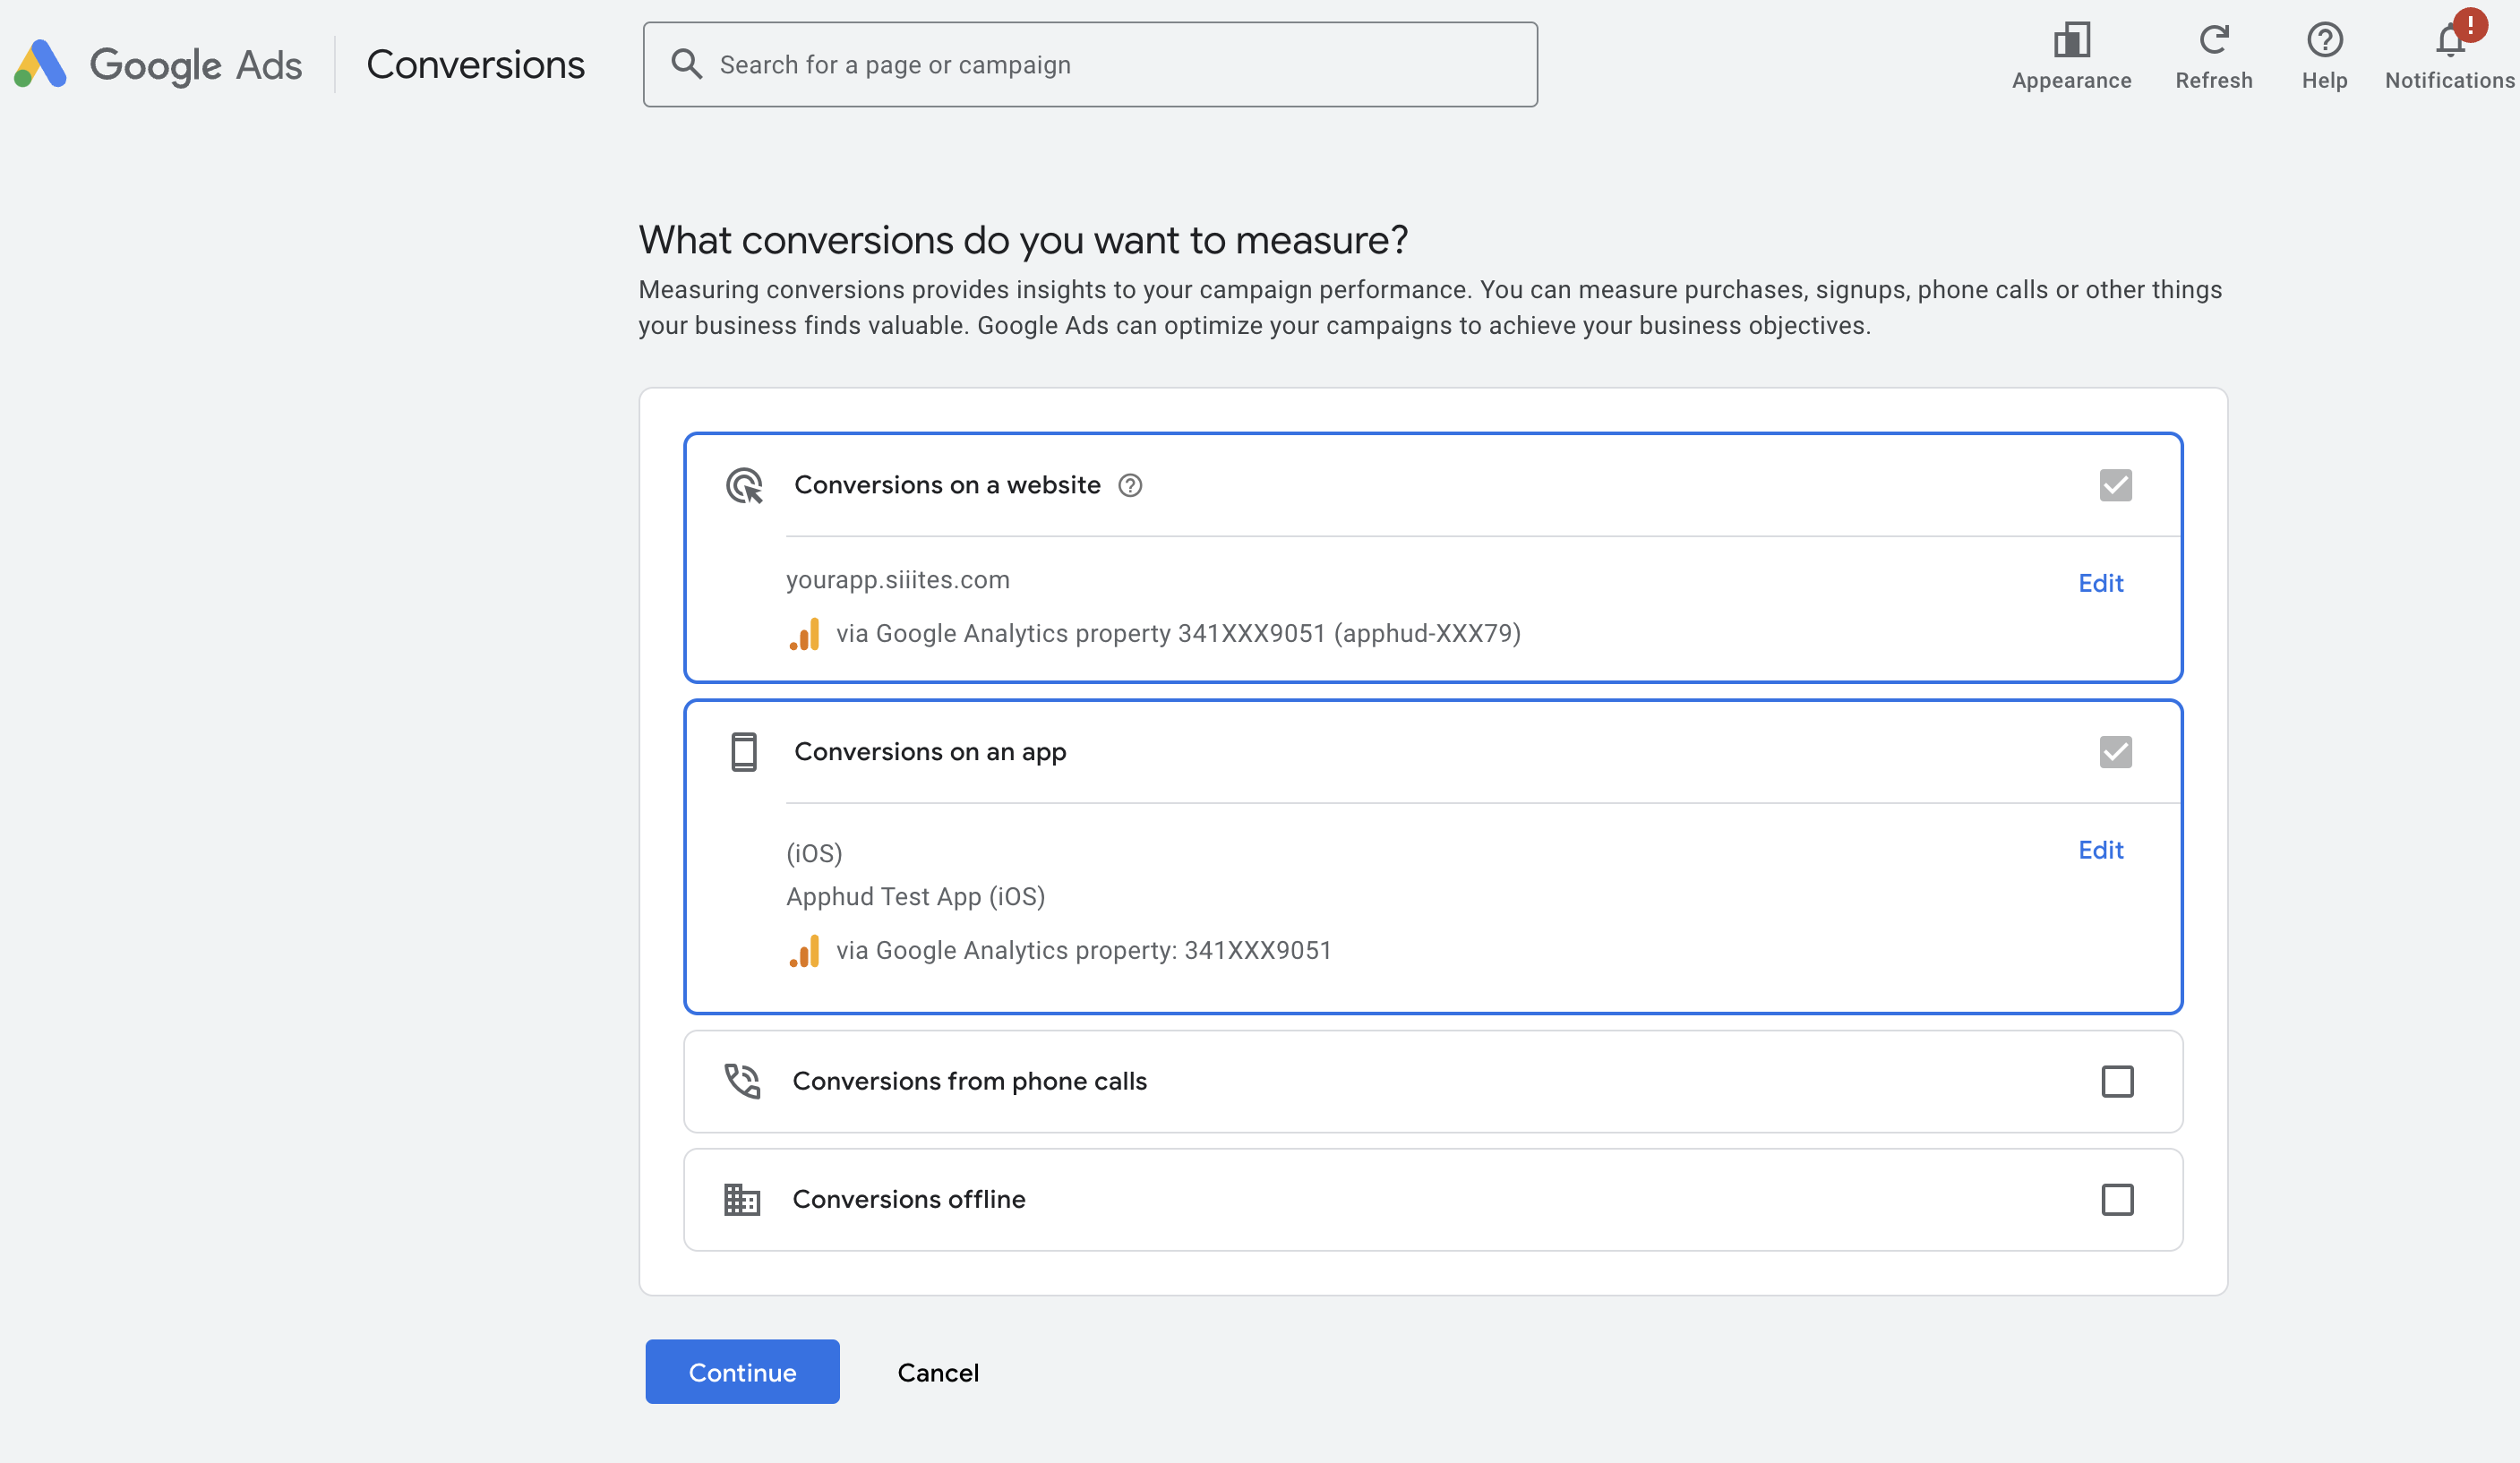
Click Continue to proceed.
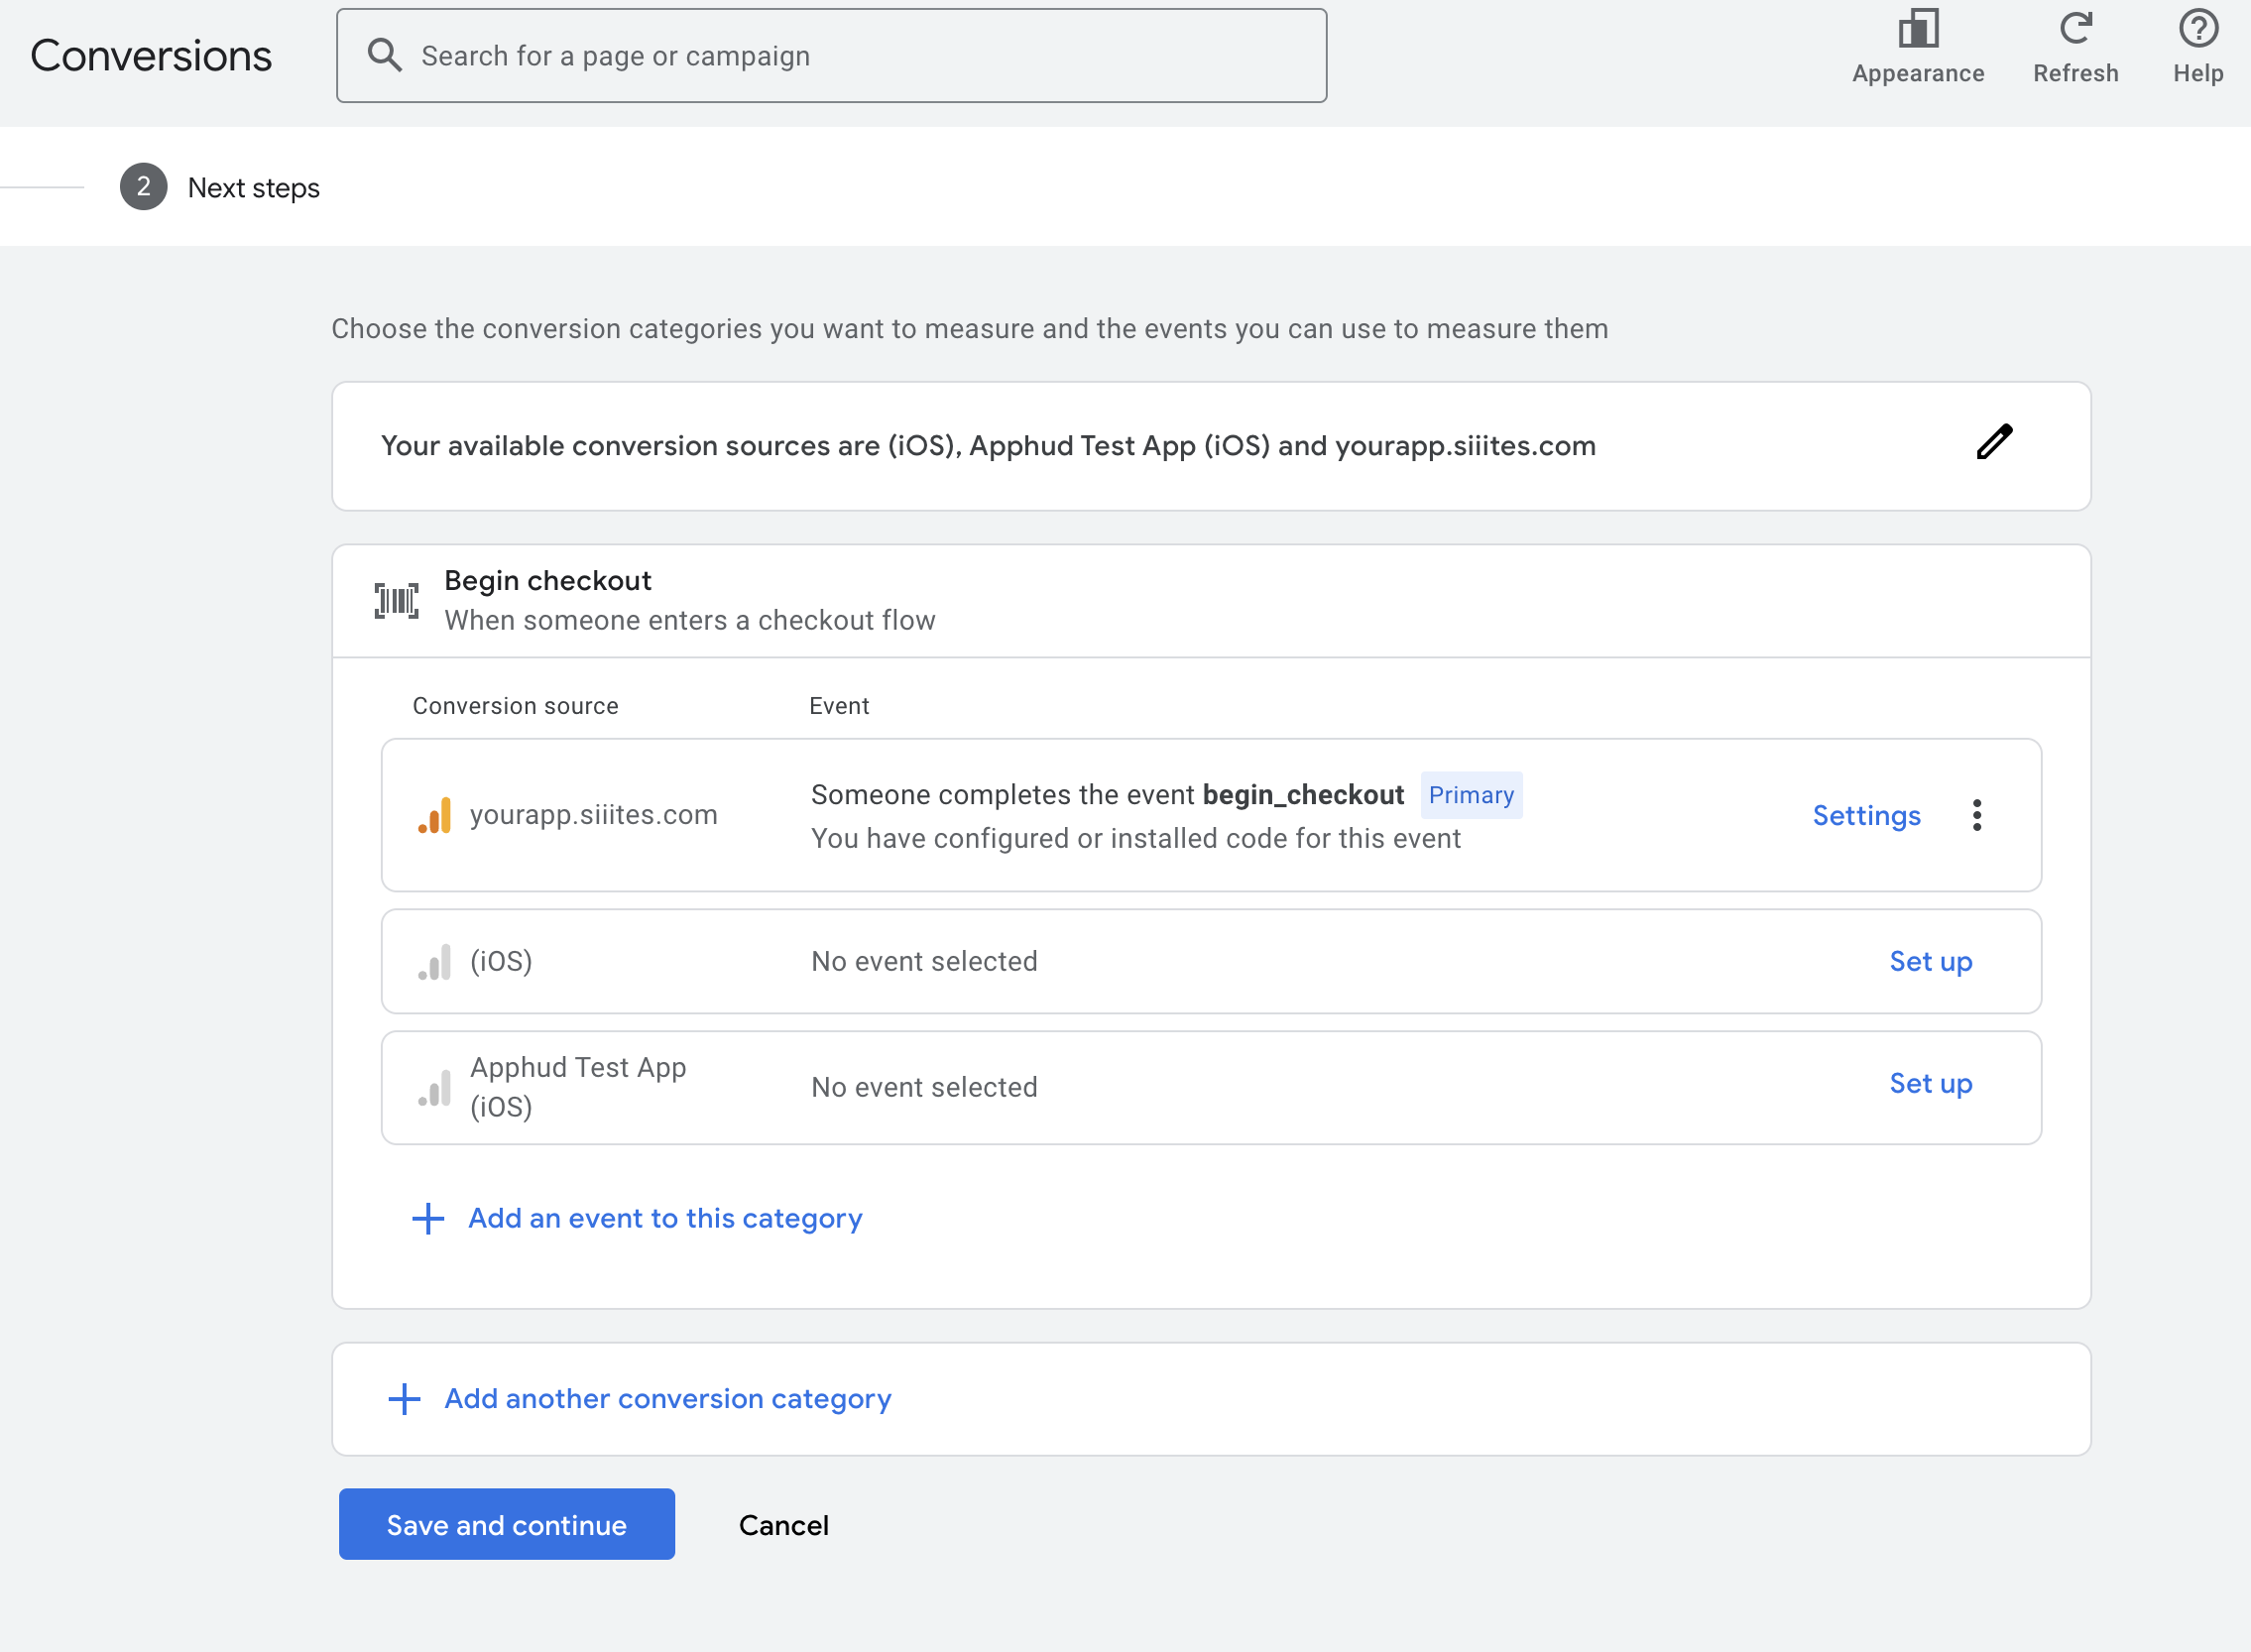
Step 3: Select the Key Event
On the next screen:
- Choose the event you want to track as a conversion.
- For example, select Begin Checkout if you are tracking checkout initiations.
- Click Save and continue.
Step 4: Start Your Google Ads Campaign
Your Google Ads conversion tracking is now set up. Once you start driving traffic, you will see conversion values appear in your Google Ads reports.
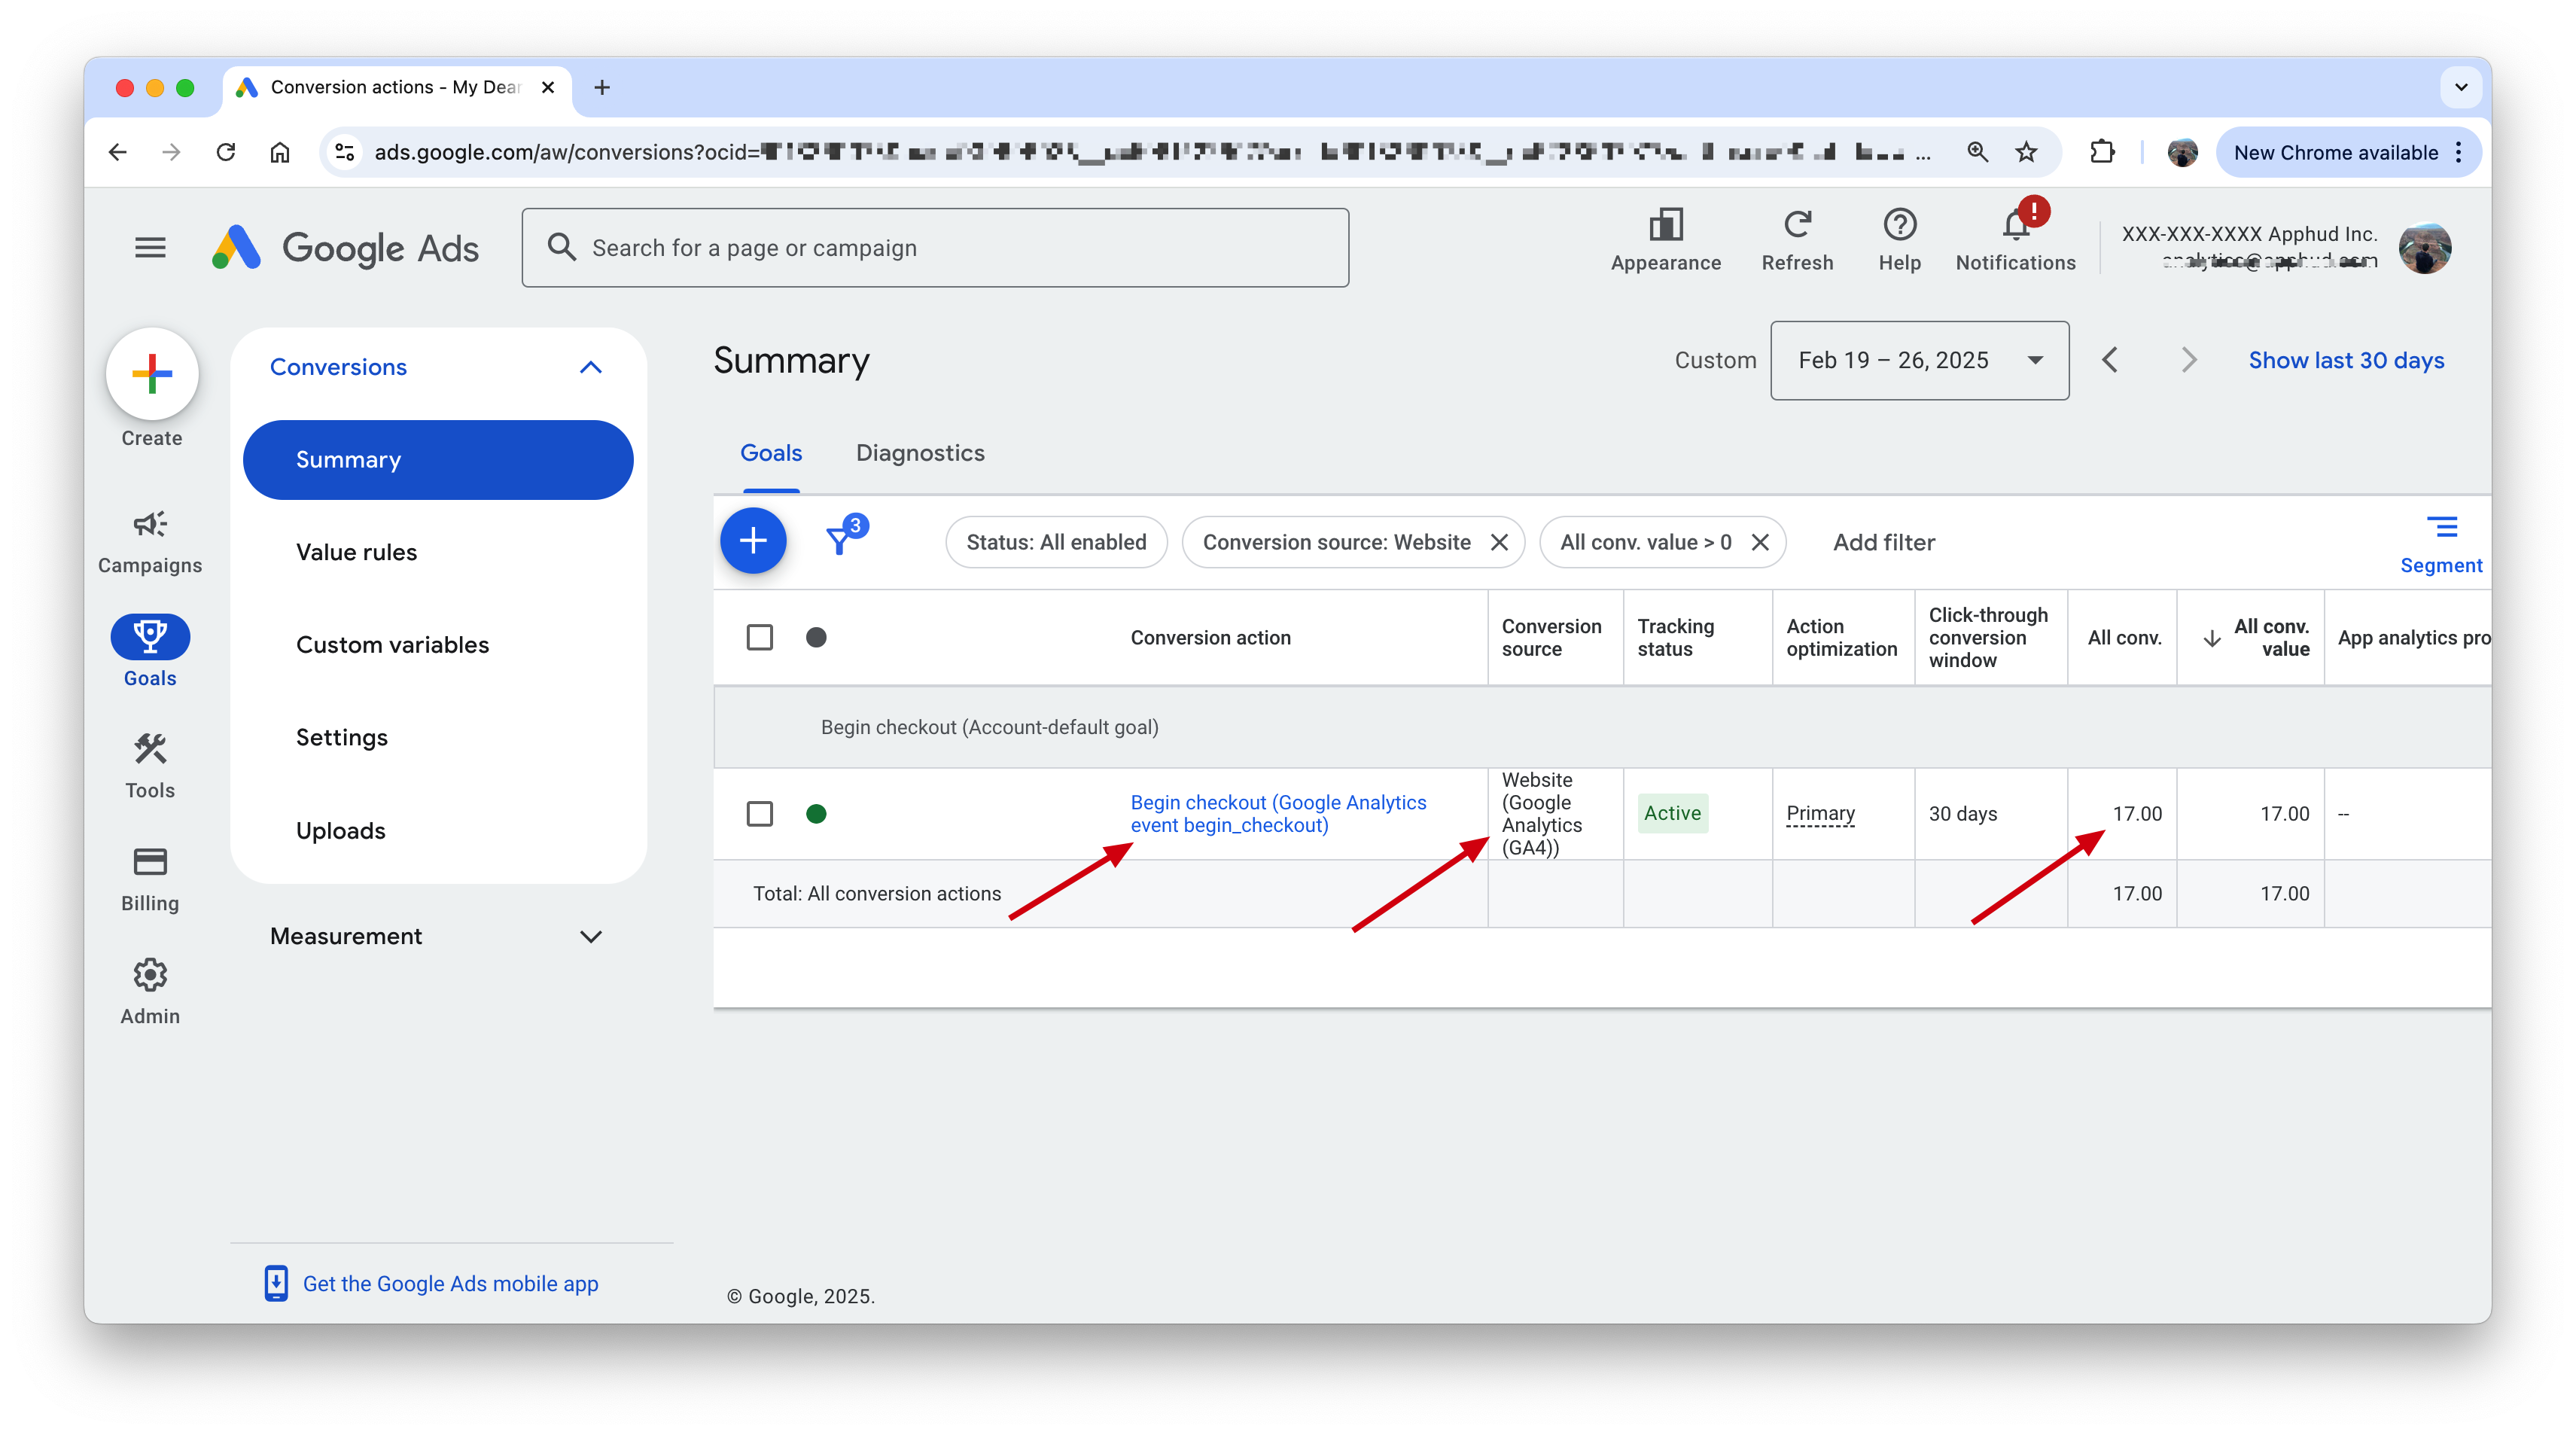
See the official Google guide for more information.
User Properties
At least one event must reach Firebase firstYou must have at least one event successfully sent to Firebase. When the event is processed by Firebase, User Properties will appear in the selection. Events are processed in Firebase & Google Analytics within a few hours (usually 3–6 hours).
Besides events, Apphud also sends User Properties to Firebase. This helps you create custom audiences or Custom Definitions and target specific users in A/B tests or view analytics for specific audience. The list of User Properties and their values can be found on the User Properties reference.
Permission group names and the 24-character limit
Google limits user property names to 24 characters, so Apphud shortens longer names to fit. Properties for permission groups are named aph_status_<group name> and aph_autorenew_<group name>, where the group name is lowercased and every character other than a letter or digit becomes _. The prefixes take 11 and 14 characters, so only the first 13 characters of the group name are kept for the status property and the first 10 for the auto-renew property.
Similar group names can stop events from reaching GoogleIf two permission groups start with the same characters (for example
my_diet_silver_tier_1andmy_diet_silver_tier_2), their shortened property names become identical (aph_autorenew_my_diet_si) and are sent to Google as duplicates within one request. Google can reject such a request with an HTTP 500 error, and the events do not arrive. The old Measurement Protocol merged duplicates silently, so this appears only after you move to the Data Manager API.To fix it, rename the groups so that the first 10 characters of each name are different (Product Hub → Permission groups), or turn off Send user properties in the integration's Revenue settings.
Custom Dimensions
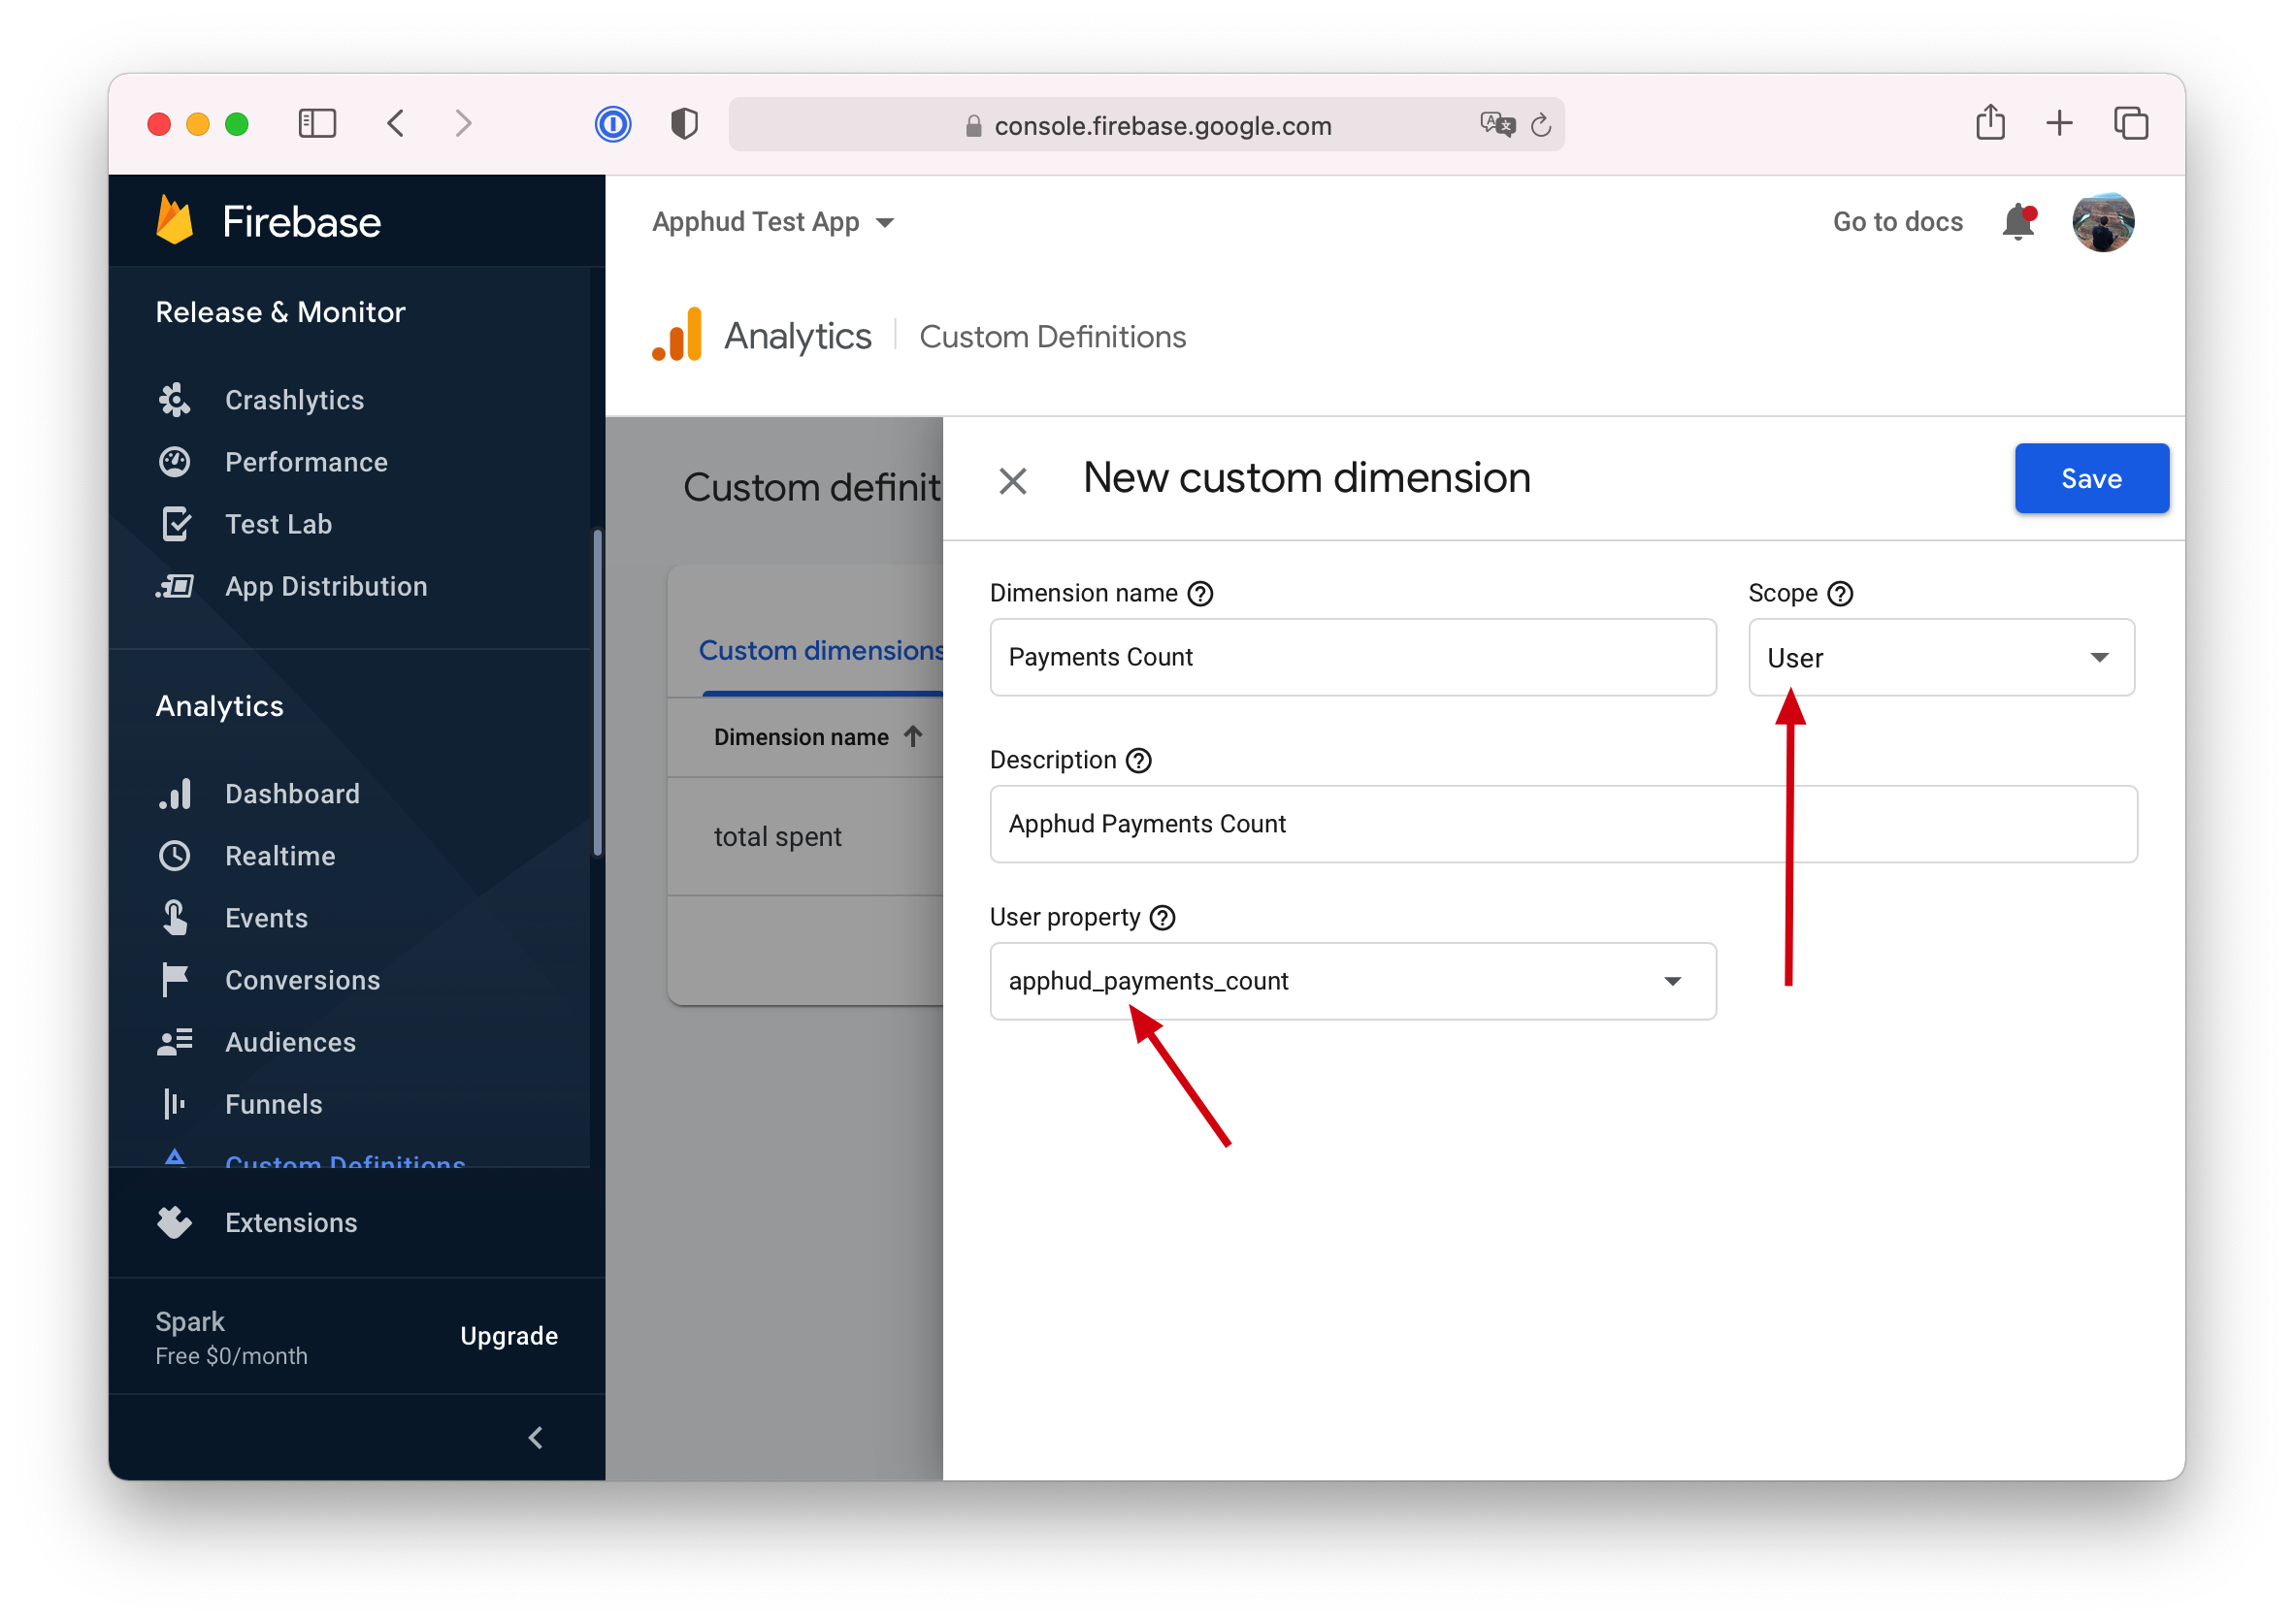
To use User Properties in your analytics, first assign them to a custom dimension.
- In Firebase, open Custom Definitions → Create custom dimensions.
- While creating custom dimensions, select User scope.
- Enter a name and description.
- Select a User Property (for example,
apphud_payments_count). Click Save.
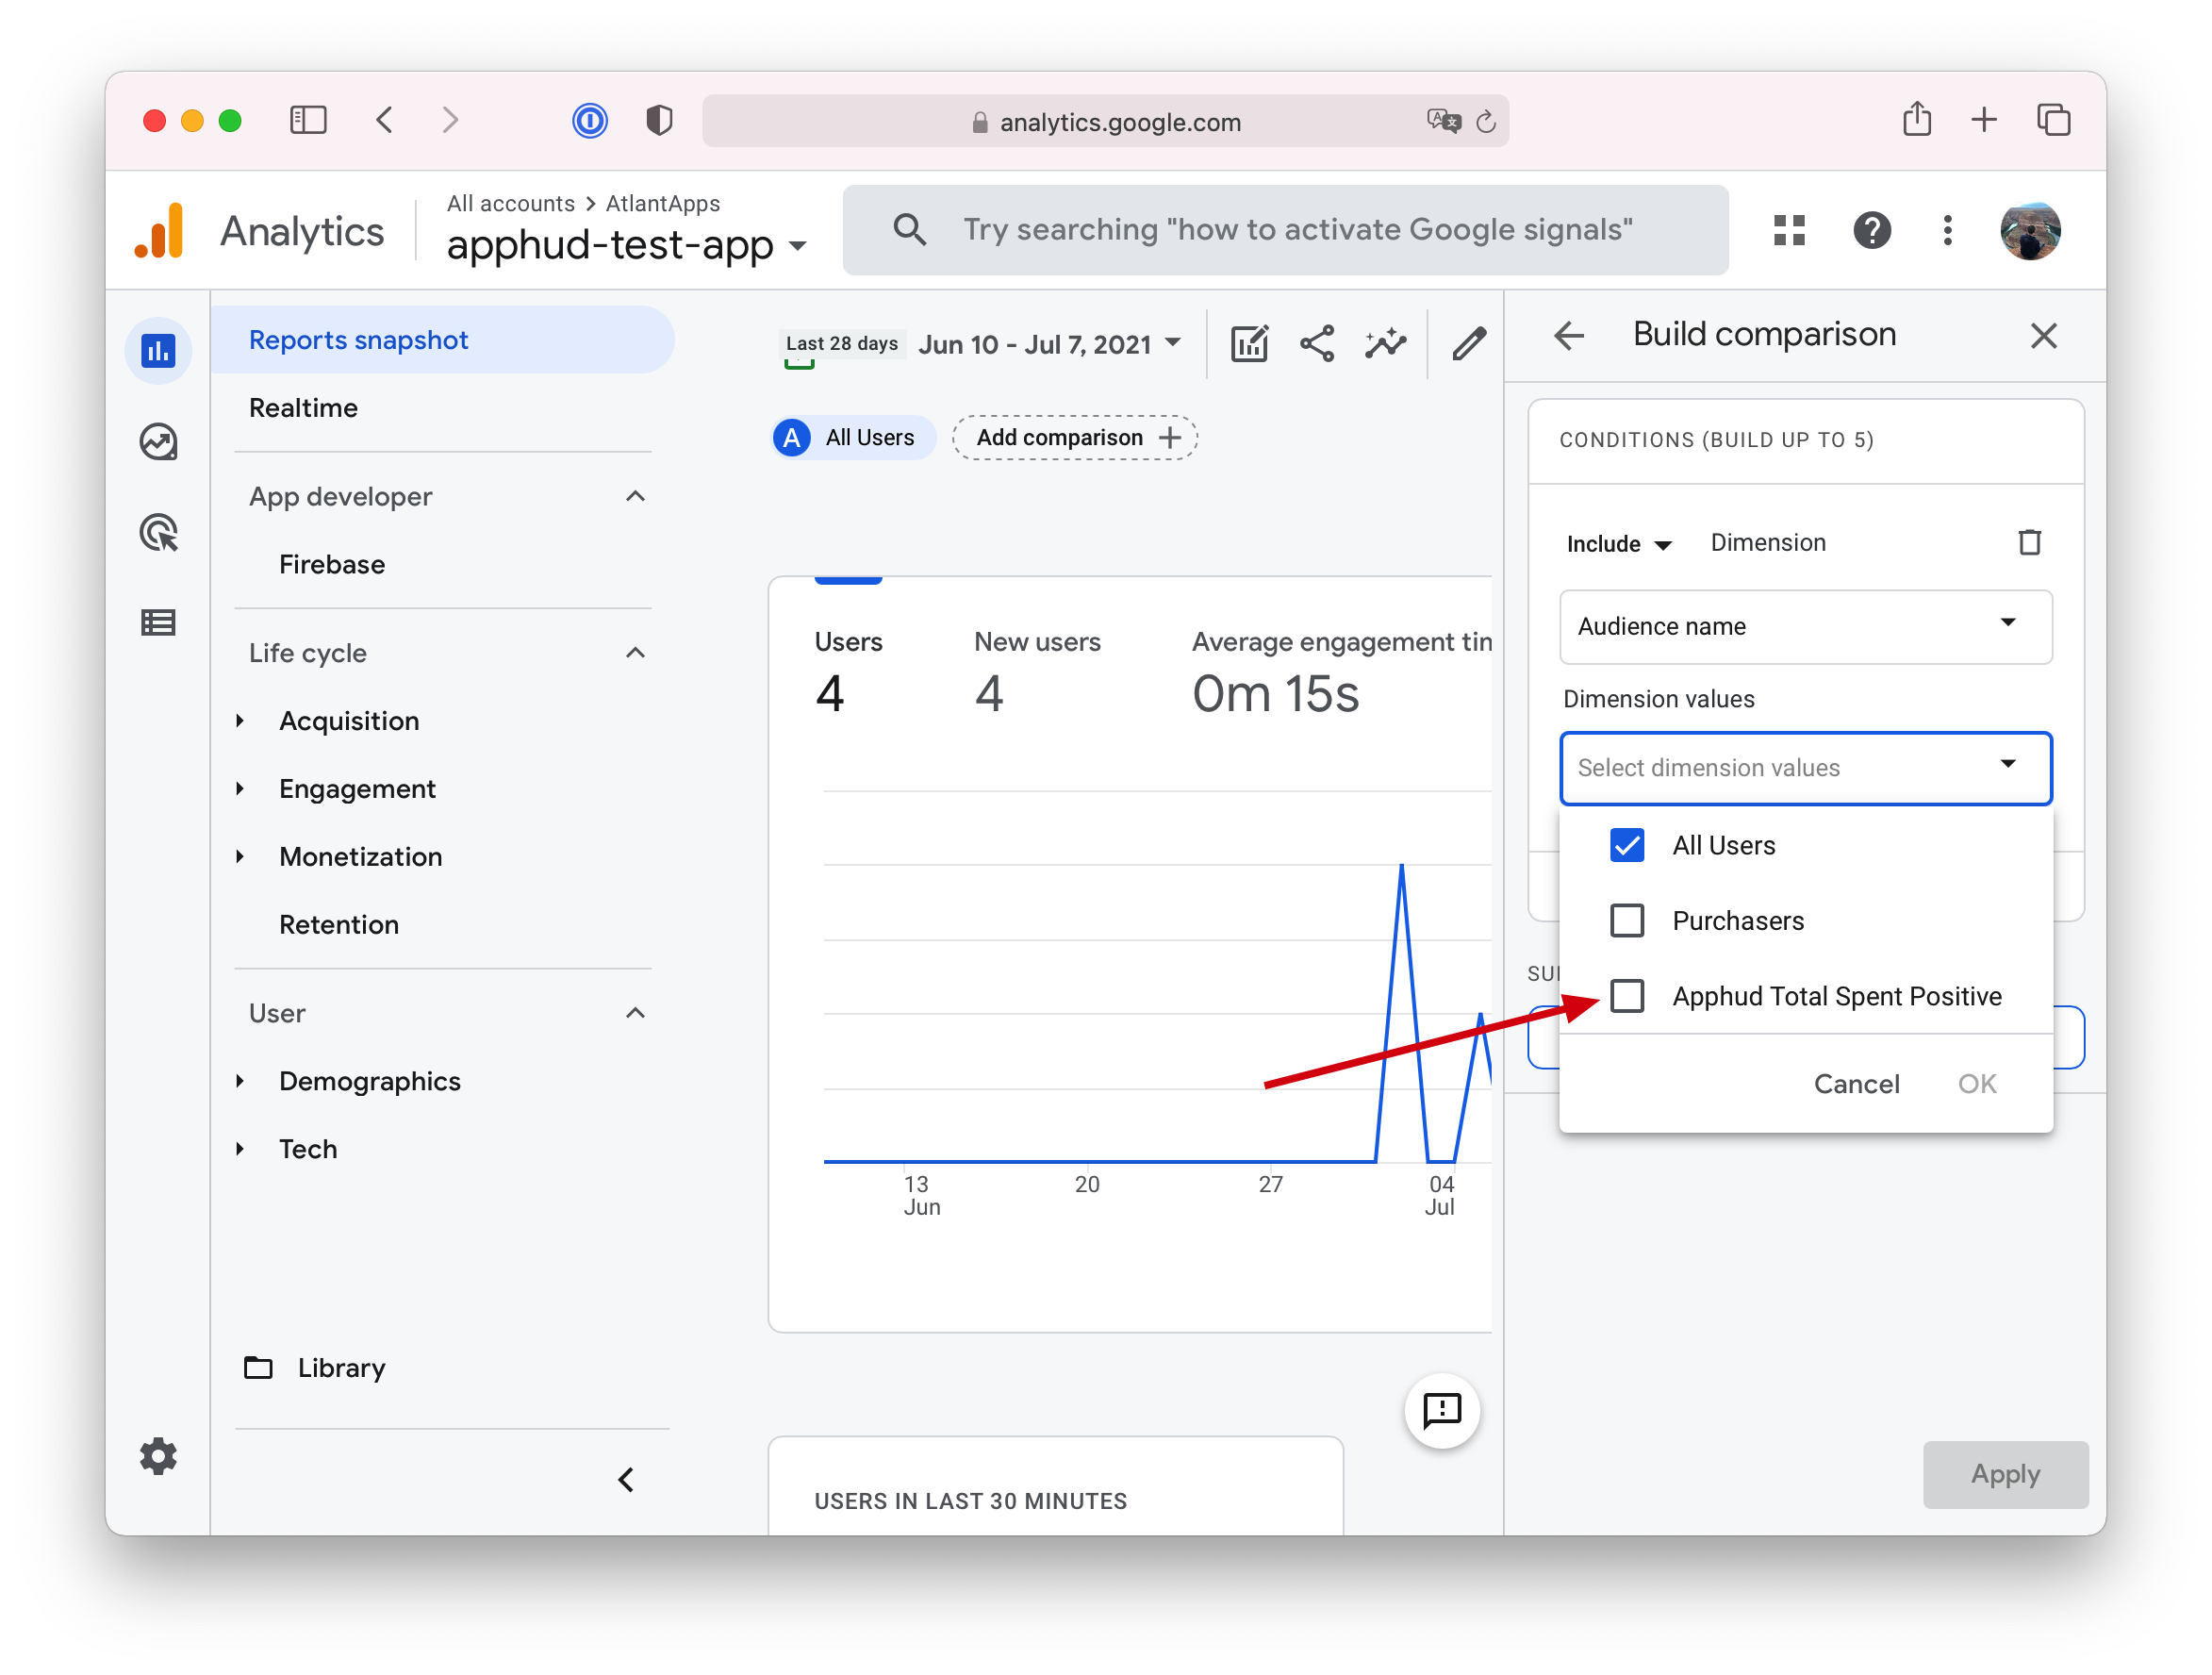
Custom Audiences
Custom Dimensions are a prerequisiteTo create a custom audience using an Apphud User Property, first create a Custom Dimension (see above).
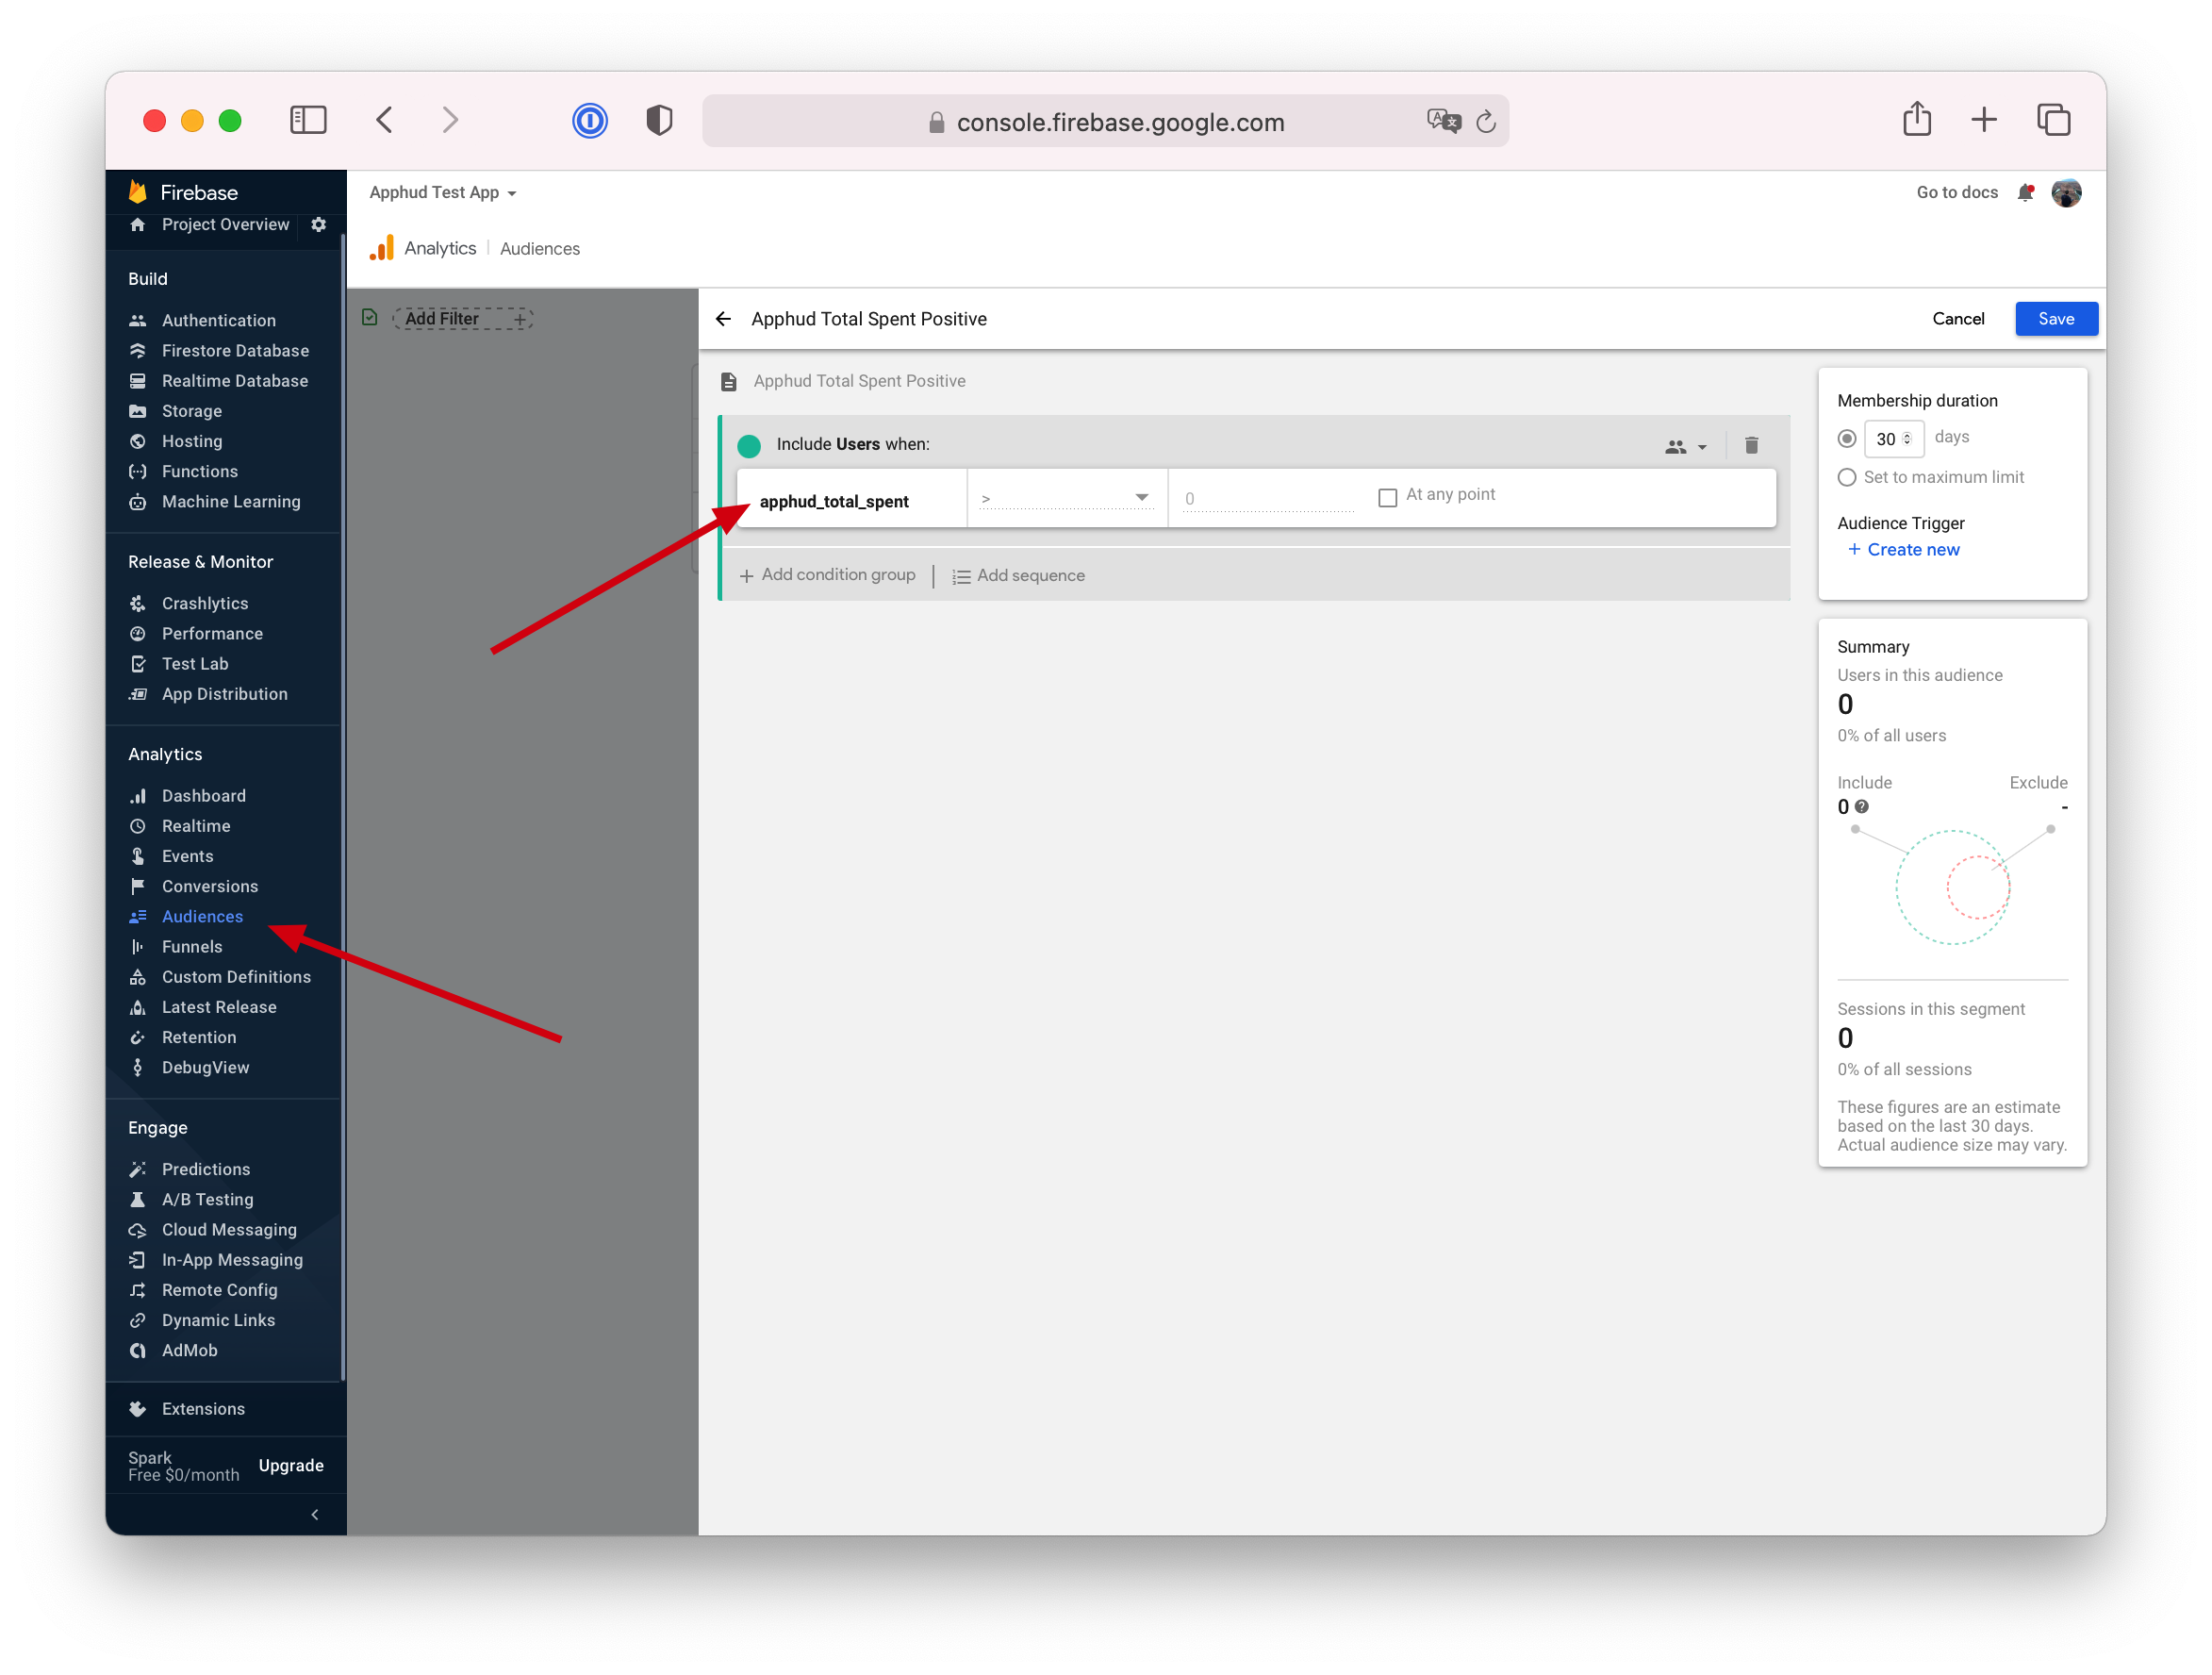
After creating a custom dimension, you can create custom audiences.
- In Firebase, open Audiences → Create custom dimensions.
- Select Custom → your custom dimension name (for example,
apphud_total_spent). - Edit the condition on this property (for example,
> 0). Click Save. - The Custom Audience is now available in both Firebase and Google Analytics.
View Firebase A/B test results in Apphud
You can view Firebase A/B test results in Apphud by sending remote config values to Apphud. You will be able to add a filter of your test variant to every chart, including the cohort chart.
See Analyzing Firebase A/B test results in Apphud for details.
Updated 18 days ago