
Targetings
Define monetization schema for an audience: optional app remote config, paywall overrides per placement, etc.
A targeting binds a user audience to a set of paywalls across placements.
Configure targetings in Mission Control → Targetings tab after you added products, paywalls, and placements.
For the evaluation model — how Apphud chooses which targeting applies to a user — see How targetings work on the Mission Control page.
Every app has exactly one Default targeting (audience: All Users) — the fallback for users who don't match any other targeting. Every targeting you create yourself is called a custom targeting.
The Targetings list
The Targetings tab lists every targeting, one row per targeting, with its placements nested underneath.
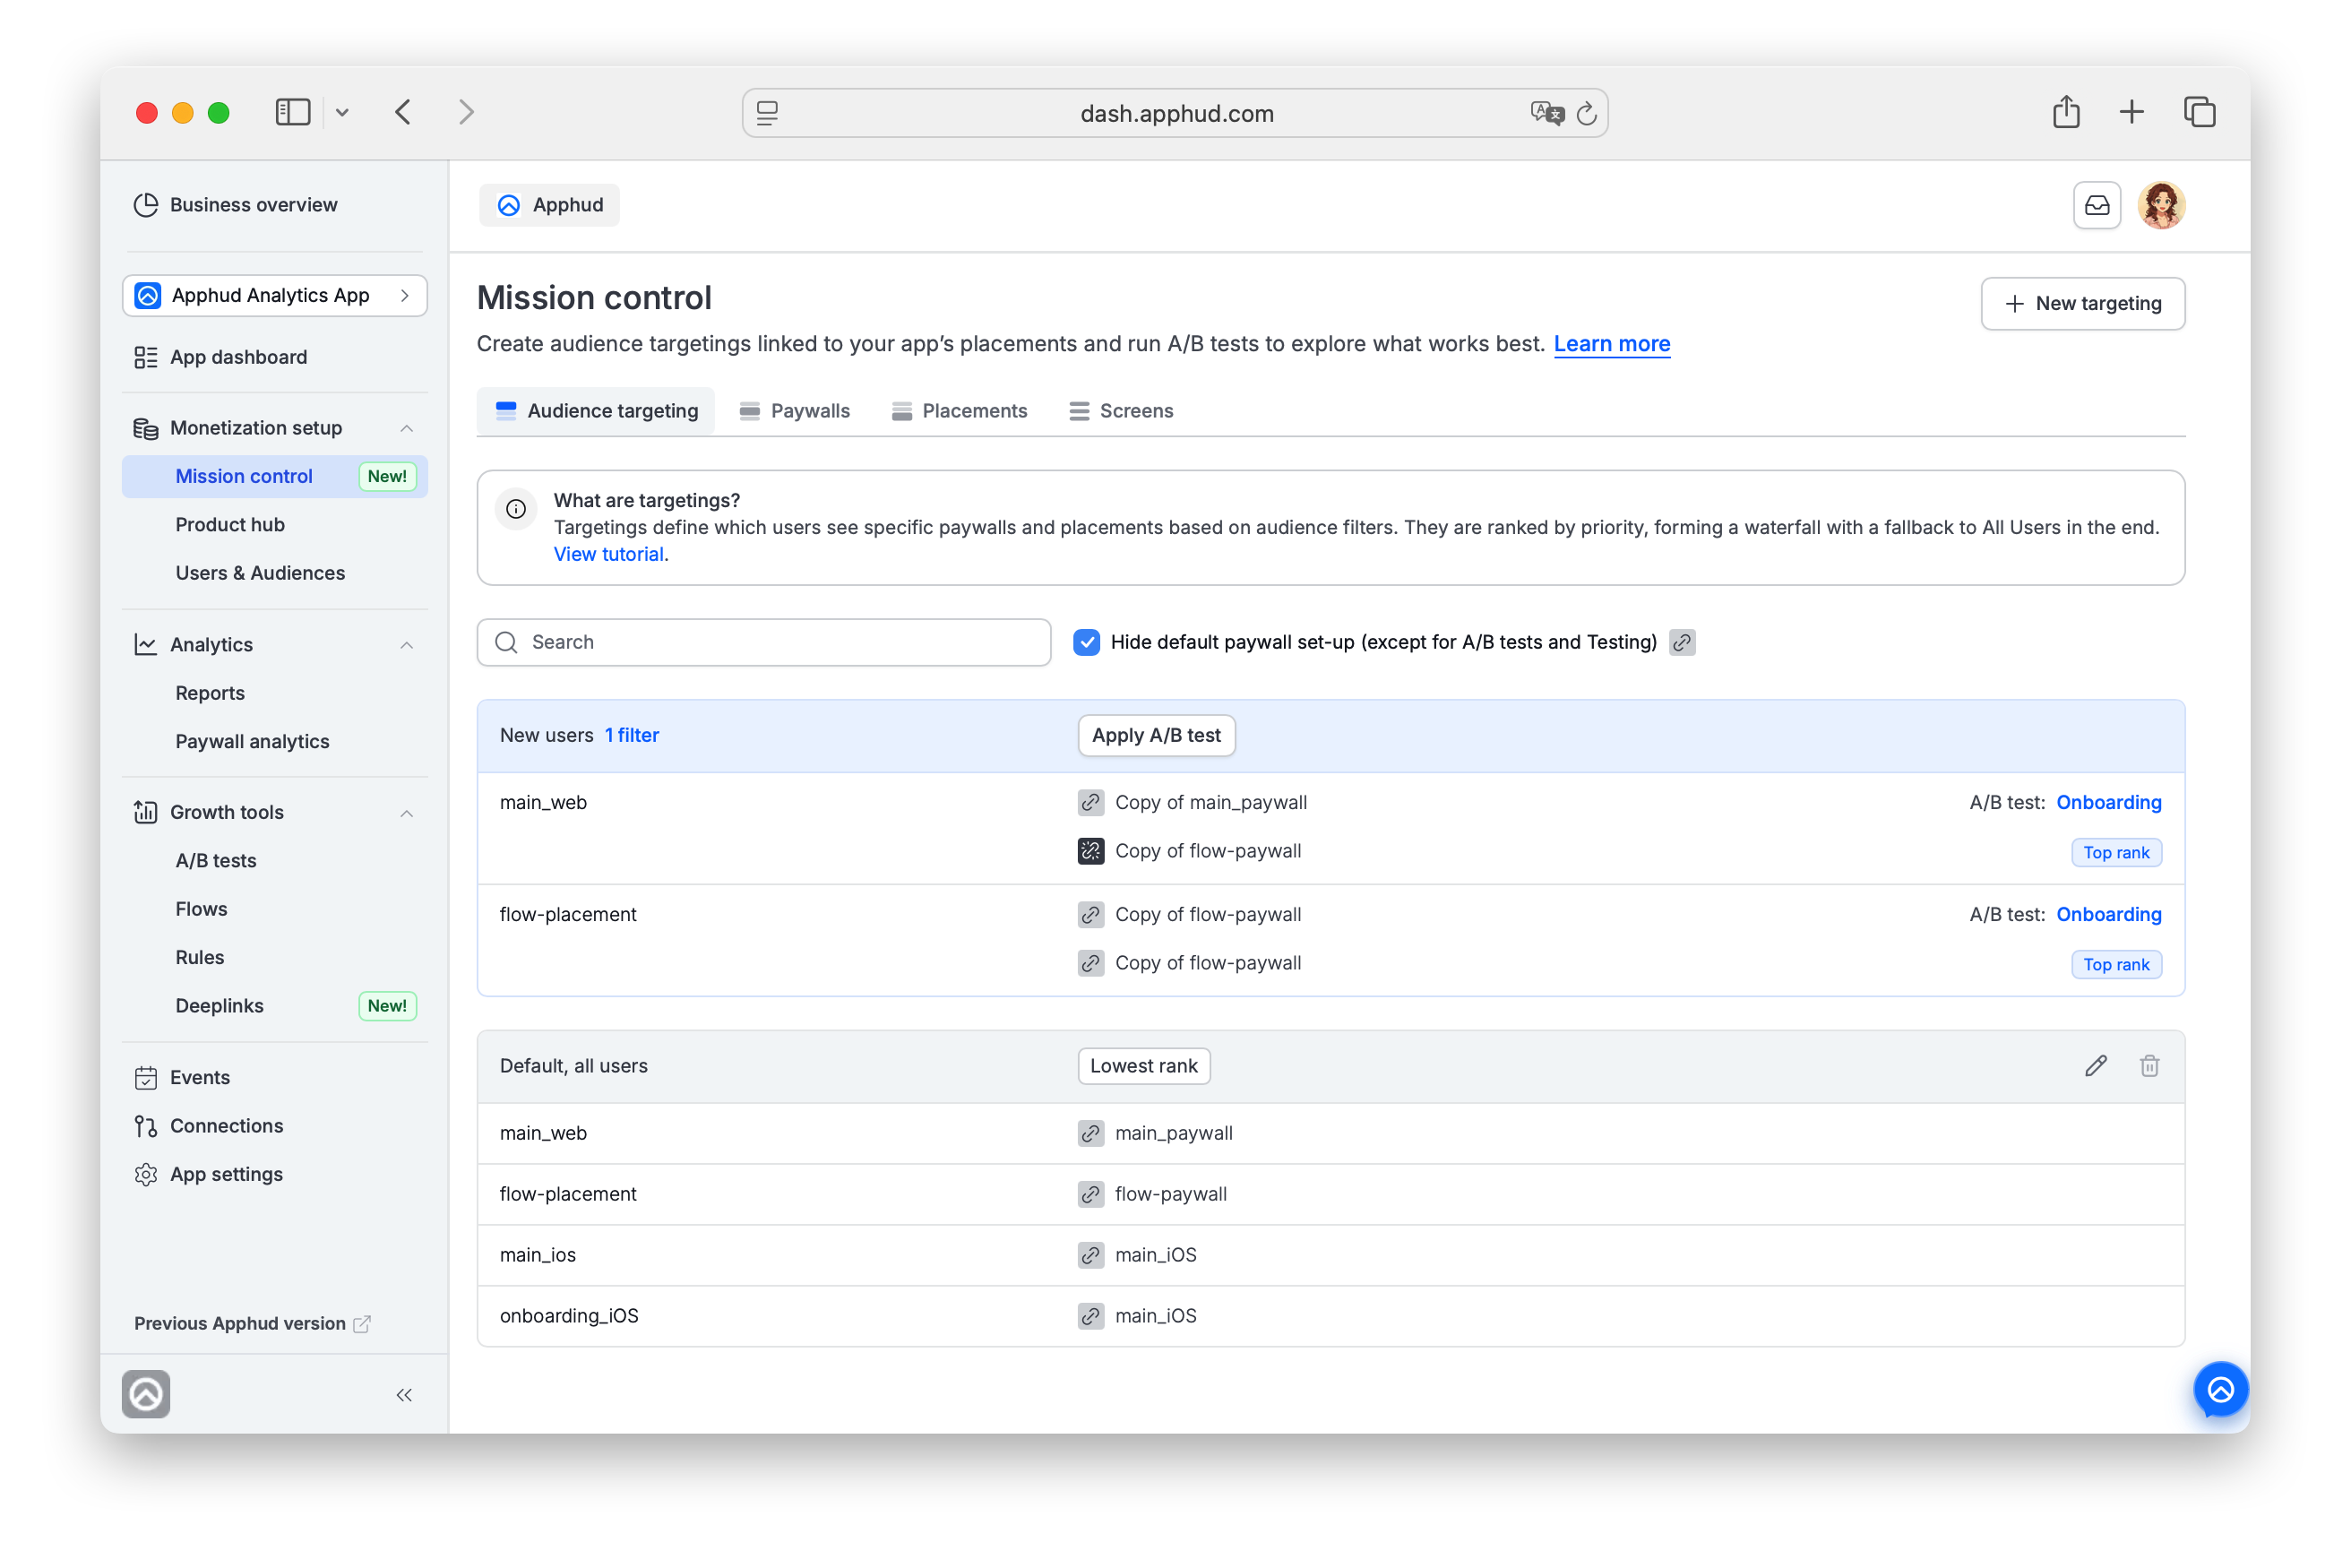
Targeting NameA targeting has no name of its own. What looks like a targeting's name in the list is actually the name of its attached audience.
A targeting itself is unnamed — it's identified purely by the audience bound to it.
| Element | Behavior |
|---|---|
| Audience & placements | Collapse or expand a targeting card with the arrow next to its name. A card can be collapsed with the arrow only when it shows more than four placements. With the checkbox checked, most cards show just a few placements, so they have no arrow and stay open. Uncheck it to see all placements and collapse cards one by one. |
| Audience filters | The N filters link in the card header (for example, "1 filter" or "2 filters"). Click it to see the audience's filter conditions. The Default targeting has no filters. |
| Rank | Rank: N counts up from the targeting just above Default. Top rank — a targeting with a Running test; Testing — all its tests are in Testing mode; Lowest rank — Default. |
| A/B test | Apply A/B test is on every custom targeting, even if a test is already attached. On a tested targeting each covered placement row shows A/B test: {name}. Hover the name to see when the test was launched, its audience size and the number of users affected; click it to open the test in a new tab. See Several tests on one Targeting. |
| Search | Search by targeting name, audience, placement, paywall, or product at the top filters the list. |
| Hide default paywall set-up (except for A/B tests and Testing) | Checkbox above the list. When checked, each custom targeting shows only the placements whose paywall differs from Default, plus the ones covered by A/B tests. The Default targeting always shows all its placements. When unchecked, every targeting lists all placements, including ones inherited from Default. See Set up Mission Control. |
| Edit and Archive icons | Pencil — Edit, trash — Archive. Not available for a targeting with an attached A/B test. See Edit a targeting and Archive a targeting. |
| Drag handle | Drag a card by the dotted handle to change its rank. Not available for Default or for a targeting with a test. |
Each placement row shows the paywall assigned to it as a link (e.g. main, July29). Hover over the paywall link to preview the products included in that paywall (e.g. "Apphud Year", "Apphud Weekly 3dTrial") without opening Configure.
Create a targeting
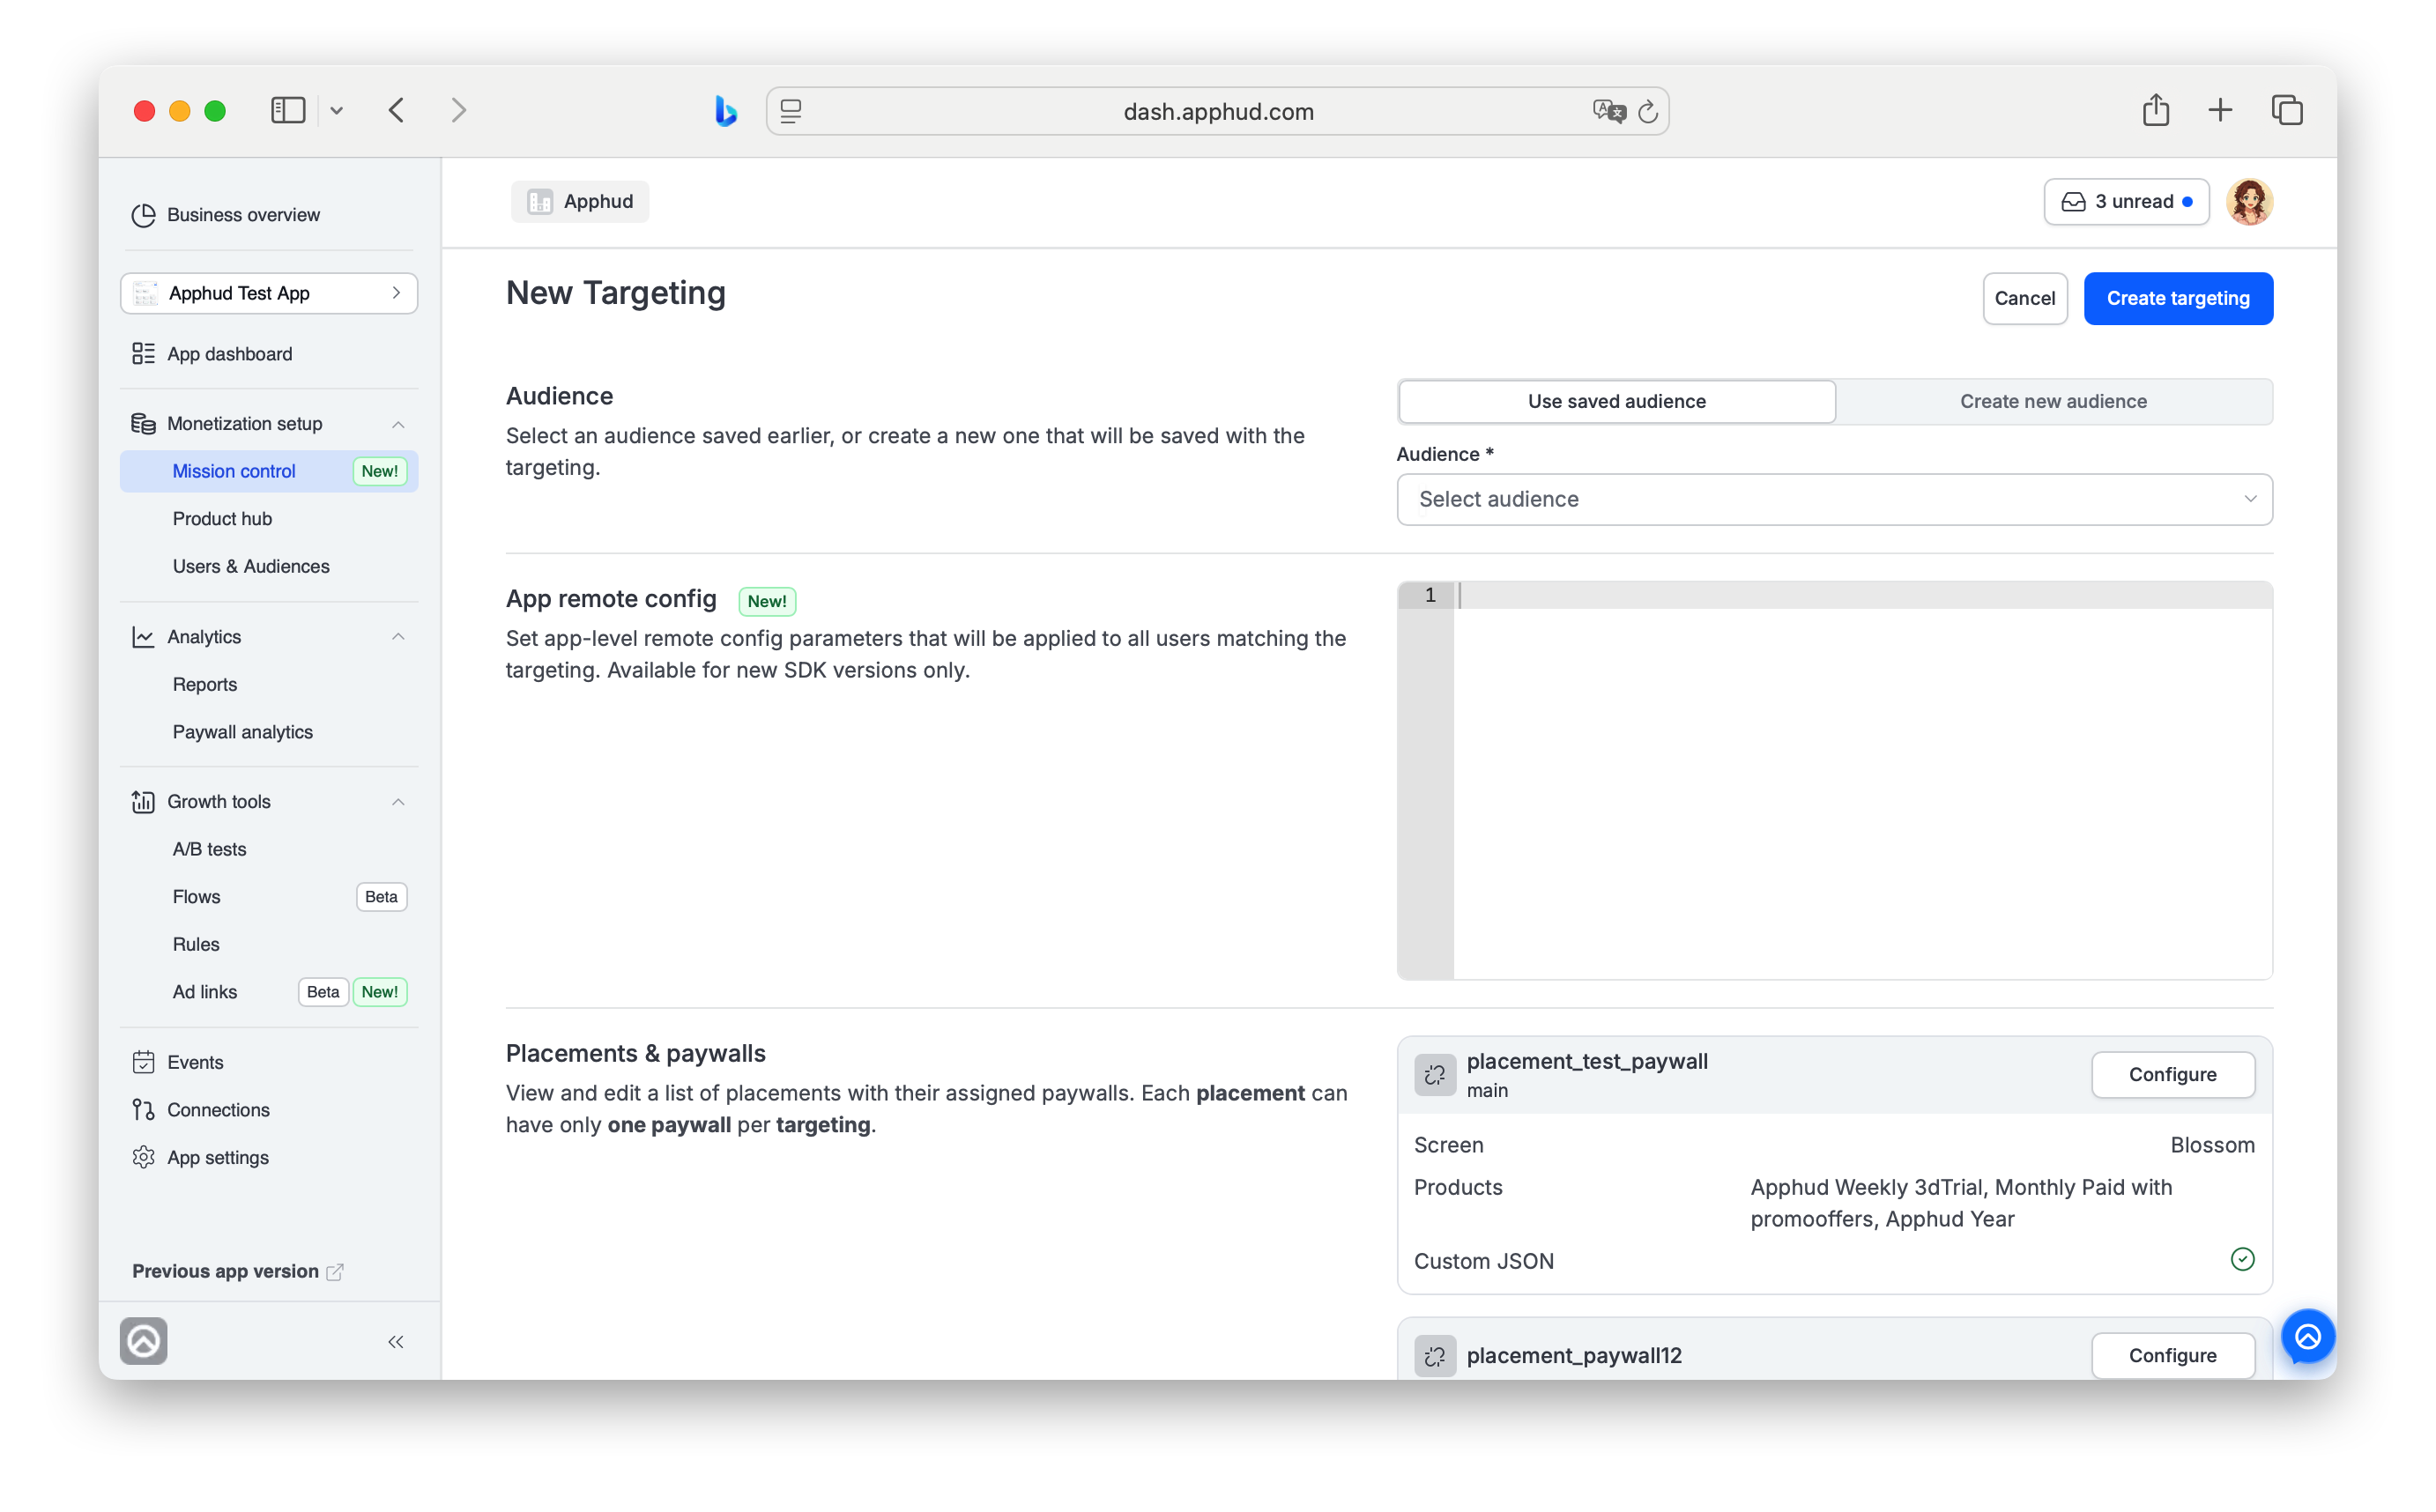
To create a new targeting:
- Choose Mission Control menu item in Monetization section. Targeting tab will open by default.
- Click + New targeting button at the top right page corner.
- Set the audience filter. Choose a saved audience or create a new one inline. See Audience for details and rules.
- (Optional) Set the app remote config. Paste a JSON object that will be delivered to all users matching this targeting. See App remote config.
- Override placements defaults as needed. Every placement starts with the inherited paywall from Default targeting. Click Configure on any placement row to set a different paywall for this targeting's audience by choosing from the existing paywall list or creating a new one from scratch. Placements & paywalls.
- Click Create targeting.
The new targeting is added with the maximum numeric rank among custom targetings.
If no active A/B tests are running, it will be shown at the top of the list, given the highest priority, and It will be evaluated first in the rank-based waterfall. A targeting with a running A/B test will always have "Top Priority" despite its actual numeric rank, and will be shown at the top of the targeting list.
To change a targeting's priority, drag its card by the dotted handle — see Reprioritizing monetization schemas.
Step 1 - Targeting Audience
A targeting must have an audience filter that selects which users match. There are two ways to set it up for a new targeting.
Use saved audience
Pick an audience from your Audiences library - default or custom one.
Audiences already attached to another targeting in this app appear disabled (greyed out) in the dropdown — each audience object can be attached to at most one targeting at a time.
NoteYou can still create a new audience with identical filters and attach it to a second targeting.
In normal paywall delivery, this is redundant — the higher-ranked targeting always wins and the duplicate stays idle.
You don't need it to run several A/B tests on the same audience: several tests can run on one targeting if they test different placements — see Several tests on one Targeting.
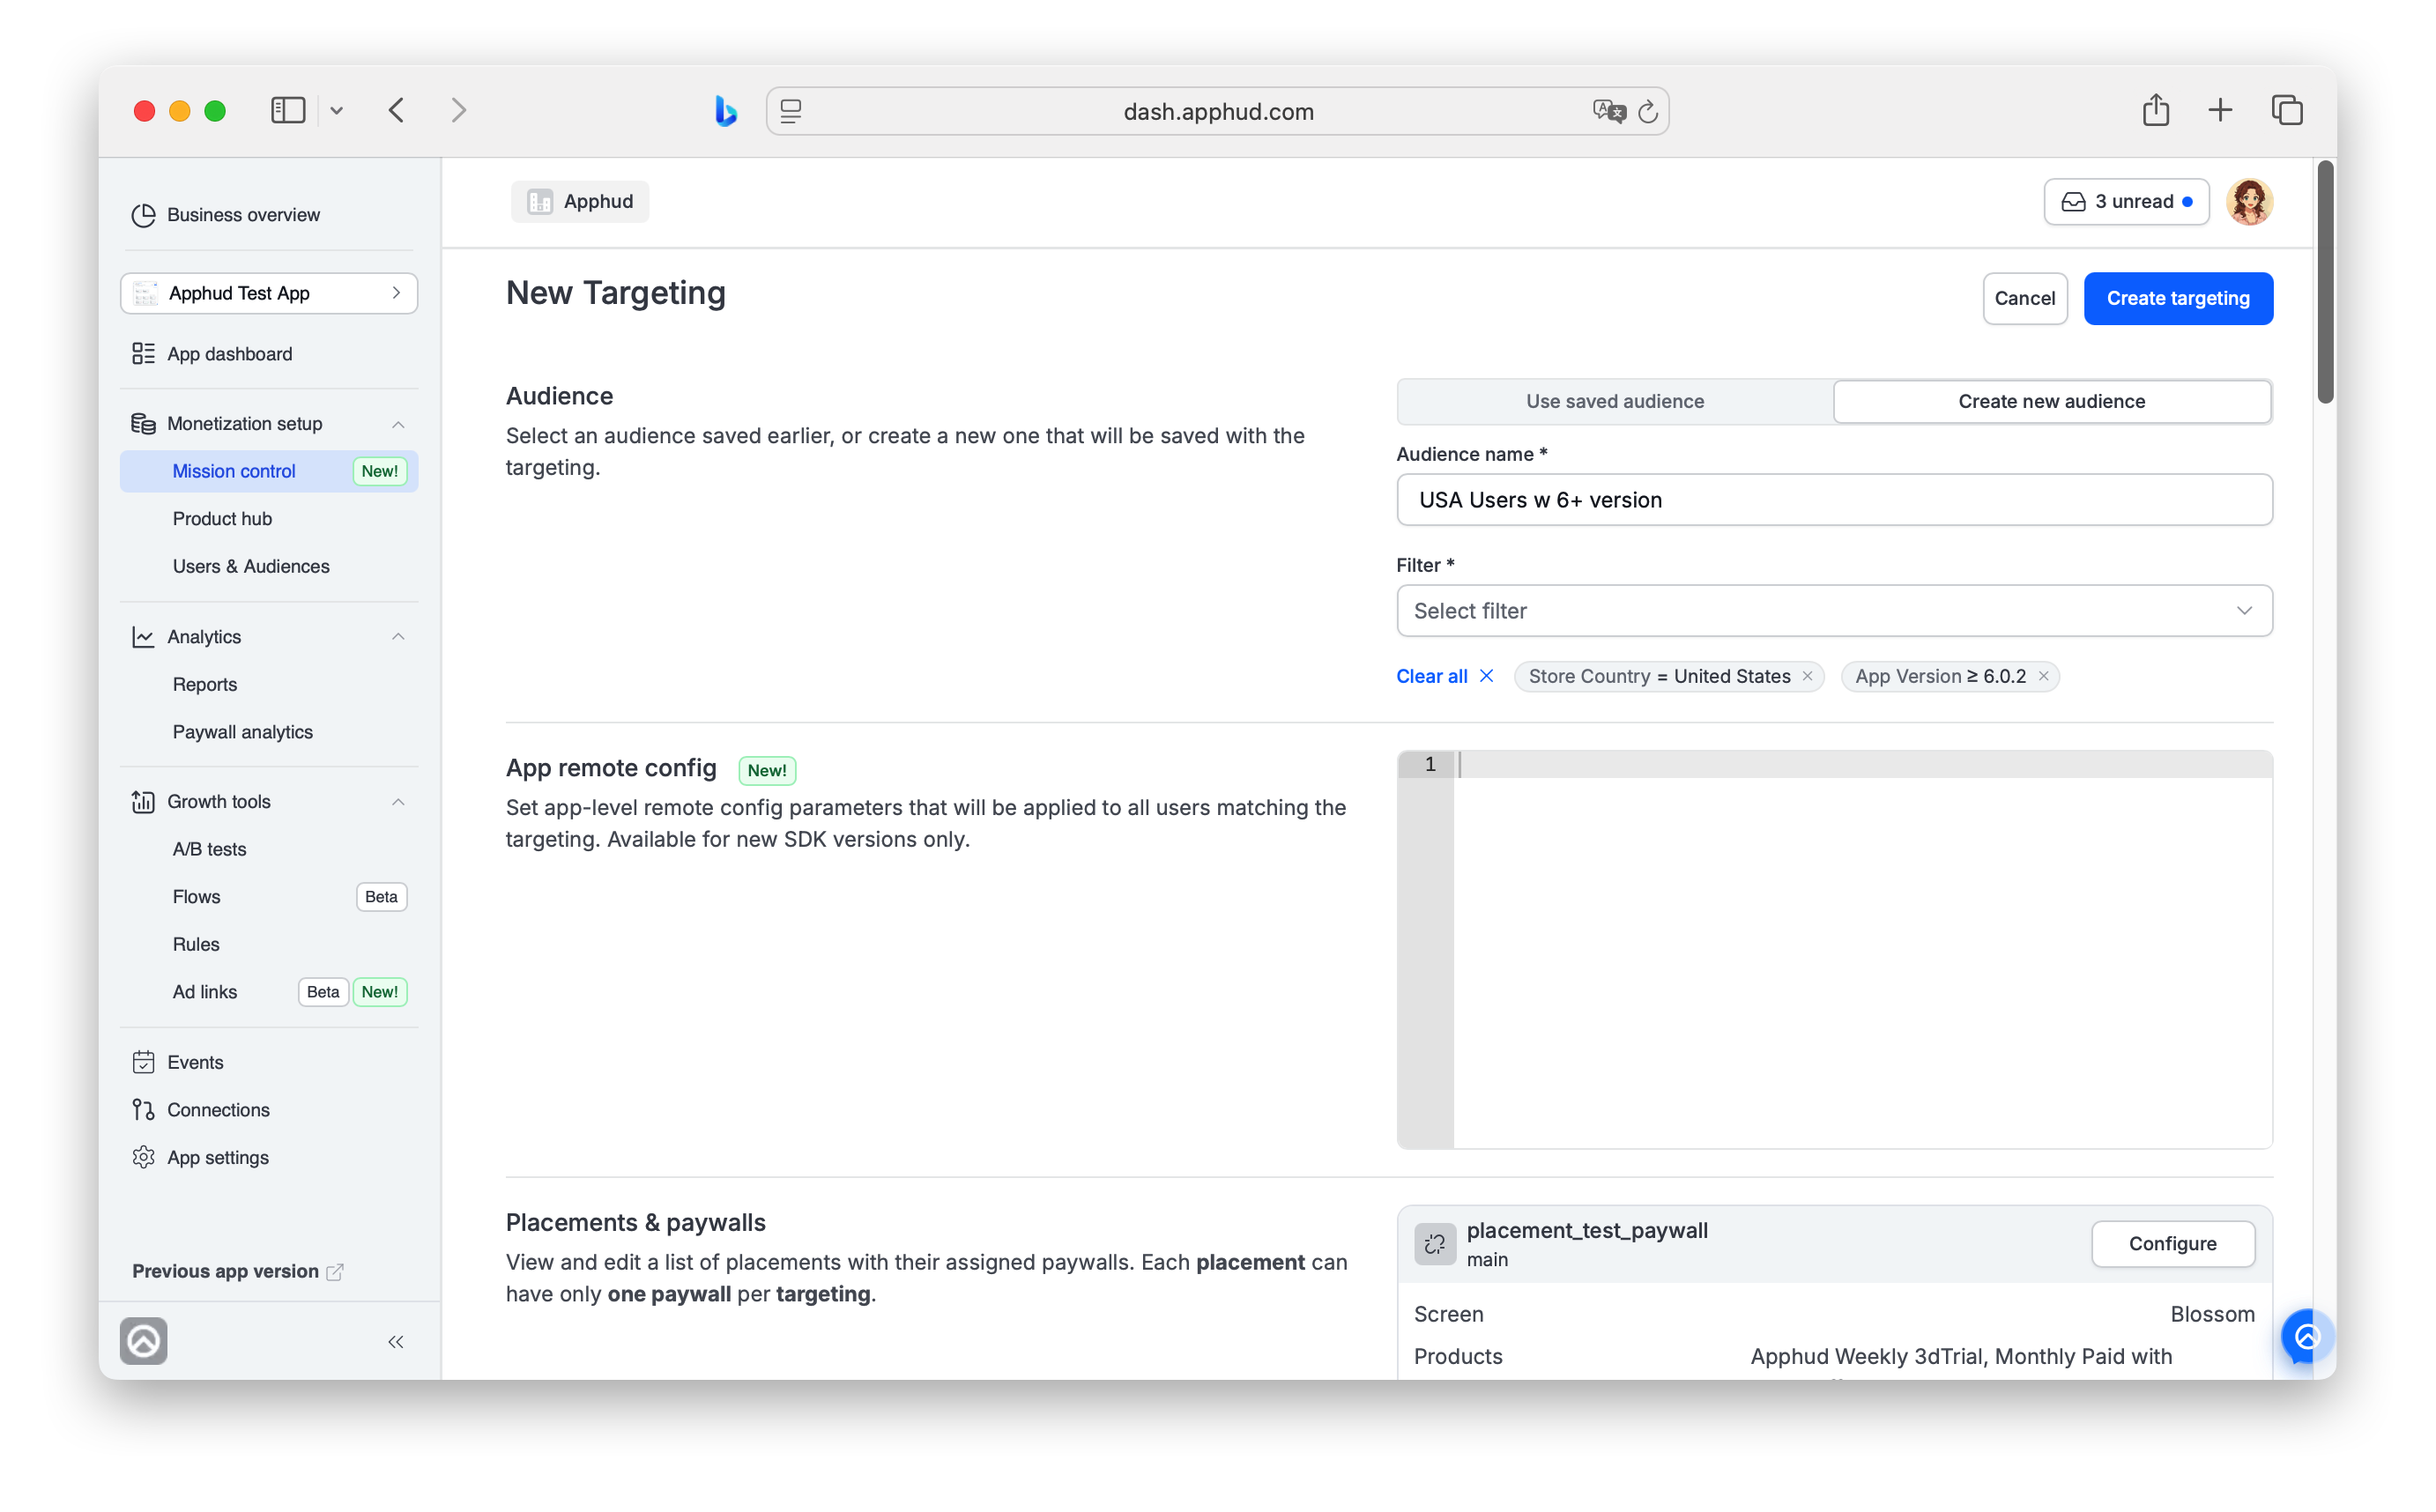
Create new audience
Define filters inline within the targeting. The new audience is saved to your Audiences library and behaves identically to audiences created directly in the Audiences menu — you can edit it later via Audiences, and it counts toward the one-targeting-per-audience rule (it will appear disabled in dropdowns of other targetings while attached to this one).
To create an inline audience:
-
In the Audience section, click Create new audience.
-
Enter an audience name.
-
Select a Filter (for example,
User Lifetime,Country,App Version).- Set the comparator (
=,≥,≠, etc.) and the value. - Click Apply filter.
- add and apply additional filers if needed.
- Set the comparator (
Each applied filter appears as a chip below the filter row. Click Clear all to remove every filter at once.
Filters within a single audience are combined with AND logic — the user must match all of them.
For the full list of available filter parameters, see Audiences → Filters.
Step 2 - Targeting App remote config (optional)
You can set a JSON configuration applied to all users matching this targeting. Use it for feature flags, content variations, theme parameters, or any value your app reads at session start.
To set it: in the App remote config section of a New targeting window, edit the JSON in the editor and save the targeting.
The JSON can be up to 10,000 characters long.
The shape and keys of the JSON are entirely up to your app — Apphud delivers the JSON as-is. The app reads it via the SDK and decides how to use the values.
SDK requirementApp remote config is delivered only to recent SDK versions. Older SDKs may still receive the field but don't parse it, so they effectively ignore it. To read it, your app needs a recent SDK:
- iOS — Apphud SDK 4.2.2+
- Android — Apphud SDK 3.2.4+
- Flutter — Apphud SDK 3.2.2+
- React Native — Apphud SDK 4.2.2+
Read the config via
ApphudUser.remoteConfigStringorremoteConfig().
Step 3 - Targeting Placements & paywalls
Each (targeting, placement) pair resolves to exactly one paywall. A new custom targeting starts with every placement inherited from Default targeting — meaning Default's paywall for that placement also applies to your audience, unless you override it.
To configure a placement:
- In the targeting view, find the placement row in Placements & paywalls.
- Click Configure.
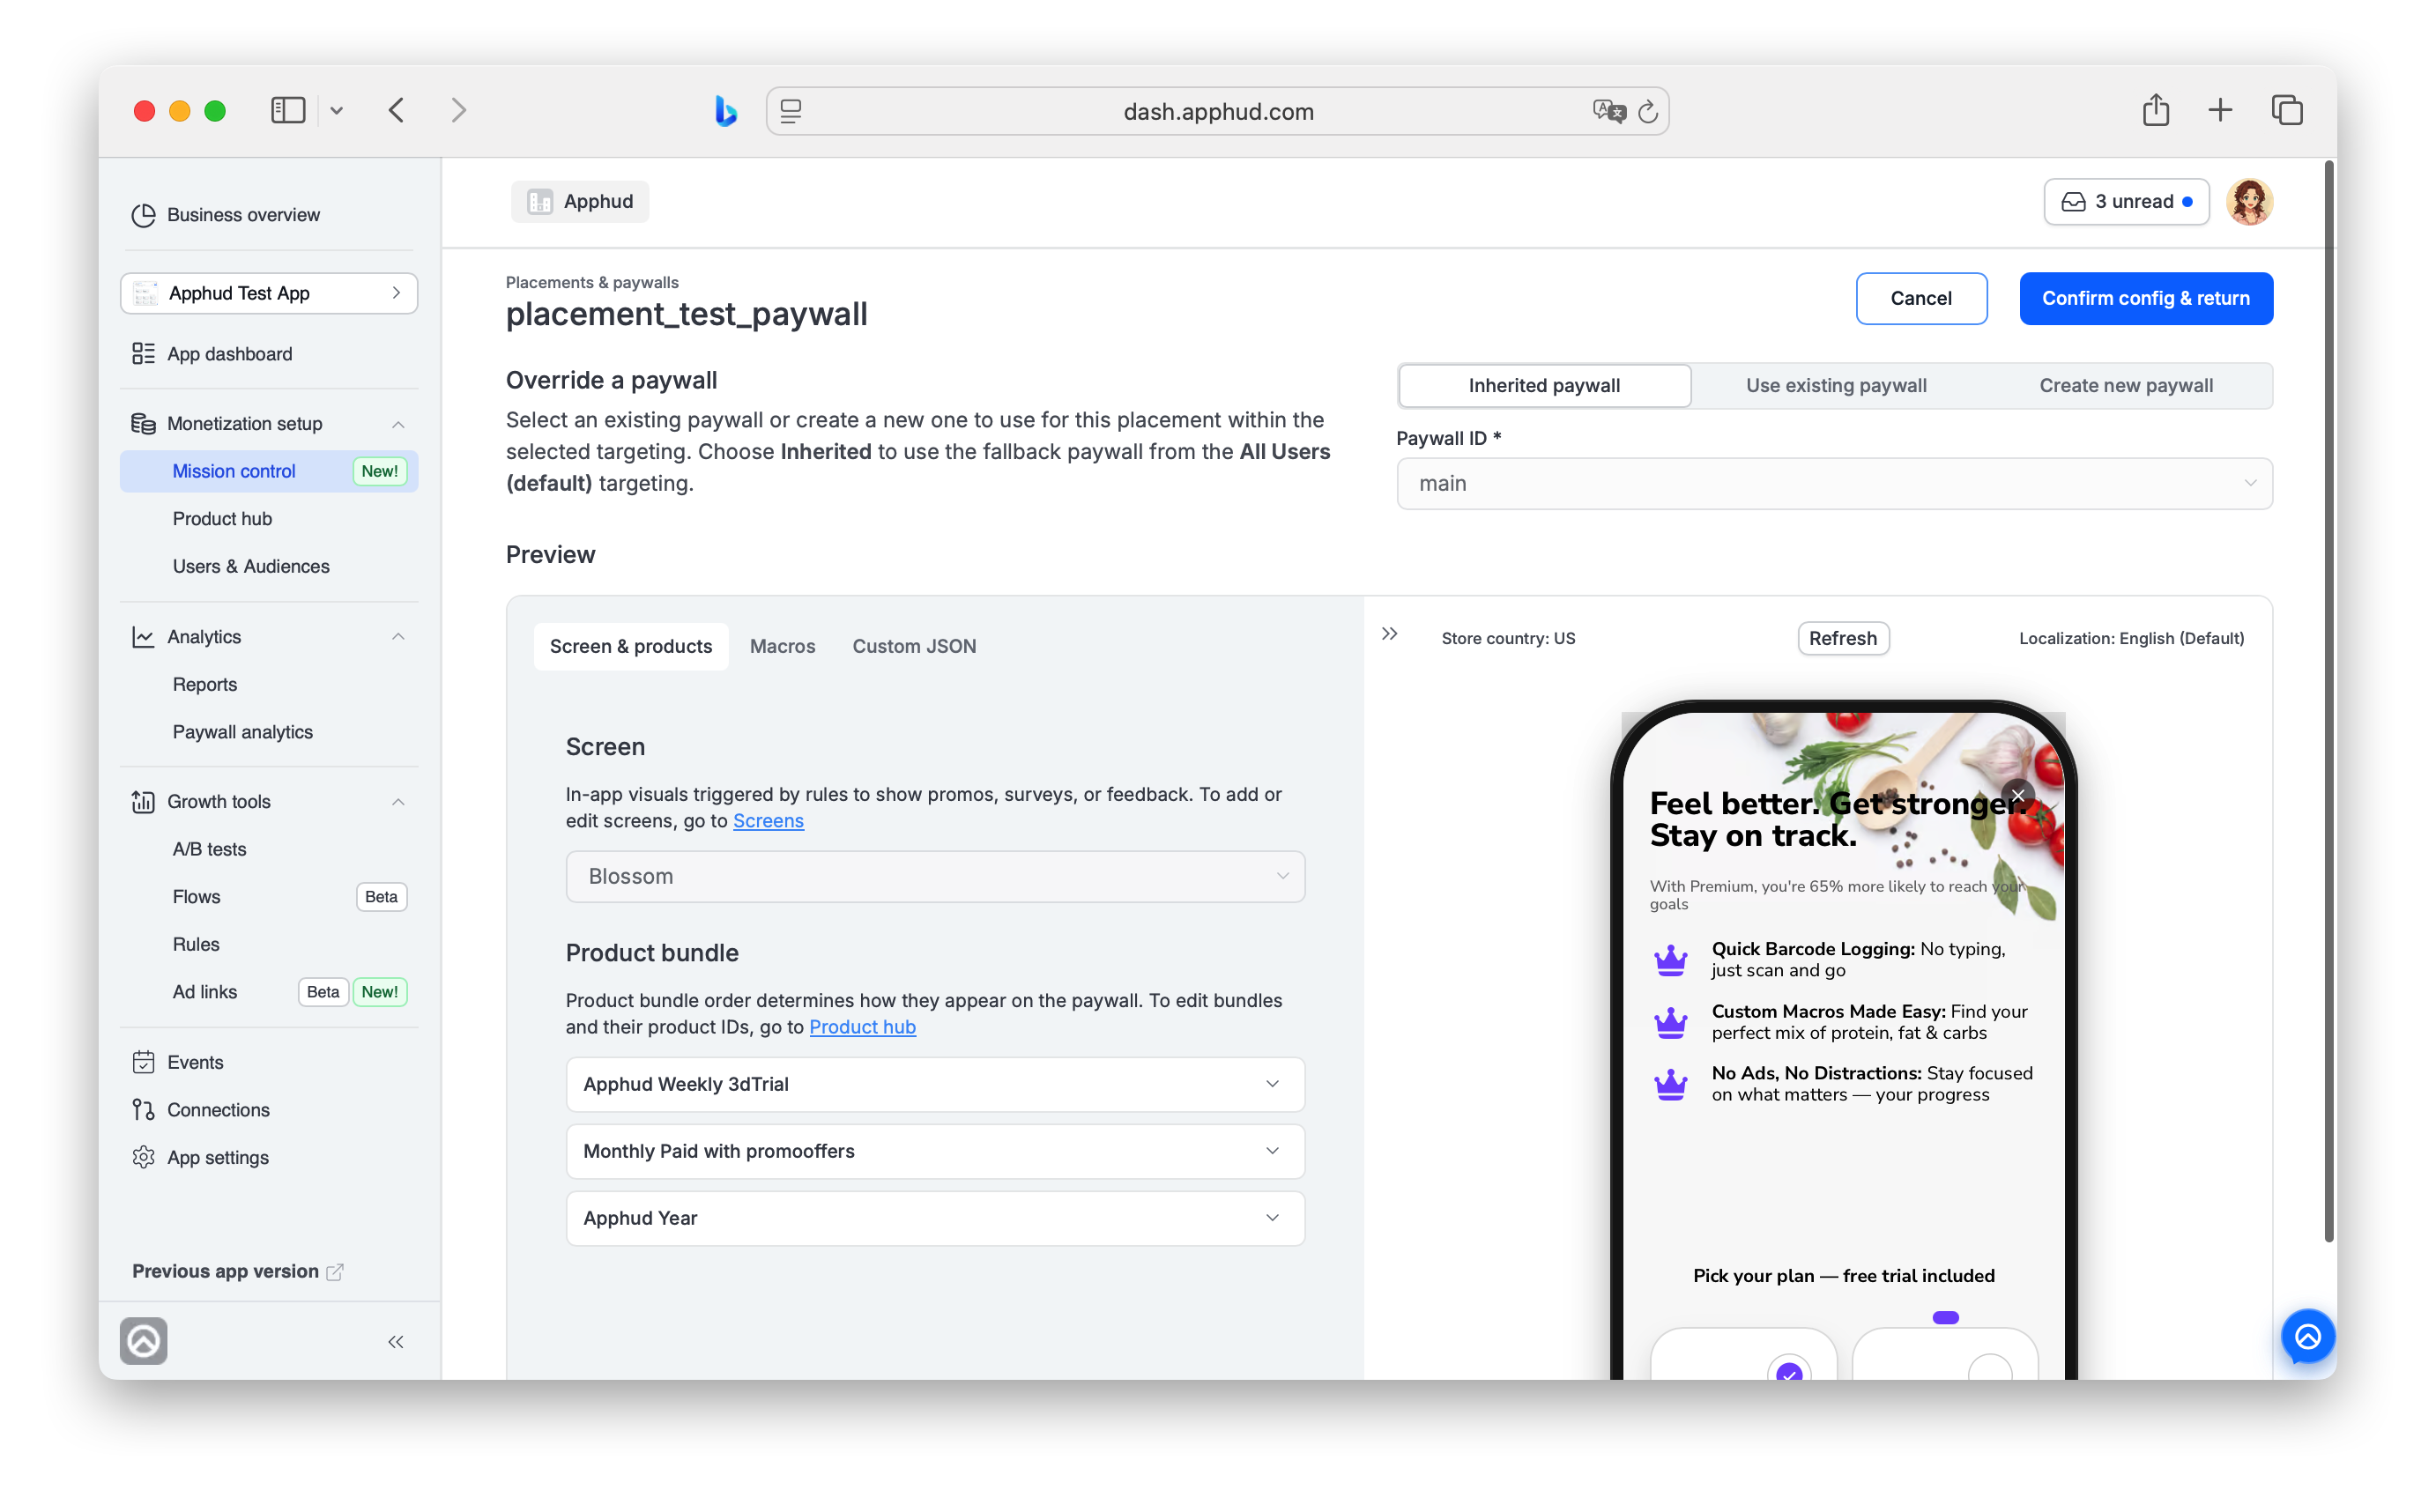
- Choose one of three modes (see below): Inherited, Existing, or New paywall.
- Inspect or edit the paywall in the Preview & edit area. Switch tabs Screen & products, Macros, Commitment plans, and Custom JSON to review or configure each part. The right side shows a live preview.
- Click Confirm config & return.
Inherited paywall
Inherited paywall is the default state when you haven't overridden a placement in this targeting. No override is recorded; users matching this targeting see Default's paywall for the placement.
You don't need to actively choose this — every placement in a new targeting starts here.
Selecting Inherited paywall in the Configure dialog is meaningful in one case: to revert a previous override. If you previously chose Use existing or Create new for the placement and want to go back to Default, open Configure and select Inherited paywall.
Use existing paywall
Pick another paywall (already created in Mission Control → Paywalls) by ID. The paywall's screen, product bundles, and custom JSON apply for this (targeting, placement) pair.
Choose this when you have a different paywall ready for this audience and don't need to create a new one.
When you select an existing paywall, you can also edit it inline in the Preview & edit area (Screen & products, Macros, Custom JSON, Introductory offer tabs).
Two save options appear:
- Apply changes — updates the existing paywall itself. The changes propagate to every targeting that uses this paywall, not just the current one. A confirmation dialog warns you, noting the action cannot be reverted.
- Save as new — creates a new paywall with your edits applied, using the original as a starting point, and assigns it to this (targeting, placement) pair only. The original paywall stays unchanged for other targetings.
Edit existing paywalls with cautionEditing an existing paywall affects every targeting that uses it.
If you only want the change for the current targeting, use Save as new instead of Apply changes.
Apply changes modifies the paywall globally and cannot be reverted.
Create new paywall
Define a brand-new paywall inline. The new paywall is added to the Paywalls list and used for this (targeting, placement) pair.
Choose this when no existing paywall fits, and you want to build one within the same flow.
After saving, the placement shows the chosen paywall to users matching this targeting.
Other targetings are not affected. You can later reuse the paywall for other targetings or placements, just like any paywall created directly in the Paywalls tab.
For full paywall configuration details — bundles, commitment plans, screens, macros, JSON shape, localization — see Paywalls.
Creating new Placement
You can add a new Placement from a targeting configuration.
Below the placements list in Placements & paywalls, the + Add placement button lets you create a new placement directly without leaving the targeting flow.
When you add a placement this way you're prompted to assign a paywall for it (the same Configure flow as for existing placements — with Inherited, Use existing, or Create new options).
The new (placement, paywall) pair is added to every targeting in your app, including Default and all other custom targetings. They all start using the paywall you assign here unless individually overridden later.
Use this when you realize during targeting setup that a new placement is needed app-wide.
Edit a targeting
You cannot change an audience for a saved targeting; the rest is reconfigurable. To update an existing targeting:
- Open Mission Control → Targetings.
- Find the targeting card and click the pencil icon at the end of its header.
- Modify App remote config, any placement's override, or add a new placement from scratch.
- Save changes.
Note that for a custom audience, you can adjust and save the audience filters in the Audiences section, thus changing the targeting audience. If the audience name is updated - the update will be also reflected in Targetings.
Audience Editing impactChanges to audience filters apply on the next evaluation.
Users who previously matched but no longer match the updated audience filter will fall through the targeting waterfall to the next matching targeting or Default on their next session.
Matching is re-evaluated on every SDK fetch (registration, session start, and subsequent fetches), so the change takes effect on the user's next fetch — no delay for non-experiment targetings.
Archive a targeting
Archiving removes a targeting from the active list. If the targeting has a running A/B test, you won't be able to archive it till the test is completed.
To archive:
- Open Mission Control → Targetings.
- Find the targeting card and click the trash icon at the end of its header.
- Confirm in the Archive targeting? dialog.
What happens on archive:
- Only the targeting is archived. Placements and paywalls attached to it remain intact and continue to be available in Placements and Paywalls.
- The audience that was attached to this targeting becomes available again for use in other targetings.
Worked examples
These scenarios walk through how a targeting setup translates to what specific users see.
Example 1 — promo paywall for new users only
Goal: Show a special trial paywall on onboarding to new users; everyone else sees the standard paywall.
Setup:
- Default (audience: All Users):
onboarding → main_paywallsettings → settings_paywall
- Custom targeting "New Users" (Default audience: New Users, rank 1):
onboarding→ overridden withtrial_paywallsettings→ inherited
Outcome:
| User | Placement | Sees | Why |
|---|---|---|---|
| New user | onboarding | trial_paywall | Matches "New Users"; placement overridden |
| New user | settings | settings_paywall | Matches "New Users"; placement inherited from Default |
| Existing user | onboarding | main_paywall | Doesn't match "New Users"; falls through to Default |
| Existing user | settings | settings_paywall | Falls through to Default |
Example 2 — overlapping audiences, rank order matters
Goal: Run a country-specific paywall (Mexico) AND a new-user paywall on onboarding. Decide what Mexico-based new users see.
Setup:
- Default — fallback for everyone
- Custom targeting "Mexico" (Custom filter based audience: Store Country = Mexico, rank 2): overrides
onboardingwithmexico_paywall - Custom targeting "New Users" (Default New Users audience, rank 1): overrides
onboardingwithtrial_paywall
Outcome for a new user from Mexico on onboarding:
- "Mexico" is rank 2 — higher priority than "New Users" (rank 1) — so evaluated first
- User matches "Mexico" → wins
- "New Users" is not evaluated for this user
- User sees
mexico_paywall
To prioritize "New Users" over "Mexico" for this overlap, swap their places by dragging a card by its dotted handle.
Example 3 — sandbox testing without affecting production users
Goal: Test a redesigned paywall in TestFlight or Android Studio without showing it to production users.
Setup:
- Custom targeting "Sandbox Testing" (Default audience: Sandbox Users, any rank):
onboarding→ overridden withexperimental_paywall
Outcome:
- Sandbox users (TestFlight, Xcode, Android Studio installs) match this targeting → see
experimental_paywall - Production users don't match
Environment = Sandbox→ fall through to other targetings or Default → see normal paywalls
Example 4 — feature flag rollout via app remote config
Goal: Enable a beta feature for users in your "Beta testers" audience without changing what paywalls they see.
Setup:
- Custom targeting "Beta testers" (Custom audience: saved audience "Beta testers", any rank):
- All placements inherited from Default
- App remote config:
{ "beta_features_enabled": true }
Outcome:
- Users matching "Beta testers" audience receive
{ "beta_features_enabled": true }from the SDK; the app reads this and unlocks the feature - Other users don't match → no config delivered → feature stays off (the app's default)
- No paywall differences — placements are inherited
FAQ
Can a targeting have no audience filter at all?
No.
Can I use the same audience in multiple targetings?
No. An audience can be attached to only one targeting at a time. Once attached, it appears disabled in the Use saved audience dropdown.
You can create a new audience with identical filters and attach it to a second targeting, but we don't recommend it: in normal delivery the higher-ranked targeting always wins and the duplicate stays idle.
You also don't need a duplicate to run several A/B tests on the same audience: several tests can run on one targeting if they test different placements. See Several tests on one Targeting.
Where does an inline-created audience go?
When you create a new audience inline from a targeting, it is saved to your Audiences library — same as if you had created it directly in the Audiences menu. You can edit it later in Audiences. Because it is now attached to this targeting, it appears disabled in the saved-audience dropdowns of other targetings.
What's the difference between Inherited, Use existing, and Create new when configuring a placement?
- Inherited — no override. Default's paywall for this placement applies to your audience. This option mainly exists to revert the customization applied earlier.
- Use existing — pick an already-created paywall by ID. Its full configuration (screen, products, JSON) applies for this
(targeting, placement)pair. - Create new — define a brand-new paywall inline. It gets added to the Paywalls list and used for this pair.
Can I change the audience filter of a running targeting?
Yes. Save the updated filter and it applies on the next evaluation. Users who previously matched but no longer match the new filter fall through the waterfall on their next session.
The change takes effect on the user's next SDK fetch — no delay or stickiness for normal targetings. Exception — active A/B tests: variation assignments are sticky at the user level, so a user already placed into a running experiment stays on their assigned variation even if their attributes change; once the experiment ends, they follow normal targeting rules again.
What happens if I delete a paywall that's used in a targeting override?
No, a paywall used in a placement for an audience, i.e. used in a targeting cannot be deleted.
Can I duplicate an existing targeting?
No. Currently a targeting duplication function is not available.
Can I delete a custom targeting?
In a way. Targeting gets archived - all the objects it uses remain afterwards (audience, placement, paywalls).
Where do I see analytics for a specific targeting?
There's no dedicated per-targeting endpoint or chart. Use Paywall analytics (filter by the paywall the targeting serves) and, for a targeting that hosts an experiment, Experiments for per-variation metrics.
Updated 10 days ago